Table Of Contents
Invoices- Create Invoice
- Paid Invoices
- Apply Credit Notes to Invoices
- Additional Invoice Configurations
- More Options in Line Item
- Invoiced By Signature
- Invoicing From Various Modules
- Combining Multiple Jobs into a Single Invoice
- Invoicing to Different Customer
- Editing Source Document
- More Actions
- Invoice Statuses
- Search an Invoice
- Create Receipt
- Additional Receipt Configurations
- Excess Receipt Amount Allocation
- More Actions
- Receipt Statuses
- Search a Receipt
Invoices
An Invoice is a detailed list of all the services or products you have provided to your customers, including the total amount due and the payment instructions. Once the work is completed, sending Invoices to your customers is essential to receive payments.
In the field service industry, effectively tracking invoices is crucial. Within Workstair, every job schedule is connected to Invoices, ensuring you never miss any accounts and receive timely reminders. This integration helps maintain accurate financial records, streamline your billing process, and enhance overall cash flow management.
Create Invoice
Learn How to create an Invoice:
- Goto Menu > Payments > Invoices
- Click the +New button in the top right corner of the page.
- or click Create New > Invoice under the utility button at the top right corner.
Once you click the +New button, you will be navigated to a page where you can select the Customer. Once the Customer is selected, all Schedules which are not invoiced will be listed.
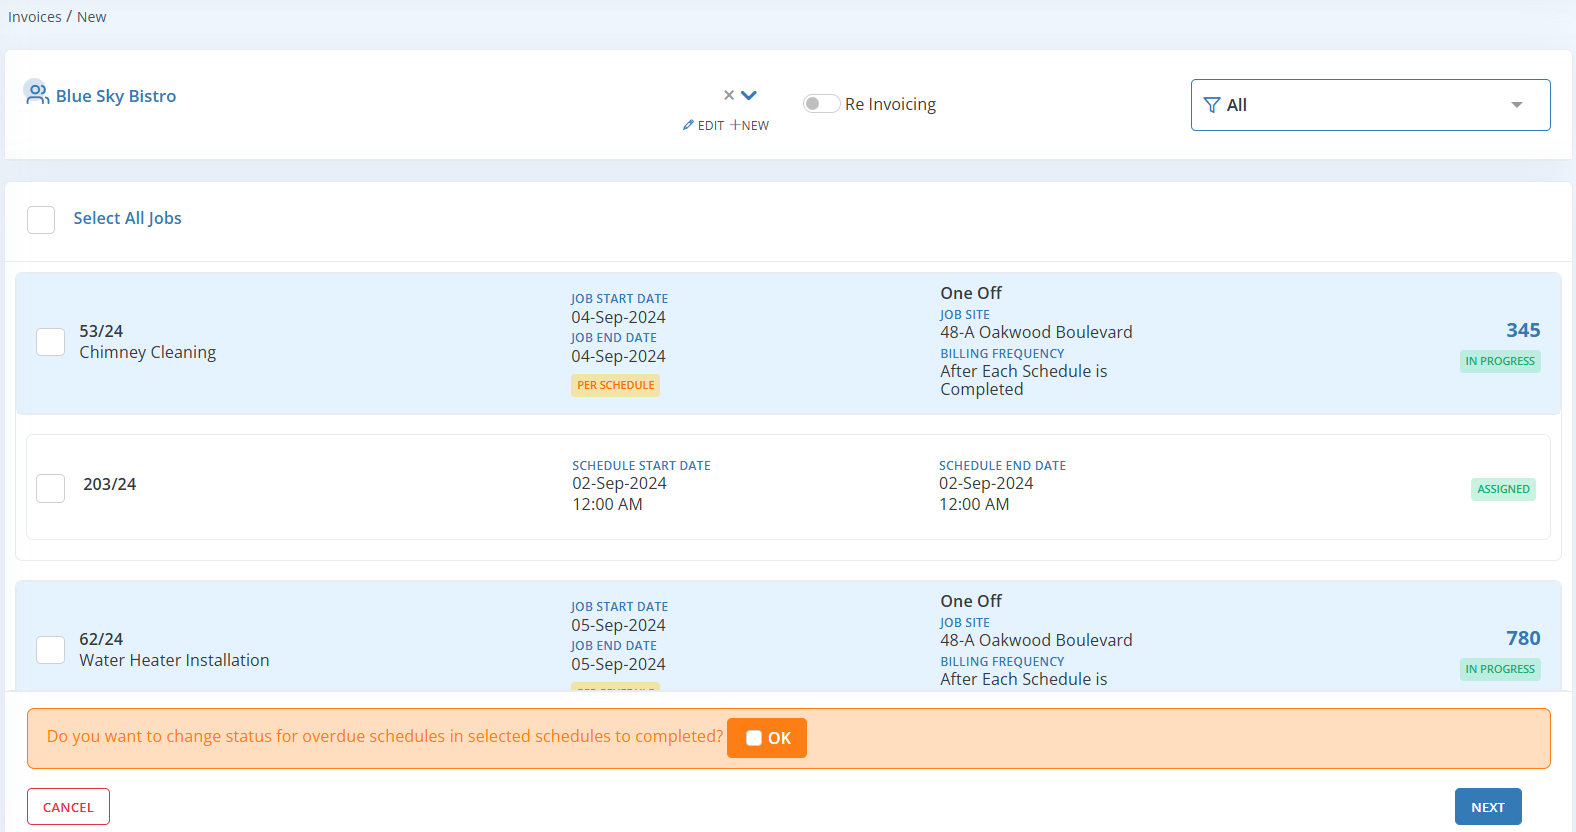
Select either one or more Schedules from the list or you can skip the selection to create a separate Invoice and then click Next.
In Customer Details, Enter the customer information:
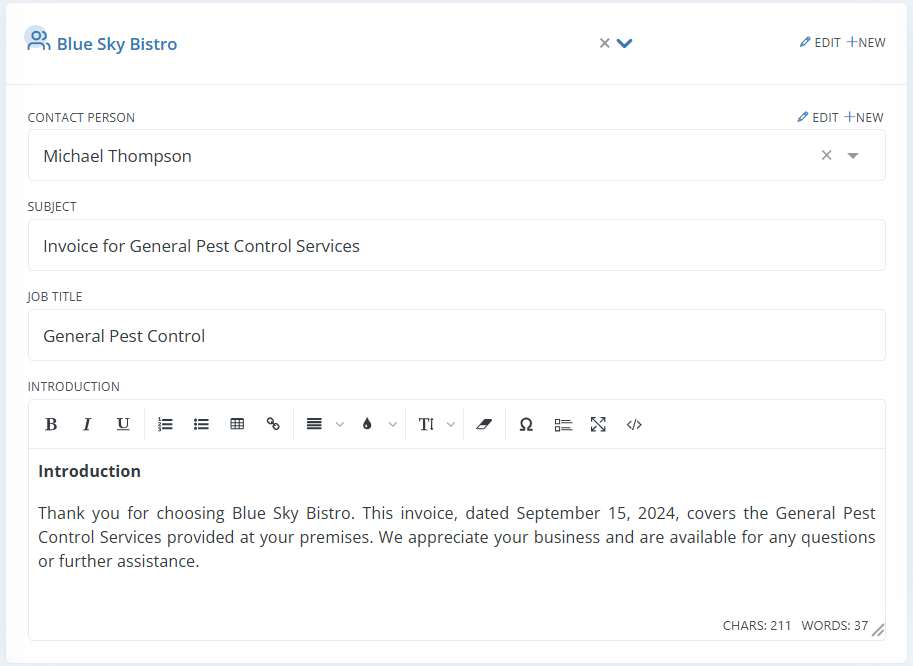
| Customer: | Choose the customer to whom you will send this Invoice. You can choose an existing customer from the drop-down list or create a new one by clicking the +New button (Complete the details of Customer and select save). |
| Contact Person: | A person who represents the customer and with whom you conduct all work-related conversations. You can choose a contact person from the drop down list or add a new contact by clicking the +New button. A customer may have more than one contact person. Click here to learn how to add more than one contact person. |
| Subject: | Add subject for the Invoice. |
| Job Title: | A short description related to the service can be entered as a job title. |
| Introduction: | Add a short introduction about the Invoice. Introduction usually includes context for the Invoice – mention any previous dealings, briefly describe your organization, and explain what the Invoice includes. Alternatively, you can load an introduction from pre-set templates. Learn more about templates here. |
In the Invoice Details section, Enter the following details:
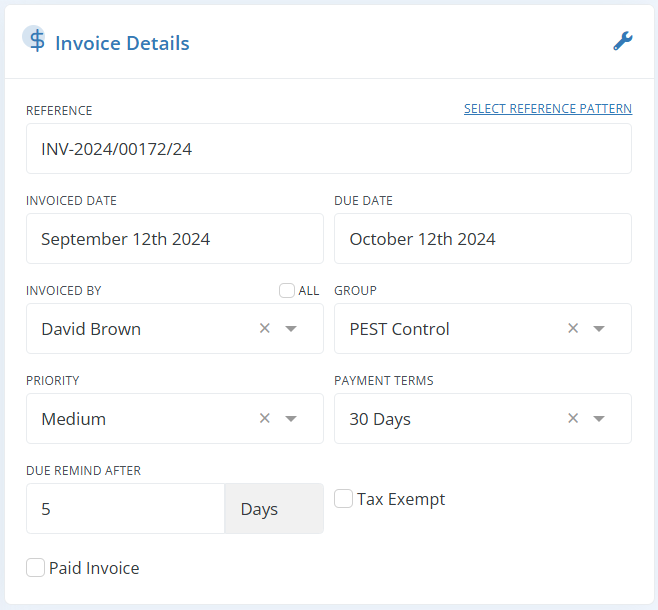
| Reference: | The reference number, often known as the document number, is the unique number used to identify each Invoice. You can create a default Invoice number pattern that will have a sequence number that is increased with each new Invoice. It is possible to edit and manually input this reference number. |
| Invoice Date: | The invoice date is the date when the invoice was issued. |
| Due Date: | The deadline by which you must pay your invoice is the due date. |
| Invoiced By: | Select the Employee name from the dropdown, who created the invoice. |
| Group: | Choose a group to which this work belongs. |
| Priority: | Mark the Priority by selecting High, Medium or Low from the dropdown. |
| Due Remind After: | It is set for invoice reminder. This is very important to avoid missing out on your payments. It will remind you to contact the customer after the given number of days of invoice due date. |
| Tax Exempt: | Check the Tax exempt checkbox to remove all taxes from the invoice. |
| Paid Invoice: | If you check paid invoice checkbox then a receipt with on collection status against this invoice will be generated and the status of the invoice will be set to paid. Once you check paid invoice checkbox action pane on the summary page will only have the option to edit invoice, Based on document, Download and Reopen Invoice options. |
Note: Difference between Invoice Date and Due DateInvoice Date: The invoice date is the date when the Invoice is issued.
Due Date: The deadline by which you must pay your Invoice is the due date.
In the Items section, enter the following details:
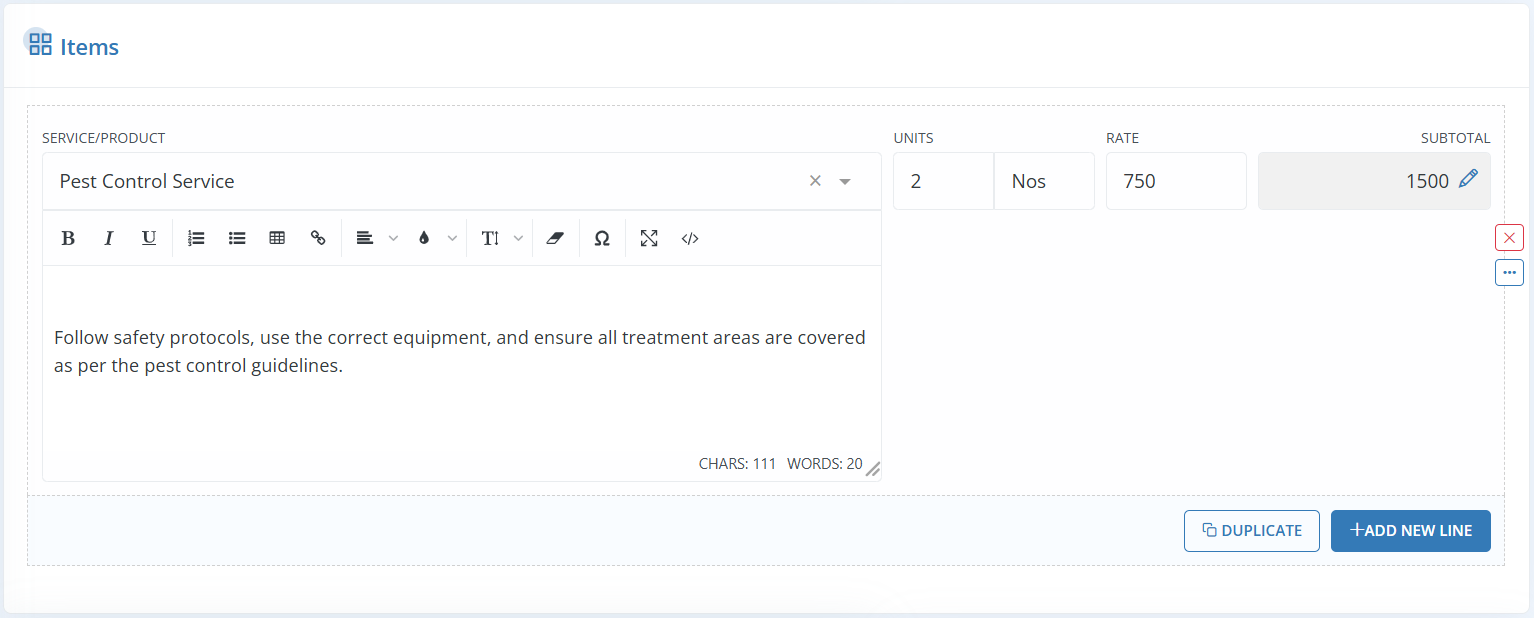
| Service/Product: | Choose the service or product from the drop-down list. You can add service items from a separate menu in the company setup; you cannot do so right here. Click here to know how to add new service/product. |
| Service Description: | Add your description about the service. It might be anything, such as details about the service, how it is used and supplied, and what all things clients will receive. |
| Units: | Add the unit of the service. |
| Unit Measurement: | Add the measuring unit, if needed. It depends on the service you offer. It could be Hours, Square feet, Square Meter, and so forth. |
| Rate: | It is the price per unit. |
| Subtotal: | It is the unit price multiplied by the total unit. This field is also editable, and when you make changes, the unit rate is updated based on the total units. |
| Duplicate: | Clicking the duplicate button will add the same service item with the same quantity and price to the Invoice. |
| Add New Line: | Click this button to add a new service line item to the Invoice. |
In the bottom section, enter the following details:
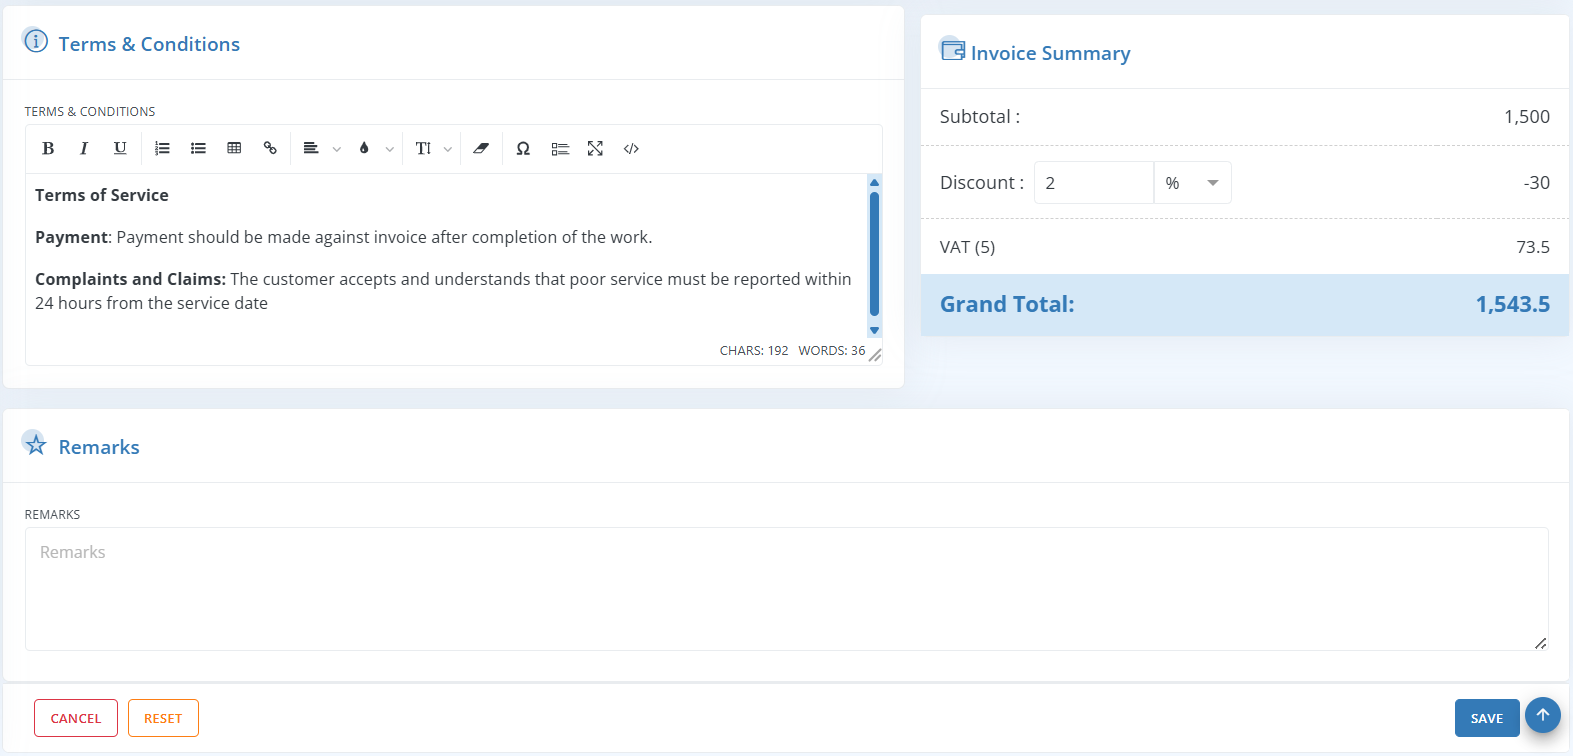
| Terms and Conditions: | Add terms and conditions to clarify things like payment terms, warranty terms or any other terms. |
| Subtotal: | Total of all Invoiced prices, without any discounts or taxes. |
| Discount: | You can add any discount on the entire Invoice here in this discount field. |
| Tax Amount: | Total Tax amount in the Invoice. |
| Grand Total: | The final amount after everything is added up; the sum of other totals. |
| Remarks: | You can add any remarks on your Invoice. |
| Cancel: | Click Cancel to bring back to previous screen. |
| Reset: | Click Reset to cancel all the changes you made in the Invoice. |
| Save: | Click Save to save the Invoice and it will be in draft status. |
Paid Invoices
In Workstair, you can mark Invoices as Paid during invoice creation, especially in cases where payment is received upfront.
- Go to Settings > PDF Configuration > Common Configuration
- Enable Partially Paid Invoice checkbox
- Click Save

- In the Invoice Details section, enable Paid Invoice checkbox
- Enter the total amount received in the Paid Amount field

Once saved, a Receipt for the payment received will be automatically created in Workstair, and the Invoice status will update to Paid.

Partially Paid Invoices
Partially Paid Invoices allow businesses to document and track payments when clients make partial contributions toward an invoice. This feature improves transparency by clearly showing outstanding balances, making payment tracking and financial management easier and more accurate.
- Go to Settings > PDF Configuration > Common Configuration
- Enable Partially Paid Invoice checkbox
- Click Save

- In the Invoice Details section, enable Paid Invoice checkbox
- Enter the received amount in the Paid Amount field

The PDF output will now display a Payment Made column in the invoice summary section.

The Receipt for the Payment Received will be automatically created in Workstair, and the Invoice status will change to Partially Paid.

Apply Credit Notes to Invoices
Workstair allows you to effortlessly create Credit Notes for multiple Invoices in a single go.
- Go to Payments > Credit Notes > +New
- Choose an existing customer from the dropdown menu.
- Select all the invoices for which you want to create Credit Notes.
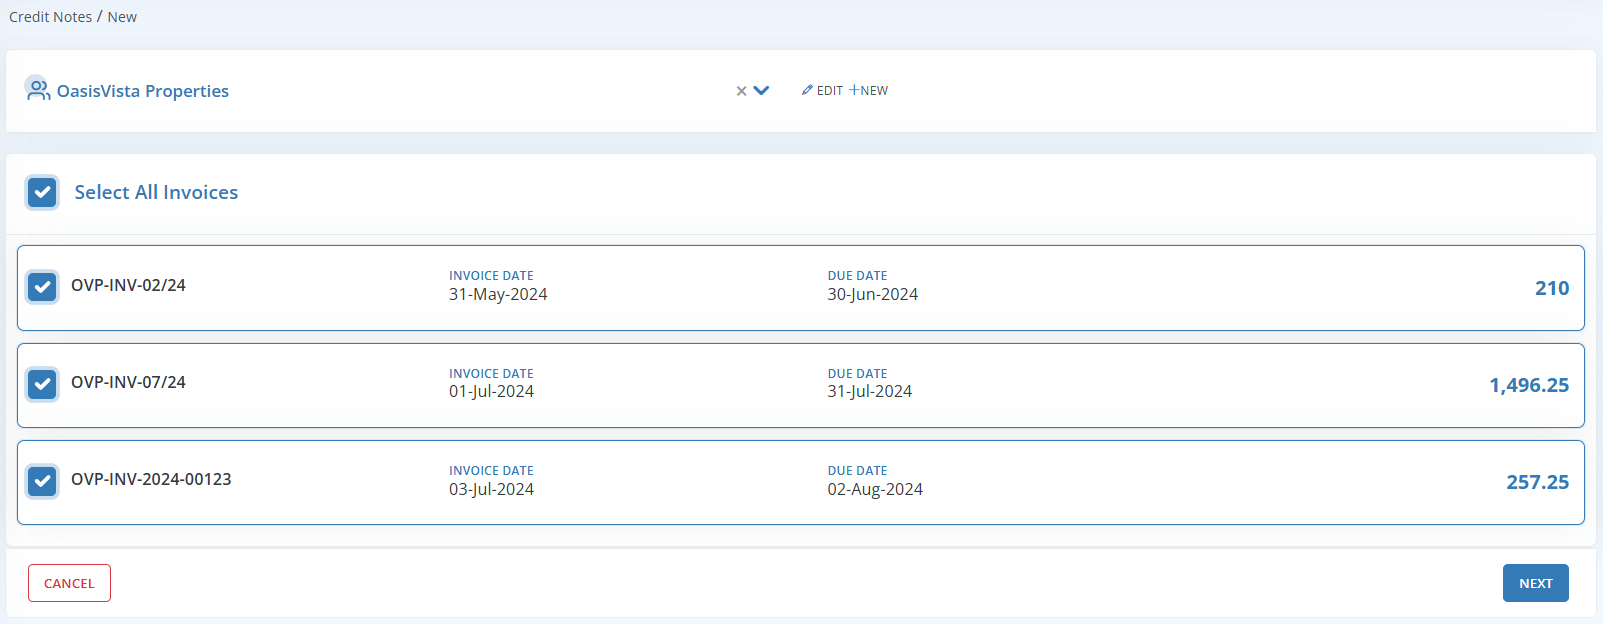
- Click Next to proceed to the Credit Note Edit Page.
- Add or modify the necessary details for the Credit Notes.
- Finally, click Save.
In the Credit Note Details page, view the Invoices associated with the Credit Notes.
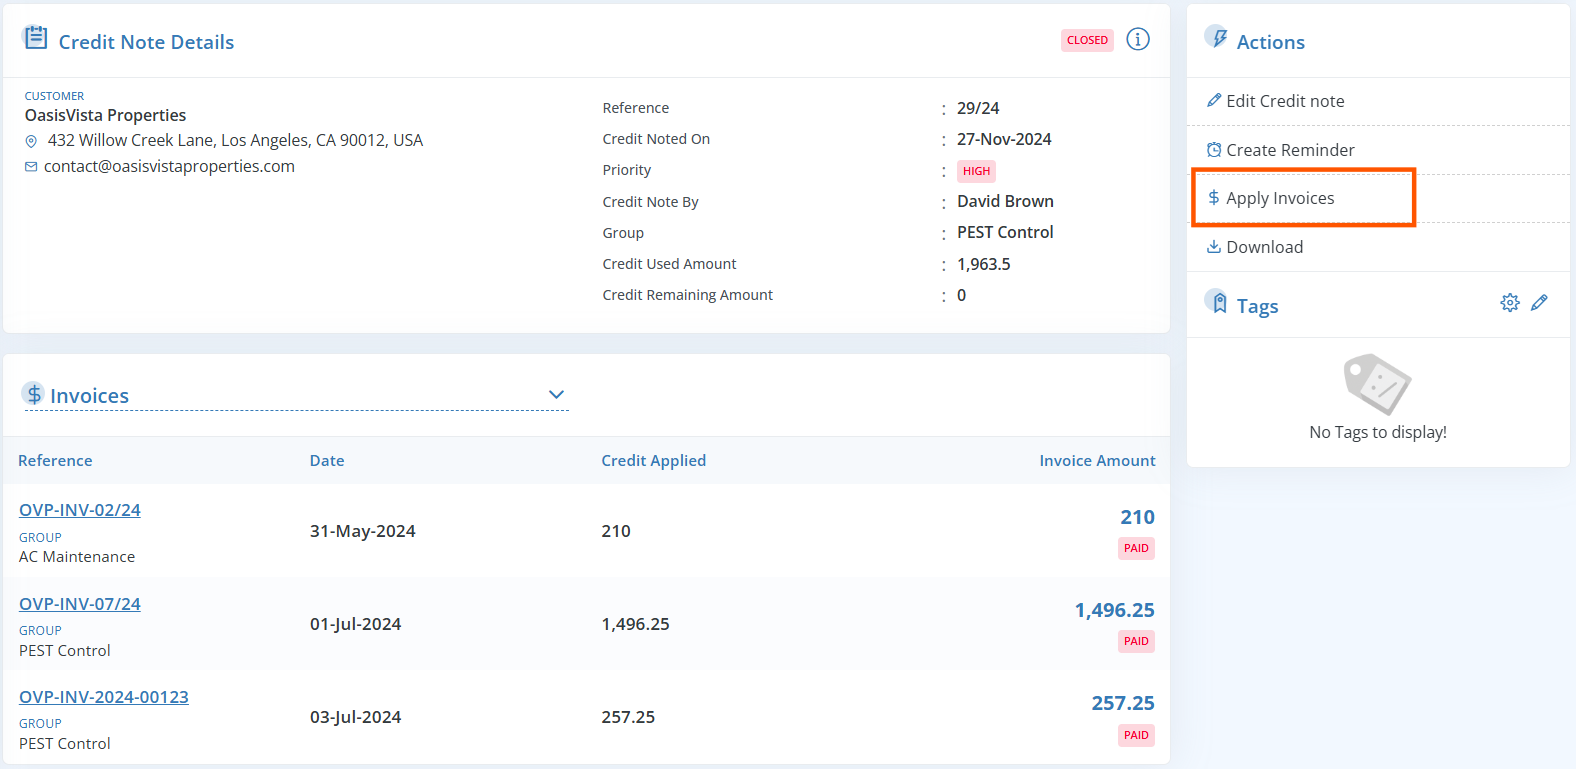
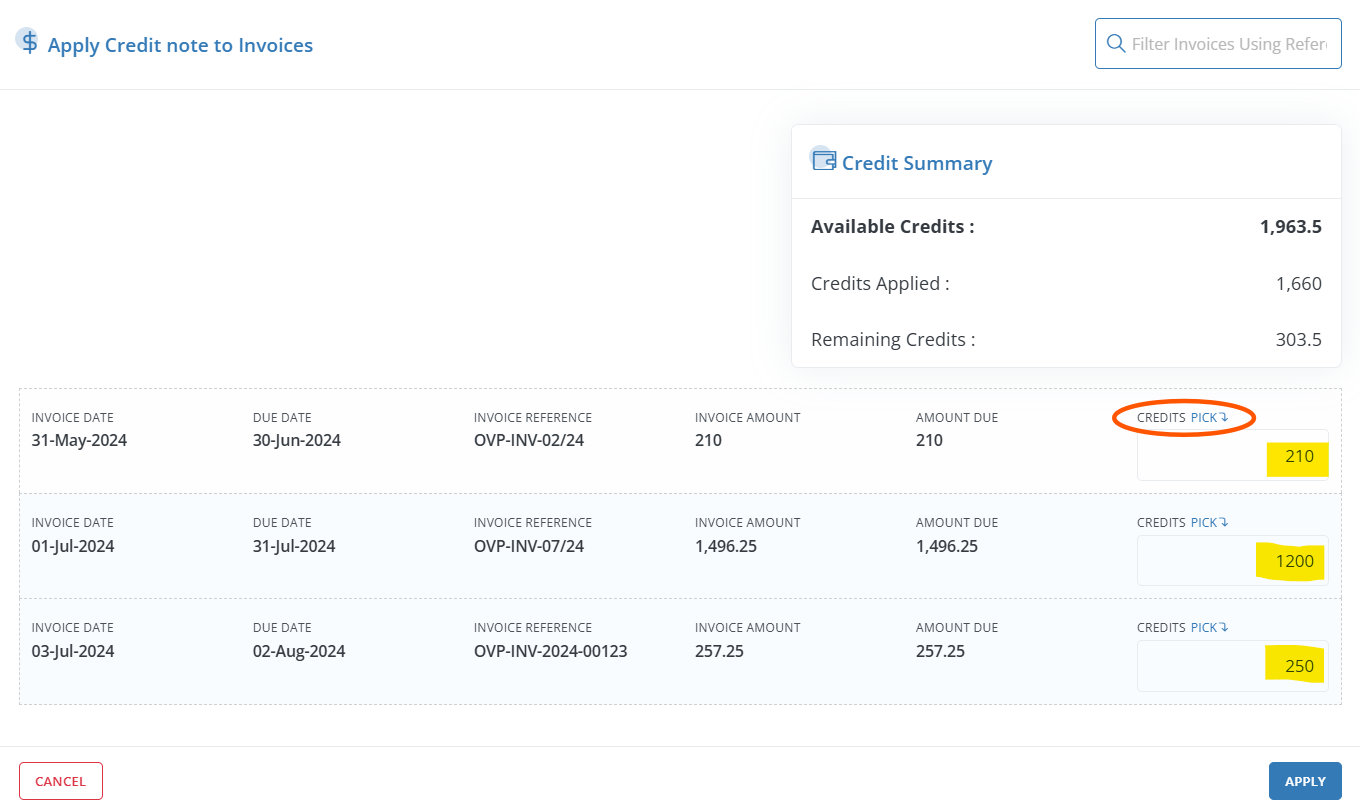
- To allocate specific credit amounts to individual invoices, click Apply Invoices under the Actions pane.
- You can also manually allocate credit amounts by entering them in the Credit field located on the far-right of each invoice.
- If you click the Pick button, Workstair will automatically allocate the full amount to the due amount.
Additional Invoice Configurations
The additional configuration button is found in the top right corner of the Invoice Details Pane.
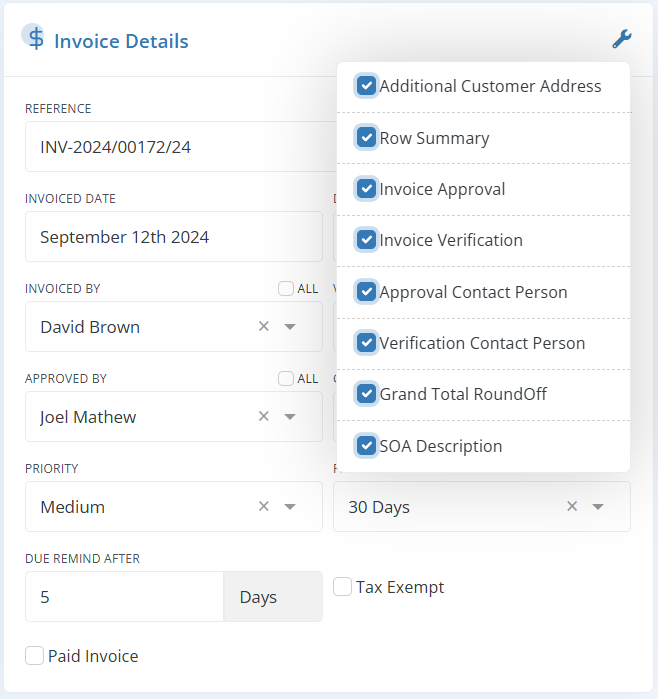
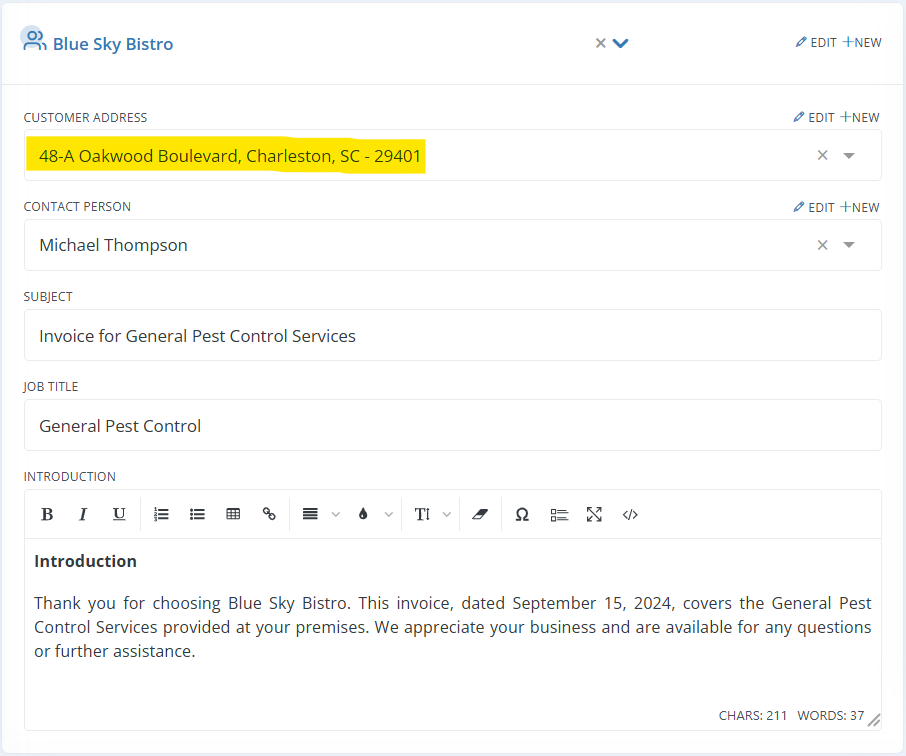
Additional Customer Address
To add more than one Customer address, enable Additional Customer Address.
Row Summary
- Enable Show row summary, to display Subtotal, Discount, Tax and Grand total will display in the row itself.
- It is necessary to Enable Show row summary if you want to add any discounts to the line item. Adding a discount is as simple as clicking the colored $ label.
- If the row summary is enabled, you can also add, change or remove taxes from the line item.

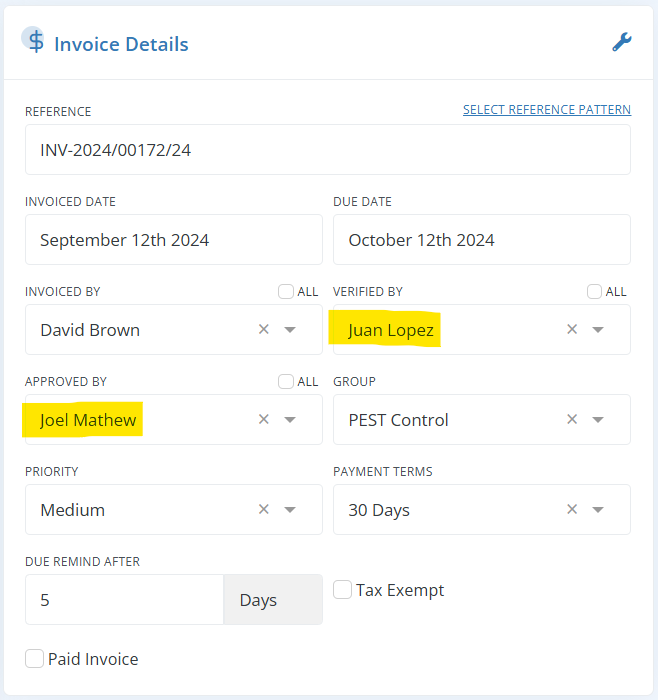
Invoice Approval and Verification
| Invoice Approval: | Enable Invoice Approval to add who has approved your Invoice. |
| Invoice Verification: | Enable Invoice Verification to add who has verified your Invoice. |
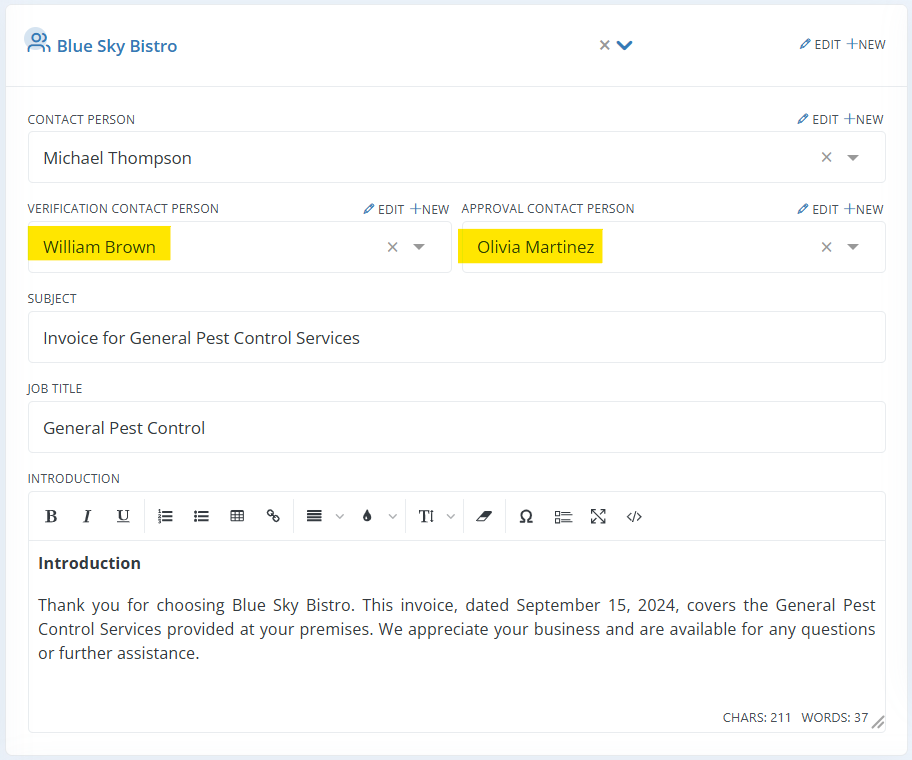
Invoice Approval and Verification Contact Person
- Enable Approval Contact Person to add who has approved your Invoice.
- To add the contact who has verified your invoice, enable Verification Contact Person.
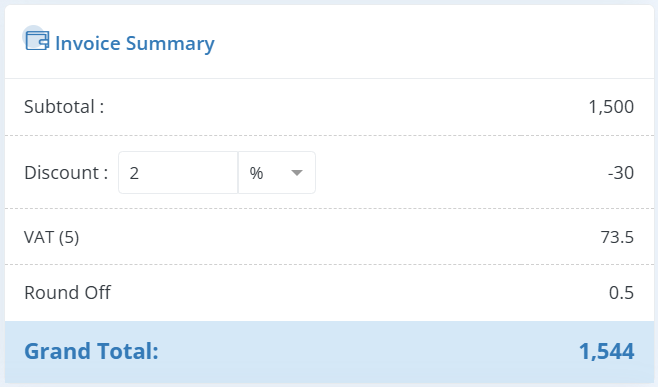
Grand Total RoundOff
Enable Grand total Round off to Round off the grand total value to the nearest lower/higher whole number.
For example: if the grand total is 1435.7 then it will round to 1436.
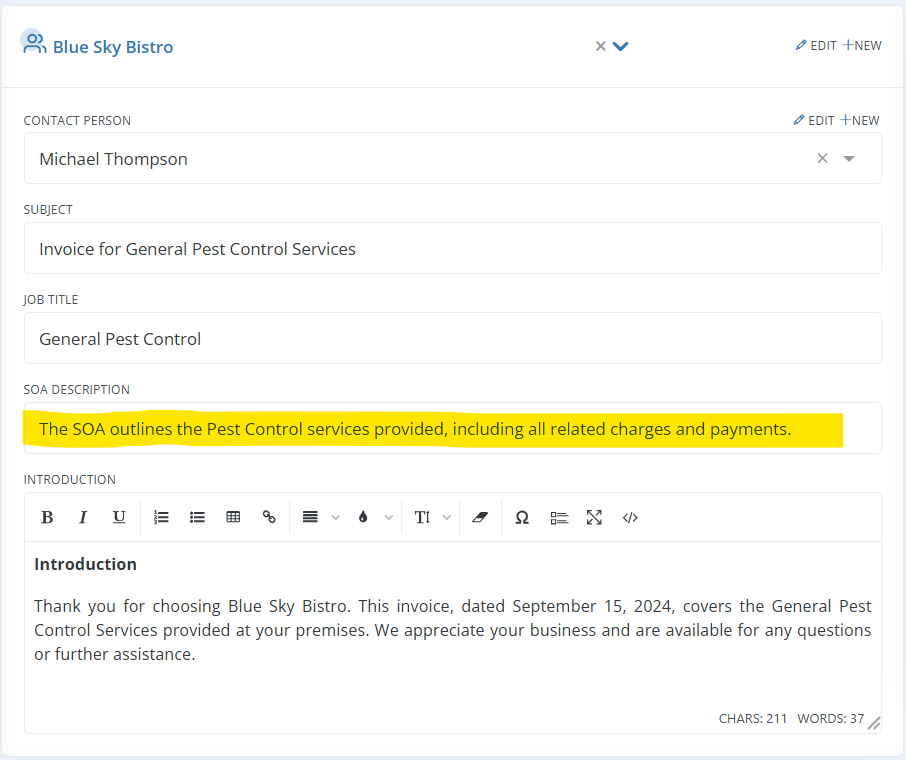
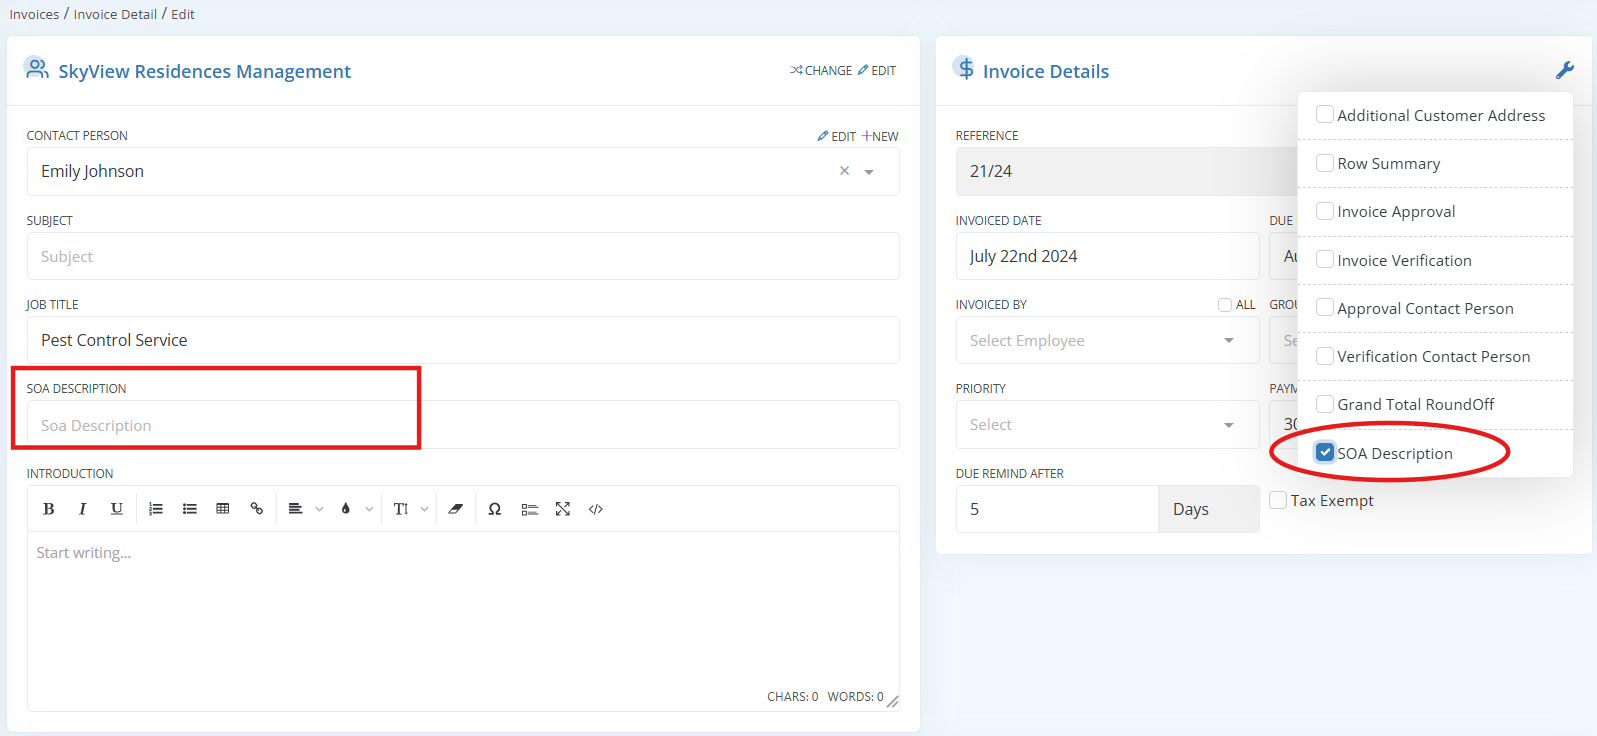
SOA Description
Enable SOA Description to add summary of all transactions done with the customer, which may comprise several transactions or invoices.
More Options in line item
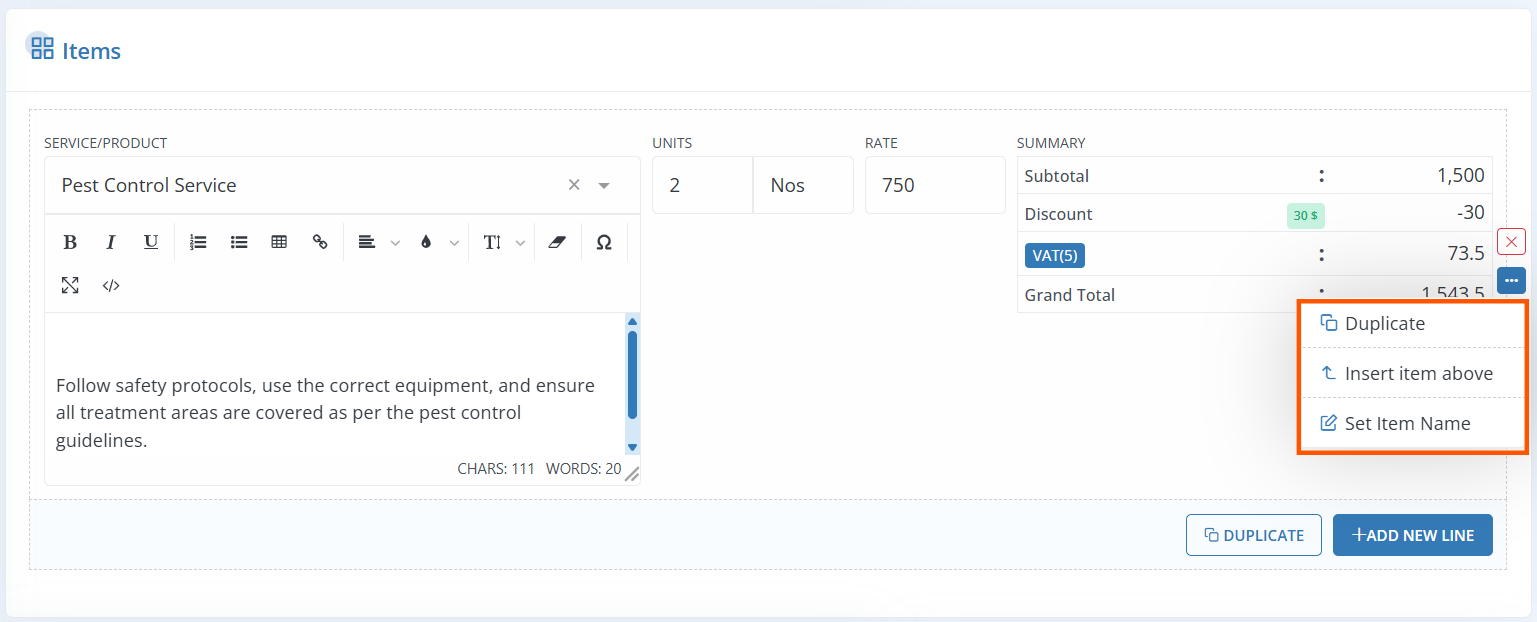
On the service line-item area, go to the far-right corner for additional options button, then click to view the options as shown below.
| Duplicate: | Click Duplicate to add an identical service item to the Invoice. Use this option when you want to add a similar service item with a minor changes. |
| Set Item Name: | Adds an alternate name for the service line item. If an alternative name is specified, the actual service item name will be replaced with the given name. |
Invoiced By Signature
To enable invoiced by Signature in Workstair is quite easy.
- Go to Settings > PDF Configurations
- Select Invoices from the dropdown

- In the Common Configurations, enable the Signature module
- Customize the Signature label, Font size, Signature Position etc.
- Click Save to apply the changes

Note: Ensure the employee with Signature is selected as the Invoiced By contact.
Invoicing From Various Modules
Workstair provides flexibility in creating Invoices from multiple modules, including Quotations, Contracts, Jobs, Schedules, and Calendars.
To enable invoicing in any of these modules:
- Click the Configuration button
- Enable the Has Invoicing checkbox

From Quotation
- Navigate to Quote Details page
- In the Actions pane, click Create Invoices
- You will be redirected to the Invoice Creation page, fill in all the necessary details and Save

From Contracts
- Go to the Contract Details page
- In the Actions pane, click Create Invoices
- You will be redirected to the Invoice Creation page, fill in all the necessary details and Save

From Jobs
- Open the Job Details page.
- In the Actions pane, click Create Invoices
- Enter necessary details in the Invoice Creation page and click Save.

From Schedules
- Go to the Schedule Details page.
- In the Actions pane, click Create Invoices
- Fill in the required details on the Invoice Creation page and click Save.

From Calendars
- Navigate to the Calendar page
- Click any Invoice Reminders and click on the Create Invoice button
- You will be redirected to the Invoice Creation page, fill in all the necessary details and Save

Combining Multiple Jobs into a Single Invoice
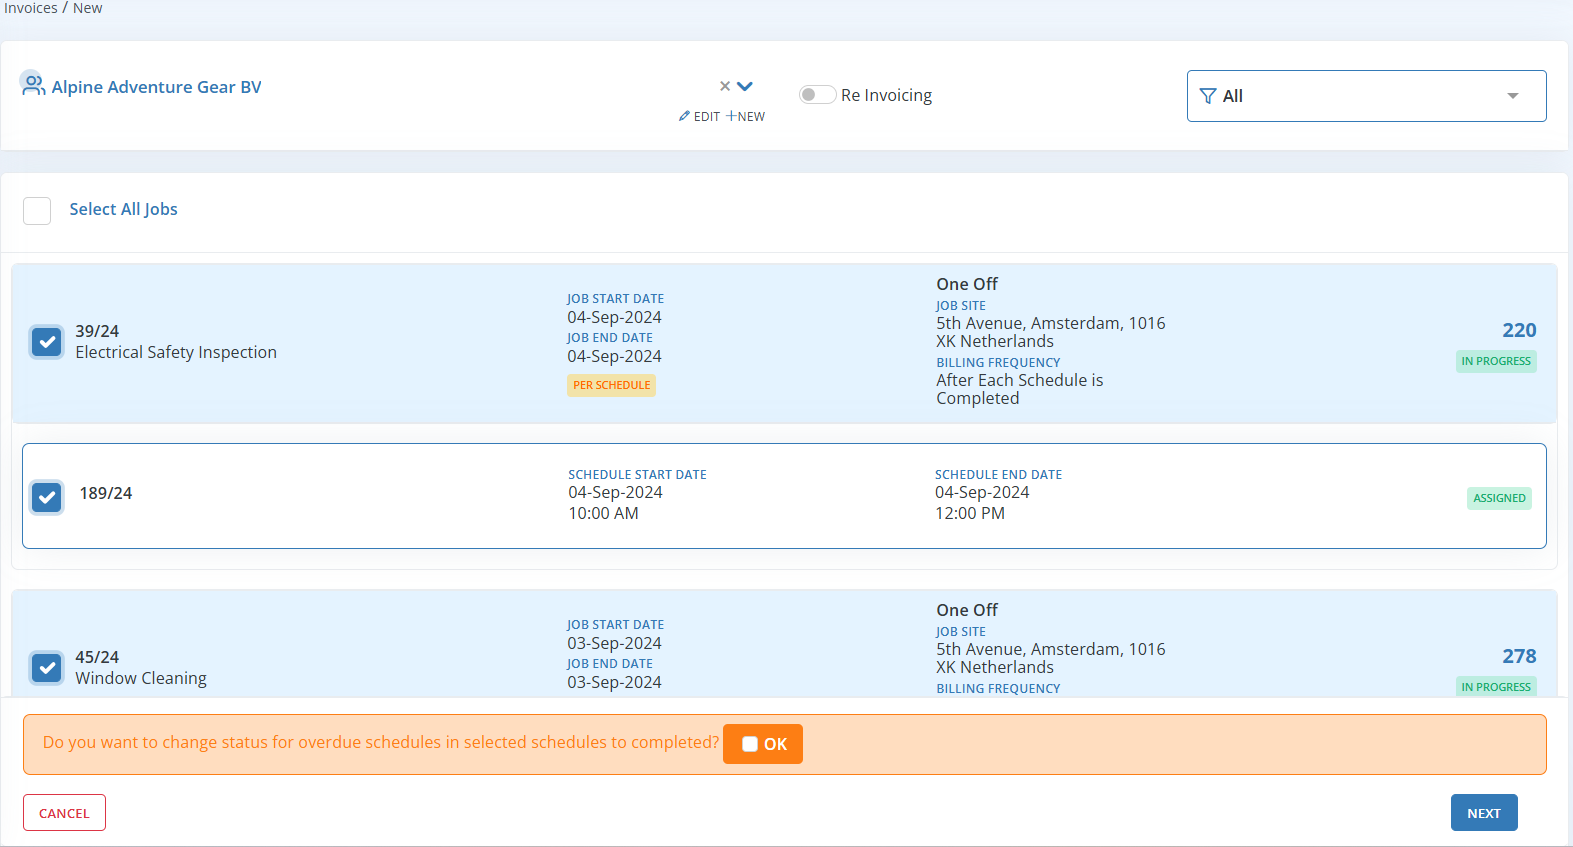
In Workstair, you can combine multiple Jobs or Schedules for the same customer into a single Invoice.
- Go to Payments > Invoices > +New
- Choose the Customer
- Select the jobs or schedules which is to be invoiced
A popup will appear asking, “Do you want to change the status for overdue schedules to completed?”. If you wish to update the schedule status, click OK
- Click Next
- Fill in the necessary details on the Invoice Edit page, then click Save
This will generate a single invoice for the selected items, simplifying billing for multiple services.
Invoicing to Different Customer
In Workstair, you can assign a different customer to receive Invoices, separate from the main Customer. This ensures that billing goes directly to the correct party.
To enable Separate Billing Address in Quotes and Contracts:
- Click on the Configuration button
- Enable the Separate Billing Address checkbox

Choose the Billing Customer, then select the Contact Person and the Billing Customer Address.

Editing Source Document from Invoices
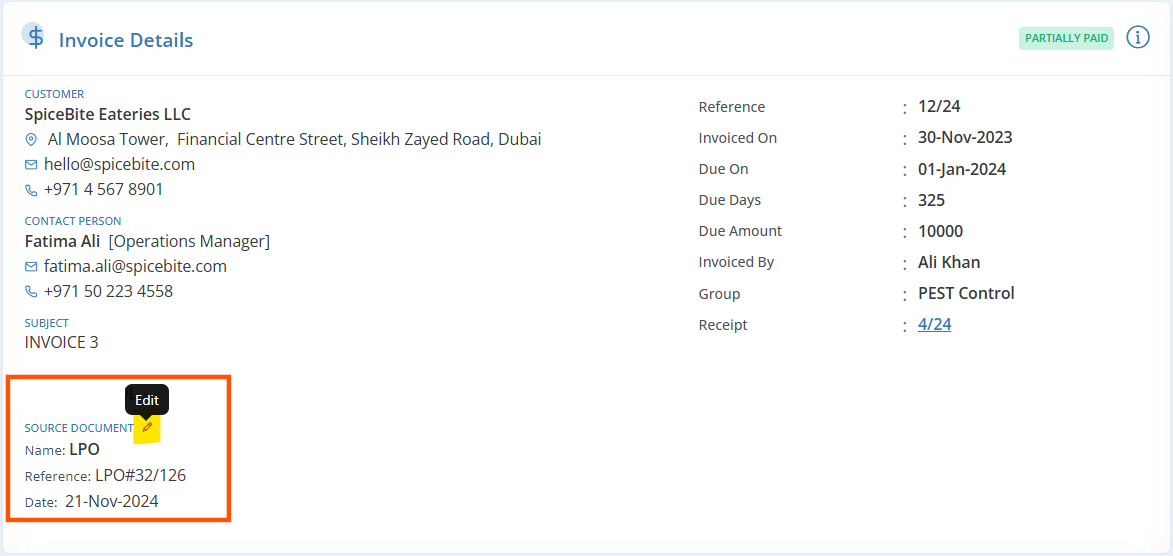
In Workstair you can easily edit the Source Document directly from the invoices:
- Navigate to the Invoice Details page.
- Click the Edit icon near the Source Document module.
- Update the source document details in the dialogue box.
- Click Save.

More Actions
You can perform a number of actions once an Invoice is created. These actions are available in the action pane of the Invoice Summary page.
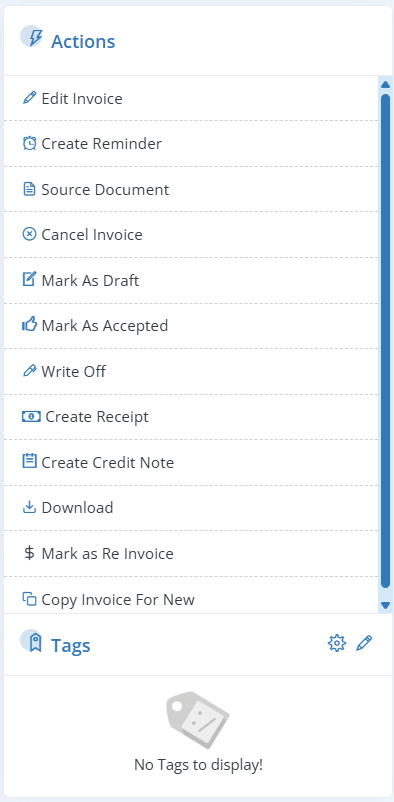
| Edit Invoice: | Modify details on an existing invoice as needed. |
| Create Reminder: | Set up customized reminders, such as customer follow-ups, payment reminders, etc. |
| Source Document: | Add or reference any related source documents, such as a Local Purchase Order (LPO), that support or justify the invoice. |
| Cancel Invoice: | Cancel the invoice and update the status accordingly. |
| Mark as Draft: | Save the invoice as a draft to make further edits later. |
| Mark as Accepted: | Change the invoice status to “Accepted” once confirmed by the customer. |
| Write Off: | Record the invoice amount as uncollectible and remove it from accounts receivable. |
| Create Receipt: | Generate a Receipt to confirm payment received for the invoice. |
| Create Credit Note: | Issue a credit note to adjust or correct the invoice amount. |
| Download: | Download the invoice as PDF for offline use or sharing. |
| Mark as Re Invoice: | Flag the invoice for re-invoicing if needed. |
| Copy Invoice for New: | Create a new invoice by copying details from an existing invoice. |
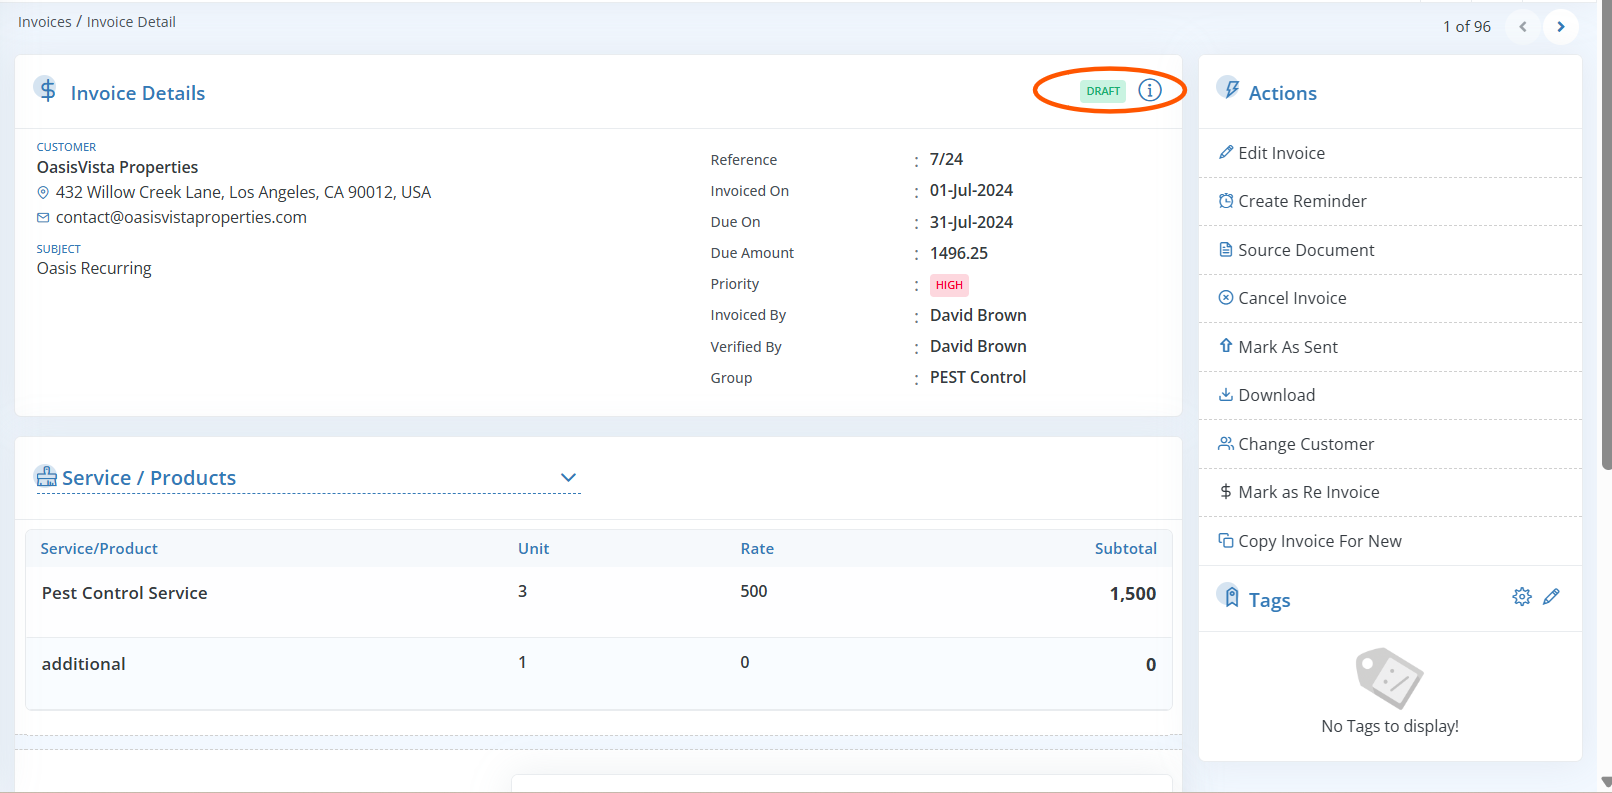
Invoice Statuses
| Draft: | This is a Invoice which is simply created but not sent to the customer. |
| Sent: | Once you share the Invoice with the customer, the status will get updated to Sent. |
| Accepted: | Once the customer accepts the invoice, the status will be Accepted. |
| Partially paid: | A payment that is not the full amount paid will have partially paid status. |
| Paid: | When full payment is received, the invoice’s status is updated to Paid. |
Note: Once the status is updated, it will be visible in the top-right corner of the invoice detail page.
Search an Invoice
The advanced search option in Workstair allows you to search documents in many ways.
To Search an invoice in workstair:
- Goto Left Menu bar > Payments > Invoices
- Search Invoice by Job title, Reference, Based Doc Reference, Customer, Invoiced Date or Status.

Note: To sort invoices, select from available criteria such as Reference, Invoiced Date, Due Date, Created At, Updated At, Status Updated At, or Priority.
For more search options:
- Click Untitled Filter button.
- There you can search Invoices for multiple customers, job sites, tags, statuses.
- Click Save to save a search with a name with search fields filled.
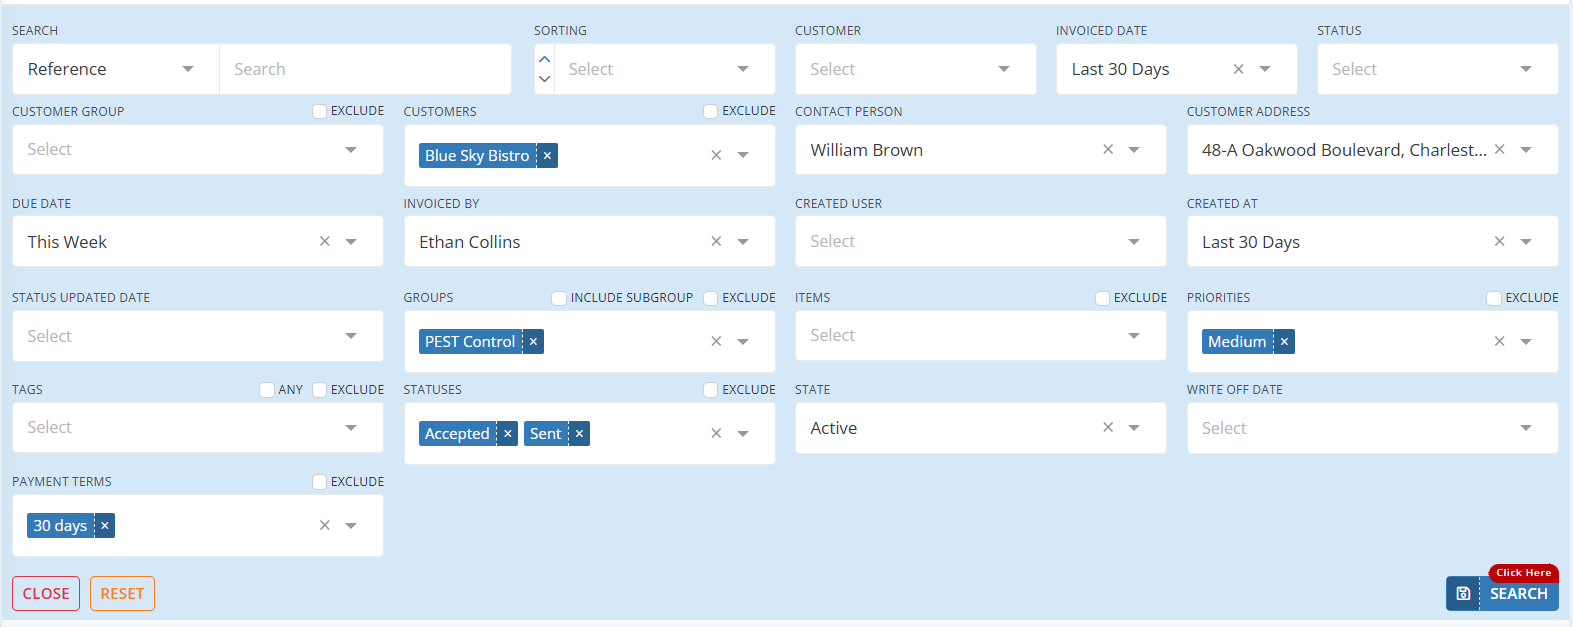
It is possible Later, when you click on this saved search, Invoices will be displayed based on the saved criteria. Click here to learn more about saved searches!
Receipts
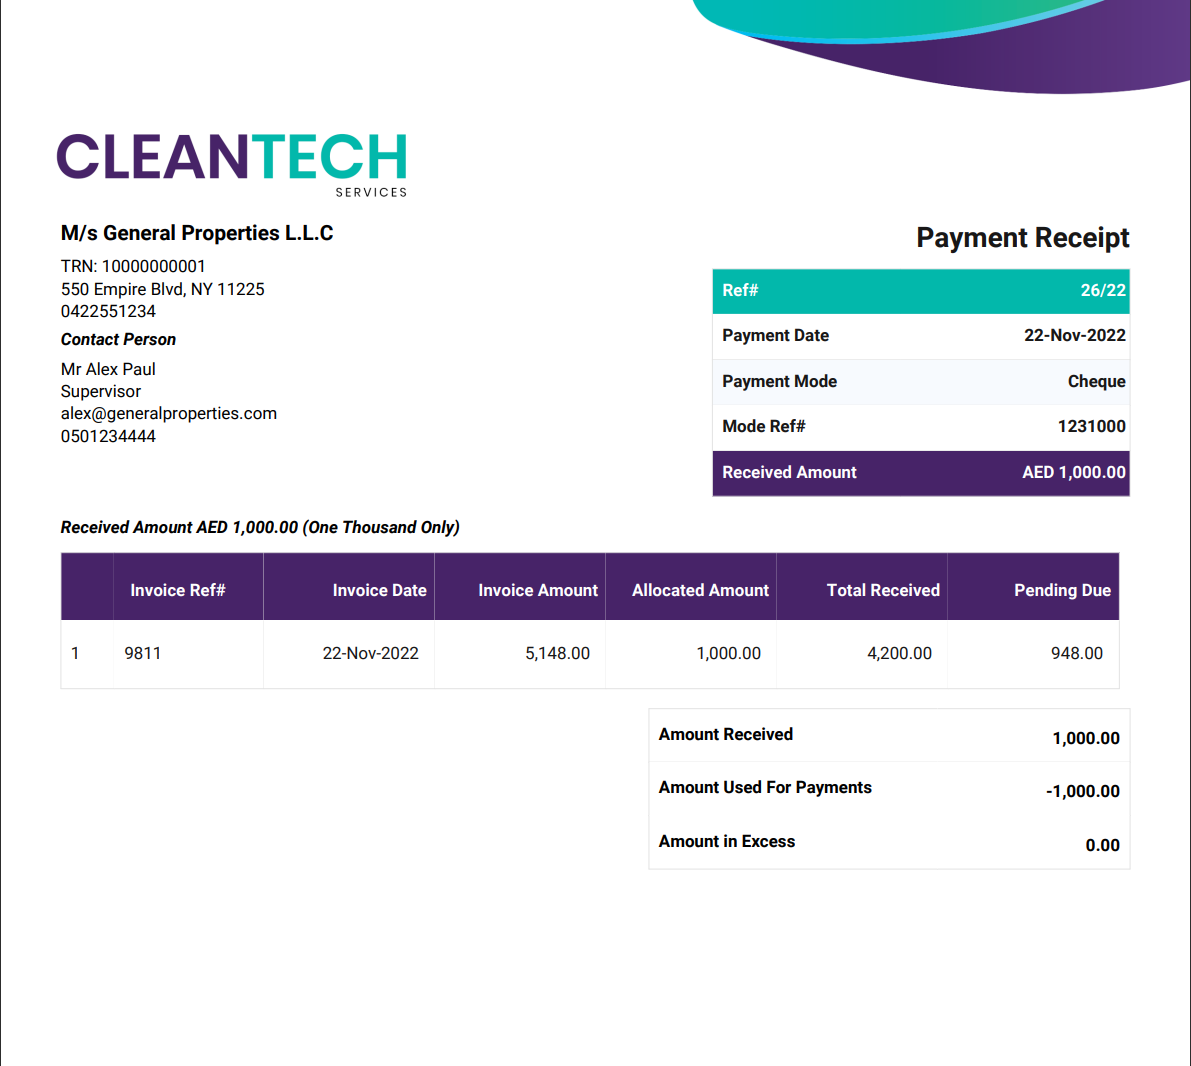
Payment receipts are documents issued to a customer when you receive a payment for goods or service you provided. In workstair, you can create a receipt to a customer against their outstanding payments or you can create a separate one without an invoice.
Create Receipt
Learn How to create a Receipt:
- Goto Menu > Payments > Receipt
- Click the +New button in the top right corner of the page.
- or click Create New > Receipt under the utility button at the top right corner.

In the Customer details, Enter customer information:
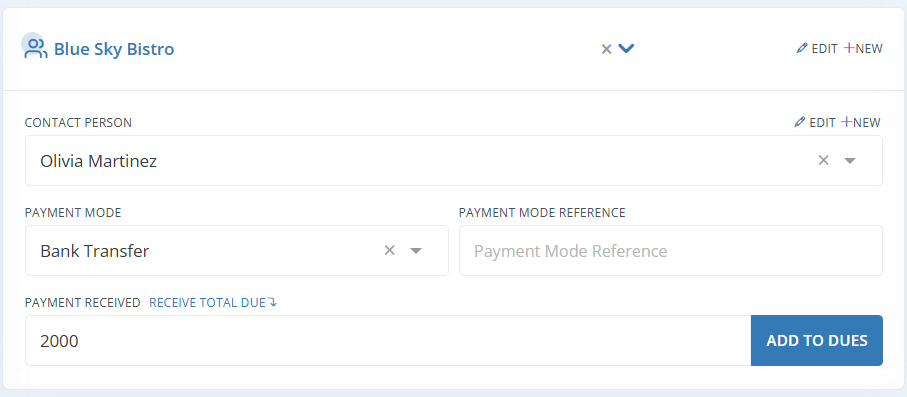
| Customer Name: | Select the customer name from the dropdown. |
| Contact Person: | Choose a contact person. |
| Payment Mode: | You can select the payment mode from the dropdown list. It can be cash, credit card or any other item. You can create multiple payment modes in Workstair. |
| Payment mode reference: | You can enter any reference of the payment like cheque number in this field. |
| Payment Received: | Enter the total amount received in the Payment Received field. Clicking the Receive Total Due button will automatically populate the total receivable amount here. |
| Add to Dues: | If you click on the Add to Dues button, Workstair will automatically distribute the total amount across each unpaid invoice in order of their invoice dates. |
In the Receipt details section, enter the following details:
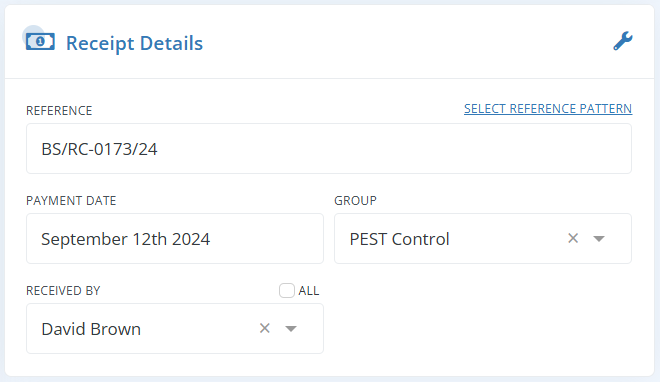
| Reference: | The unique number used to identify each Receipt. You can create a default Receipt number pattern that will have a sequence number that is increased with each new Receipt. It is possible to edit and manually input this reference number. |
| Payment Date: | The date when payment was received. |
| Group: | Choose a group to which this work belongs. |
| Received By: | Select the employee’s name from the dropdown menu who received the payment. |
In the Unpaid Invoices section, enter the following details:
When you enter the total amount received in the Payment Received field and if you click the Add to Dues button, Workstair will automatically distribute the total amount across each unpaid invoice in order of their invoice dates.
You can also manually allocate the payment amount by entering it in the Payment field at the far right of each invoice. If you click the Pick button, Workstair will automatically allocate the full amount to the due amount.

The Payment Summary pane will show the Amount Received, Amount Used for Payment, and Excess Amount.
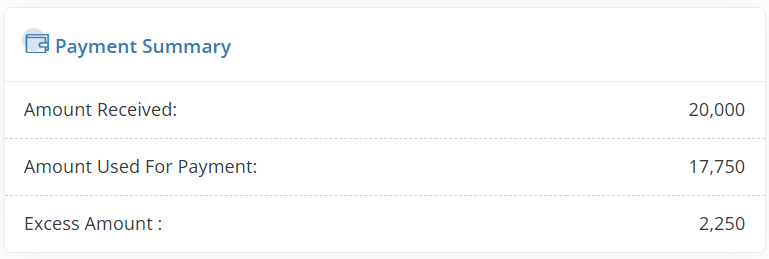
| Amount Received: | The total payment amount that has been received from the customer. |
| Amount Used for Payment: | The total amount that has been allocated to cover invoices. |
| Excess Amount: | Any amount received that exceeds the total allocated amount. |
In the bottom section, you can enter the following details:

| Remarks: | You can add any remarks on your Receipt. |
| Cancel: | Click Cancel to bring back to previous screen. |
| Reset: | Click Reset to cancel all the changes you made in the Receipt. |
| Save: | Click to Save the Receipt. Once saved, the receipt status will be set to “On Collection.” You can then adjust the status of the Receipt to “Paid” or “Partially Paid” accordingly. |
Additional Receipt Configurations
The additional configuration button is found in the top right corner of the Receipt details pane.
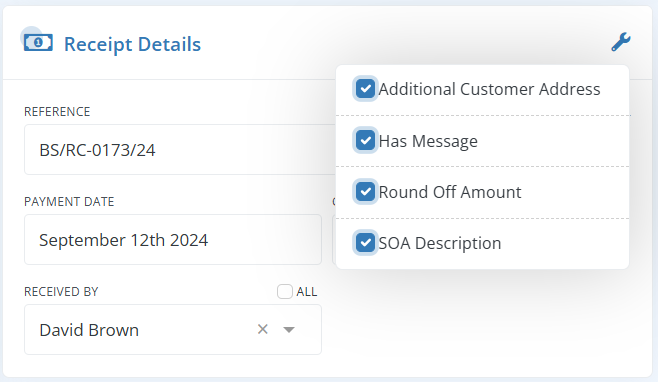
| Additional Customer Address: | Enable “Additional Customer Address” to include multiple customer addresses |
| Has Message: | Add any messages to include at the bottom of the Receipt, if applicable. |
| Round Off Amount: | Enable “Round Off Amount” to adjust and round the total Receipt amount. |
| SOA Description: | Enter the details of all transactions that happened during a particular period of time between you and customer. |
Allocating Excess Receipt Amount to Invoices
In Workstair, it’s possible to allocate any excess receipt amounts to Invoices at a later time. If there is an excess amount after allocating a customer payment, Workstair will automatically record this surplus. Later, when creating a new Invoice for the same customer, the software will prompt you to allocate any previously recorded excess amount to the new Invoice.
- In the Invoice Details page, you can see the Receipts Having Excess Amount with the number of Receipts available.

- Click View Receipt to see the Receipt details, including the reference number, received amount, and excess amount.

- Click Allocate Receipt to allocate the excess amount to the current Invoice.
- You will be redirected to the Receipt Edit page. Complete the necessary allocations.

- Click Update to save your changes.

More Actions
You can perform a number of actions once a Receipt is created. These actions are available in the action pane of the Receipt summary page.
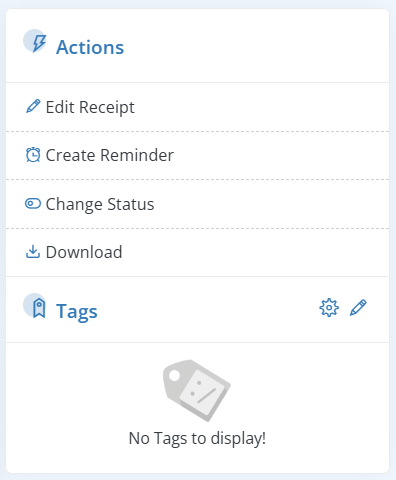
| Edit Receipt: | Edit and modify an existing Receipt as needed. |
| Create Reminder: | Set calendar reminders related to the Receipt, such as due date for cheques or follow-up actions. |
| Download: | Use this button to download the saved receipt. You can then share the Receipt with the customer. |
| Change Status: | Update the status of the Receipt to reflect its current state. |
Receipt Statuses
| On Collection: | Indicates that the payment process is in progress. |
| Collected: | Shows that the payment has been successfully processed and collected from the customer. |
| Received: | Confirms that the payment has been successfully received by the intended recipient. |
| Closed: | Represents the final state of the payment transaction, signifying that the transaction is complete and no further action is required. |
Search a Receipt
The advanced search option in Workstair allows you to search documents in many ways.
To Search a Receipt in workstair:
- Goto Left Menu bar > Payments > Receipts
- Search Receipt by Reference, Customer, Payment Date or Status.

Note: To sort Receipts, select from available criteria such as Reference, Payment date, Created Date, Updated Date.
For more search options:
- Click Untitled filter button.
- There you can search Receipts for multiple customers, job sites, tags, statuses.
- Click Save to save a search with a name with search fields filled.

It is possible Later, when you click on this saved search, Receipts will be displayed based on the saved criteria. Click here to learn about saved searches!
Statement of Accounts (SOA)
A Statement of Account (SOA) is a detailed financial report provided to customers, summarizing all transactions, including Invoices, Receipts, and Credit Notes, within a specified period. It helps both the service provider and the customer to keep track of outstanding balances, payments made, and any credits issued.
View SOA
- Go to Clients in the left sidebar and click on Customers
- From the Customer Details page, select Statement of Accounts
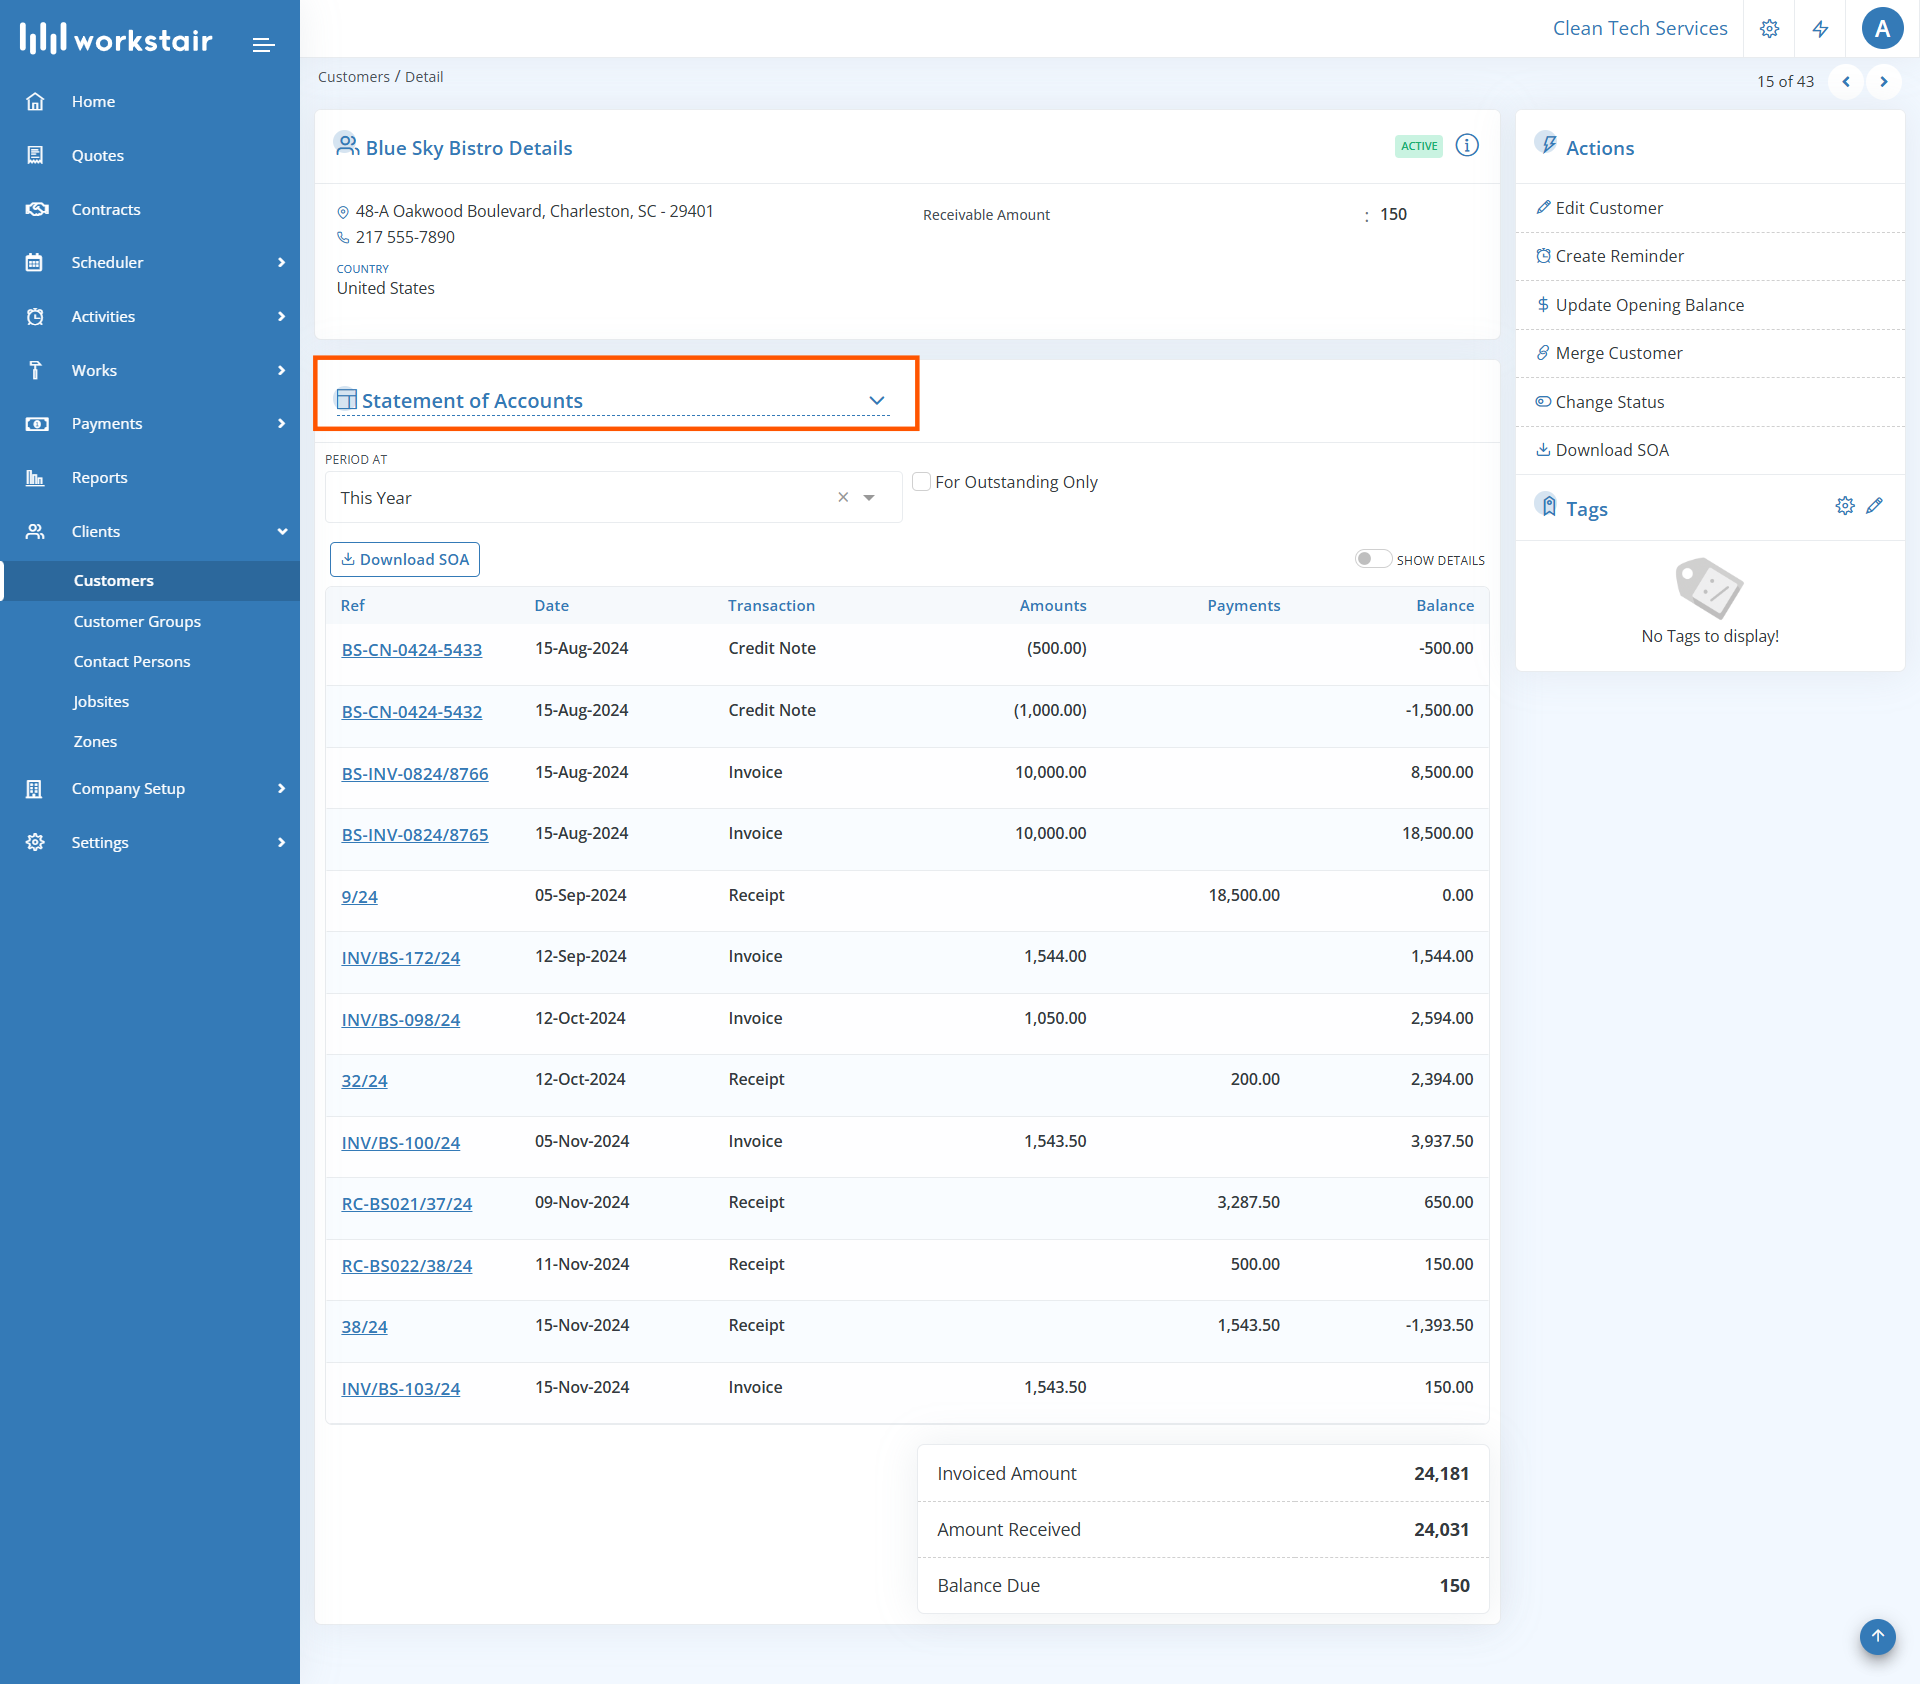
| All Outstanding: | To view all the outstanding transactions as of now, enable All Outstanding |
| For Outstanding Only: | To view the outstanding transactions for a custom period, enable For Outstanding Only |
| Period At: | Choose transaction period from the dropdown menu or select Custom for a customized period |
To learn more about generating SOA in Workstair:
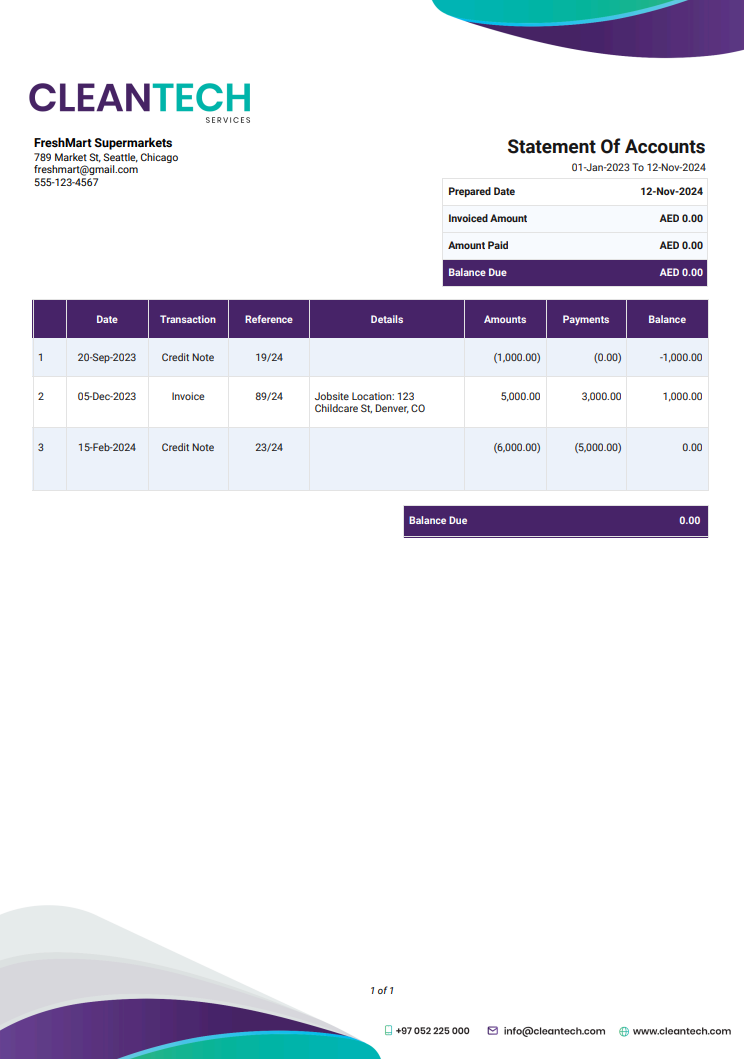
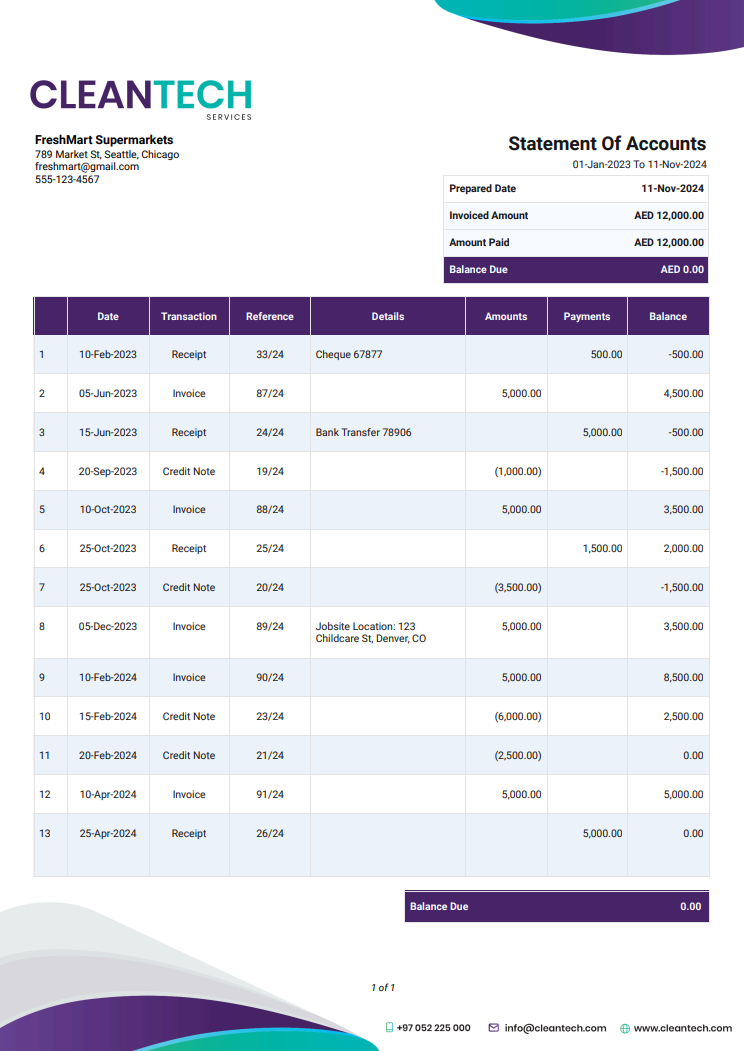
Download SOA
You can download SOA in two different ways:
- Click on Download SOA directly on the SOA summary details
- Navigate to Actions menu on the Customer Details page and click on Download SOA
Add SOA Description
An SOA Description is a brief summary or explanation included in the Statement of Account that outlines the details of transactions, balances, and any other relevant information related to a customer’s account.
Here are the steps to add an SOA description:
- Go to Summary Details page where you want to add the SOA description, like Invoices, Receipts or Credit Notes
- Enable SOA Description option and fill in the description
SOA for Customer Groups
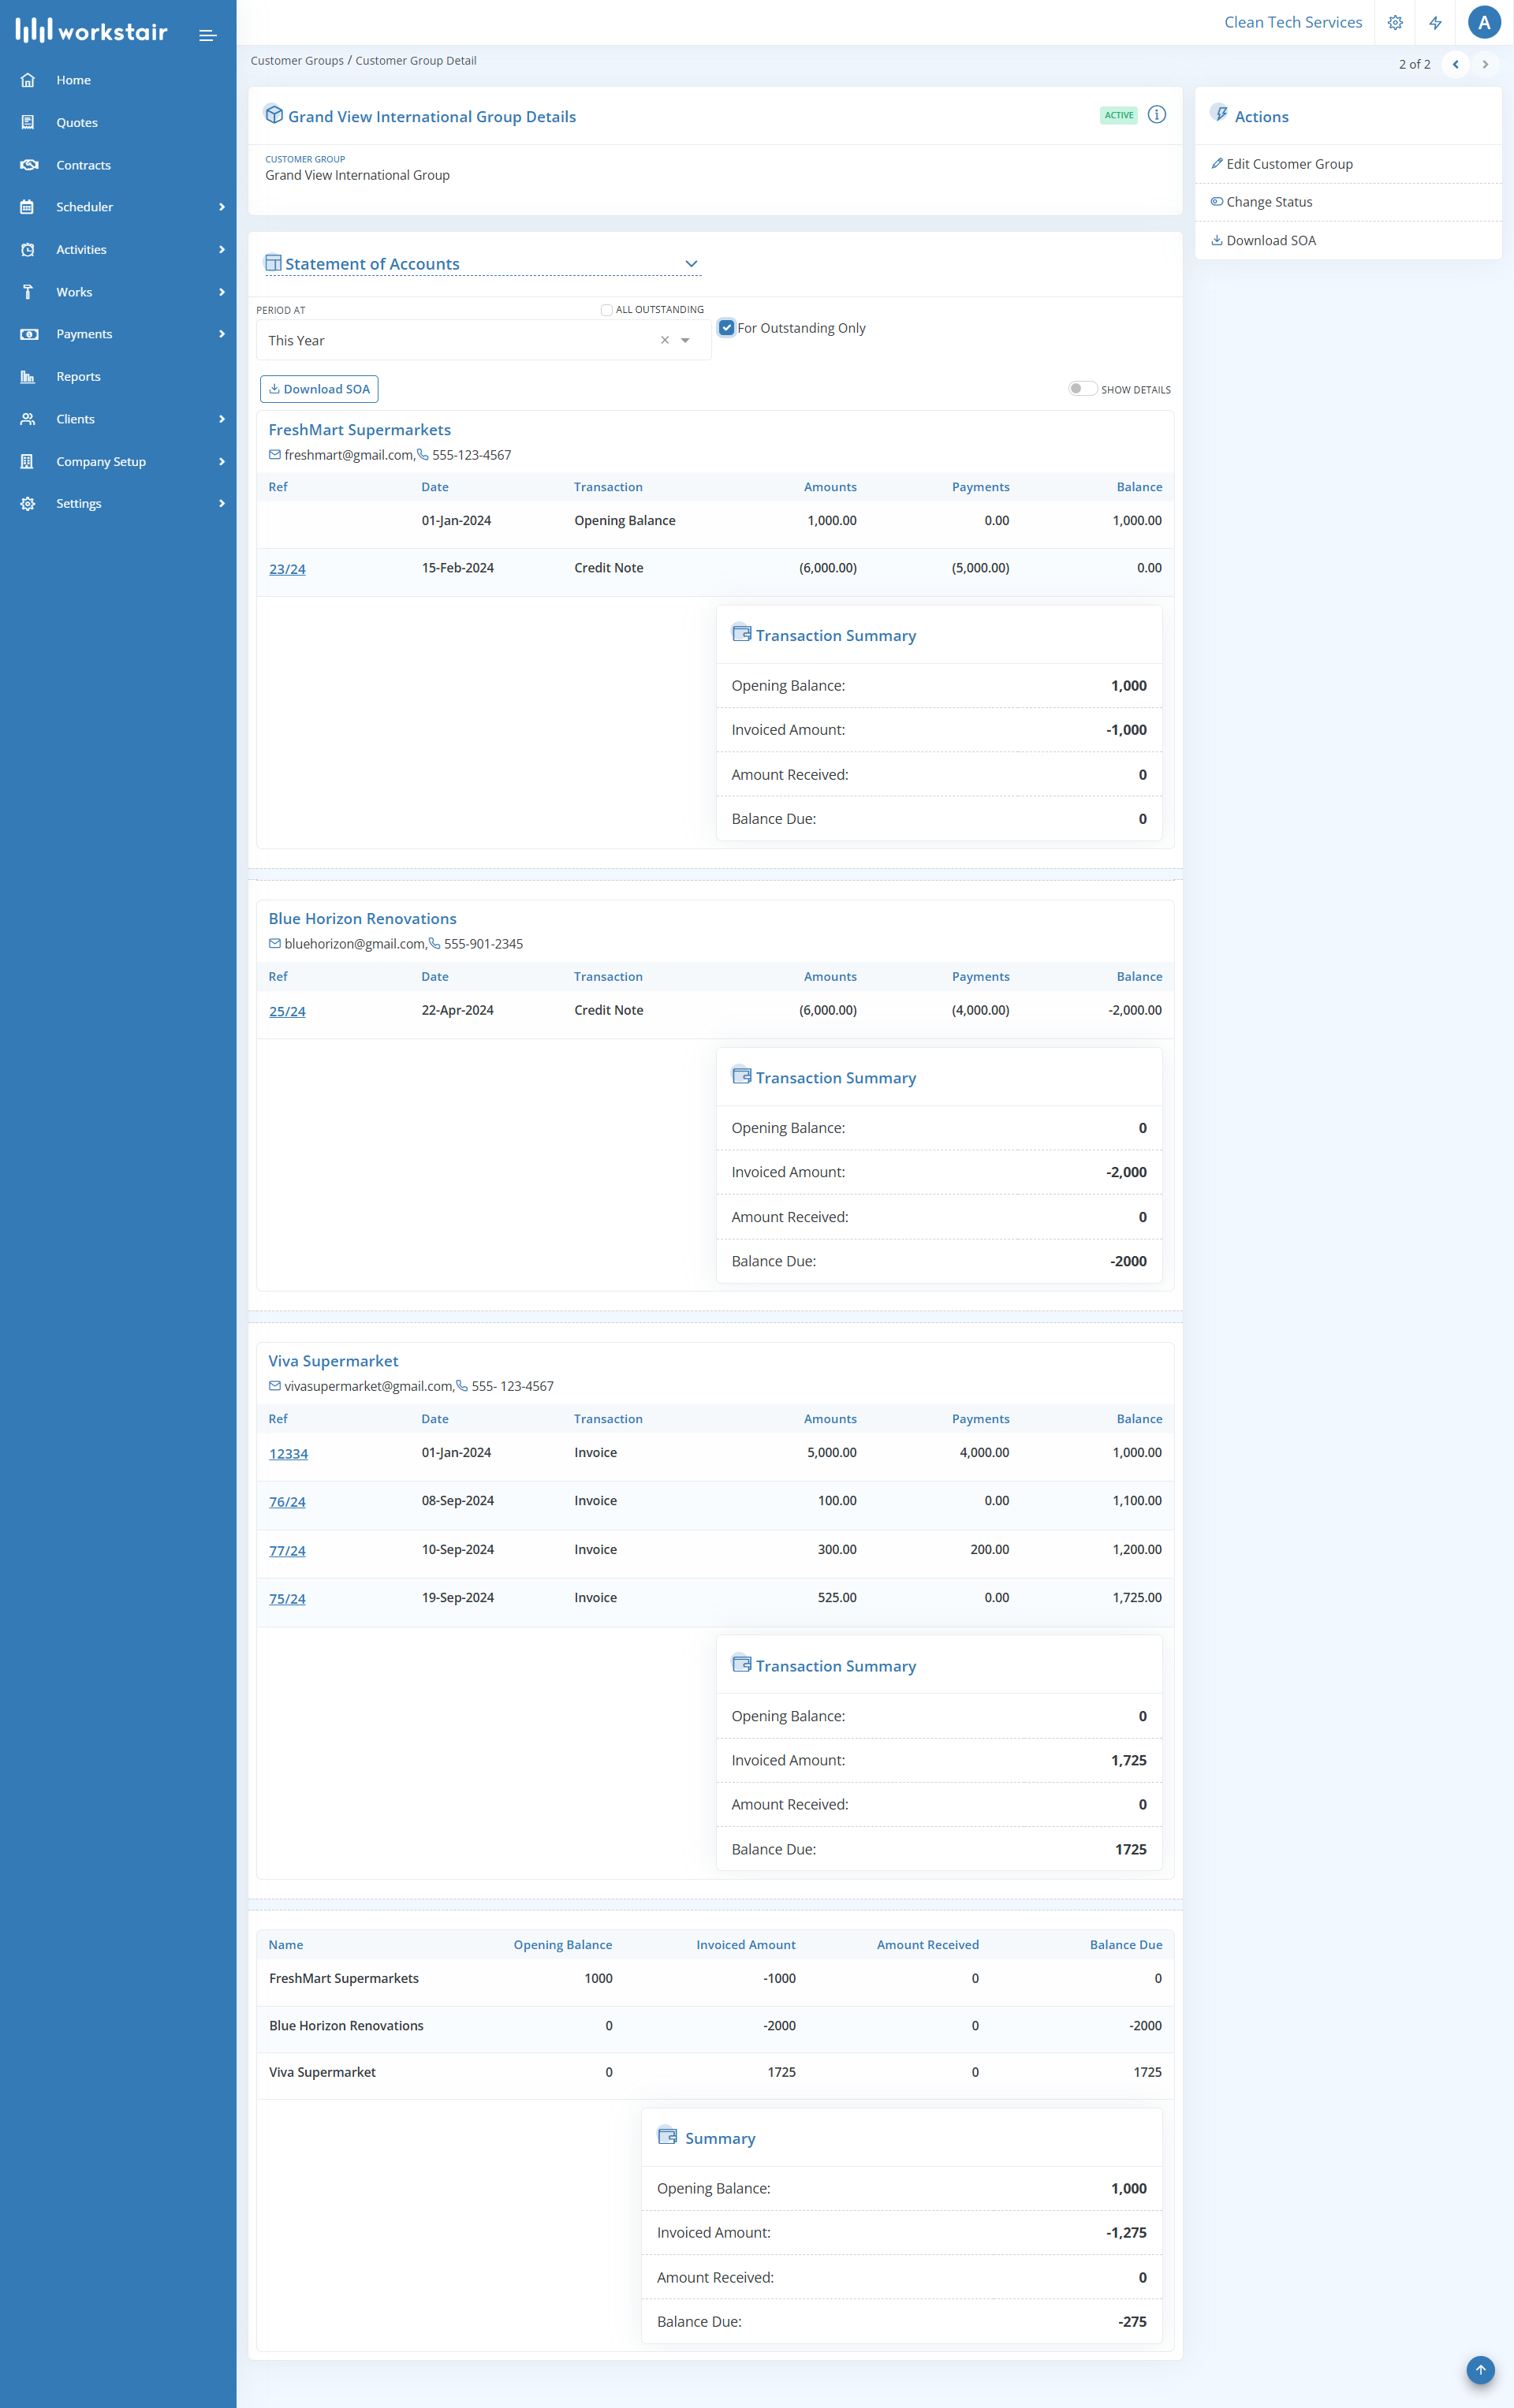
In Workstair, you can generate Statements of Account (SOA) for Customer Groups.
Follow these steps:
- Go to Clients > Customer Groups.
- Select the customer group for which you want to generate the SOA.

In the Customer Group Details page, click Download SOA.

The Group SOA can be viewed on the Details page and includes transactions for all Customers within the Customer Group.
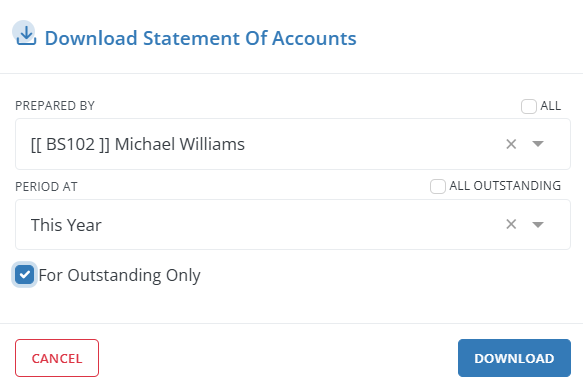
In the dialogue box that appears, configure the following options:
- Prepared By: Select the employee preparing the SOA.
- Period At: Choose the transaction period. For a custom period, select Custom from the dropdown.
- All Outstanding: Enable to view all outstanding transactions as of the current date.
- For Outstanding Only: Enable to view outstanding transactions within a specified period.
The PDF output of a Customer Group SOA will appear as follows:
Credit Notes
Introduction
Credit notes are important in the service industry for managing refunds and adjustments. They allow businesses to give customers credits for returned or canceled services, keeping track of their credit balances and simplifying future transactions.
Creating Credit Notes
You can create a Credit Note in two ways:
- Create New: Start a new credit note from scratch.
- From Invoice: Generate a credit note directly from an existing invoice.
Create New
- Go to Payments in the left sidebar and click on Credit Notes > New
- Or use the Quick Create menu at the top right corner and select Credit Notes.
- Select an existing customer from the dropdown menu or click New to add a new customer.
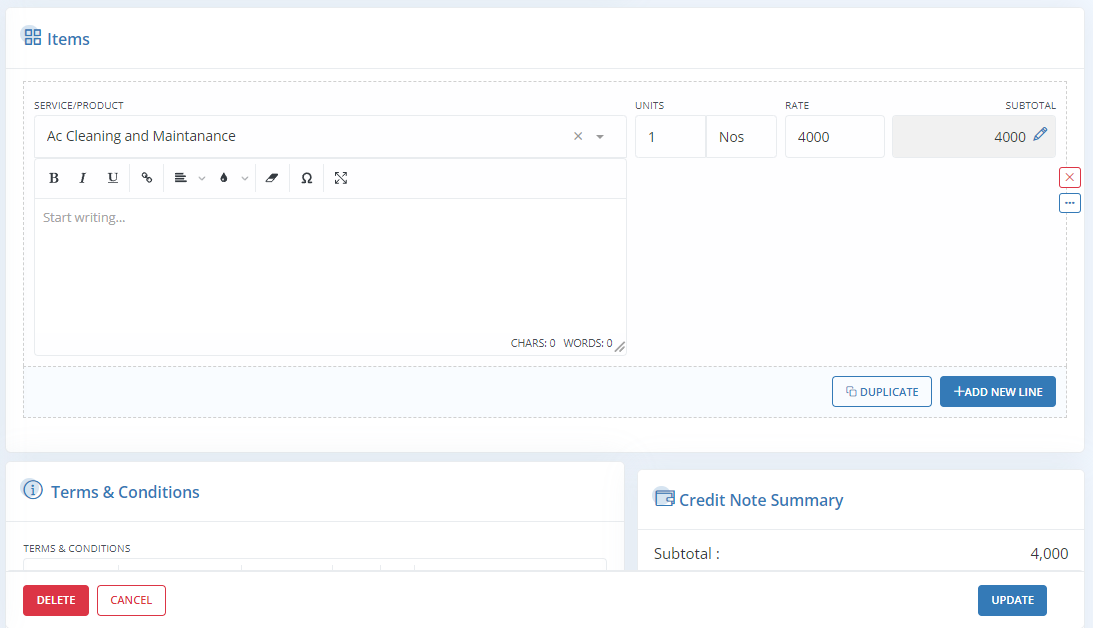
- Choose the invoice(s) from the list to apply the credit note, or skip this step if not needed yet, then click Next.
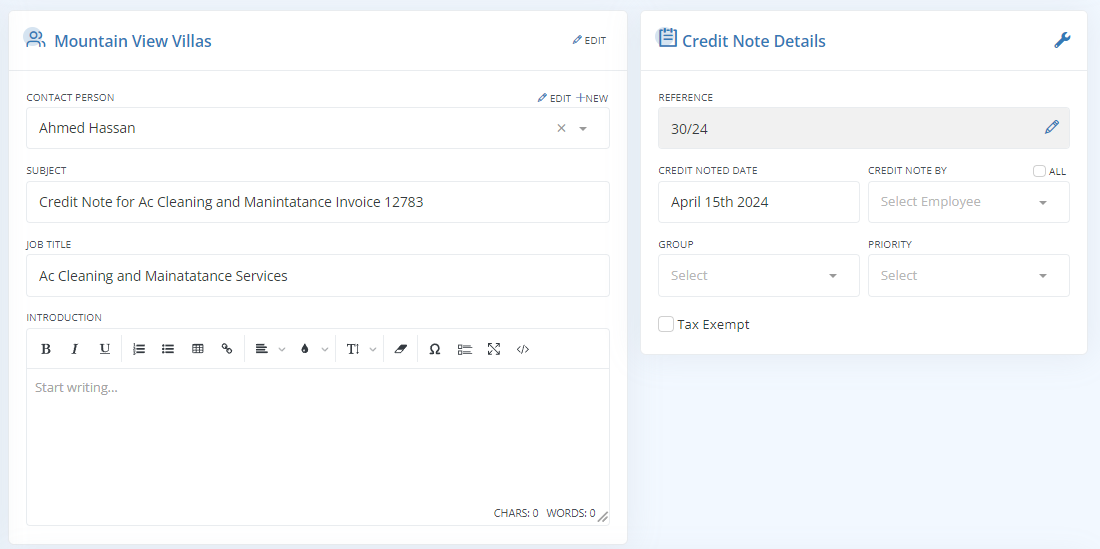
- In the Credit Note Edit Page, add or modify the credit note details.
- Finally, click Save.
From Invoice
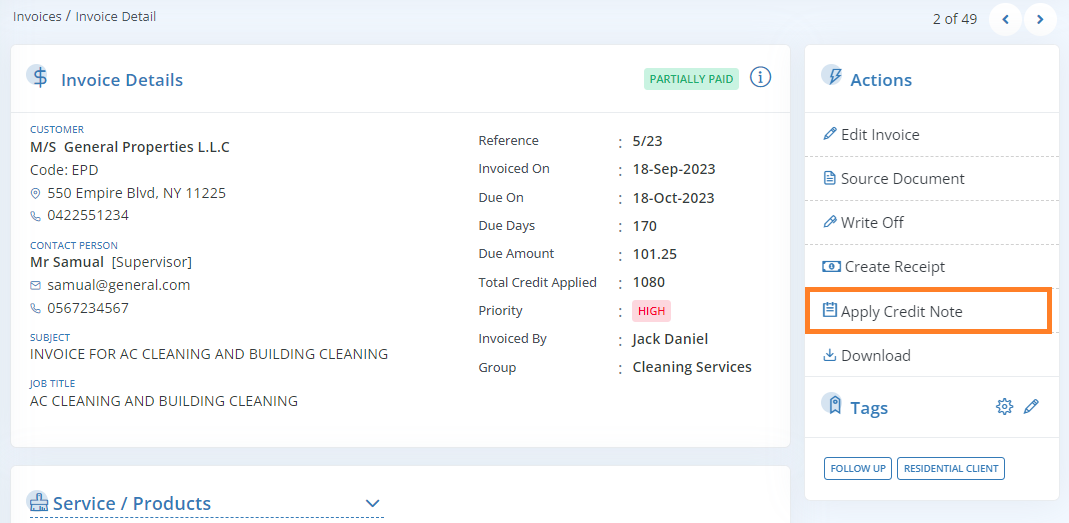
You can create a credit note directly from an invoice by following these steps:
- Go to the Invoice Summary page.
- Click on Apply Credit Note from the Actions menu.
- On the Credit Note Edit Page, add or modify the credit note details.
- Add or modify the Service items and their amounts as needed.
- Click Save to apply the credit note to the invoice.
More Actions for Credit Notes
On the Credit Note Summary page, you’ll find additional options under the Actions menu for performing specific tasks:
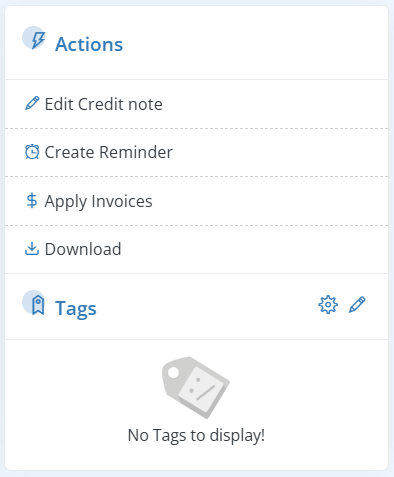
| Edit Credit Note: | Make changes to an existing Credit Note. |
| Create Reminder: | Set calendar reminders related to the Credit Note, such as a reminder for the credit expiry date or follow-up on credit application status. |
| Apply Invoices: | Allocate the Credit Note amount to one or more Invoices. When you click “Apply Invoice,” a window will appear listing all open Invoices, allowing you to distribute the amount among them. |
| Download: | Download the Credit Note in PDF format and can share it with the customer. |

Re-Invoicing
The Re-Invoicing feature allows you to convert credit notes back into invoices. This is useful when an invoice initially converted into a credit note needs to be reissued as an invoice at a later stage.
To Enable Re-Invoicing
- Go to Settings and then select Module Configuration
- Choose General from the dropdown menu
- Enable Re-Invoicing
- Click on Save

Re-Invoicing from Credit Notes
- Select the Credit Note that you want to Re-Invoice
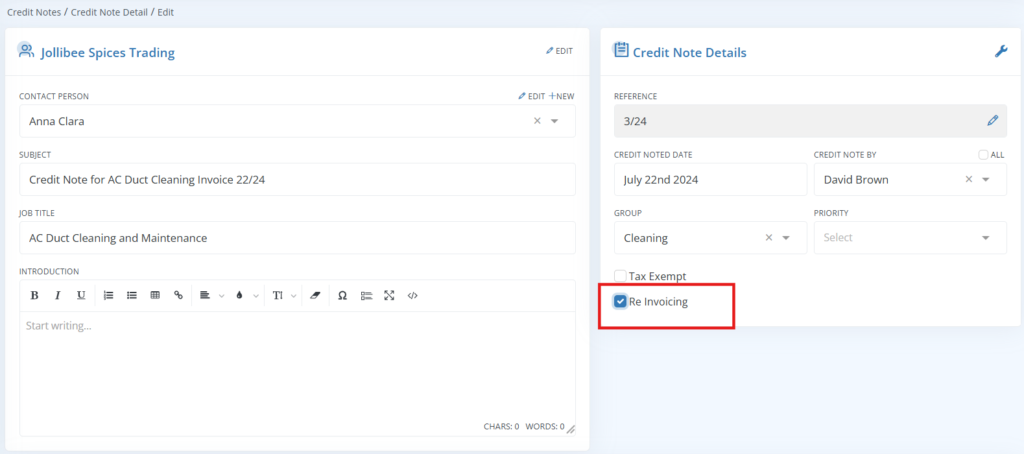
- Go to Credit Note Edit page
- Enable Re-Invoicing checkbox and Save
- In Credit Note Summary page, go to Actions menu and click on Create Re-Invoice
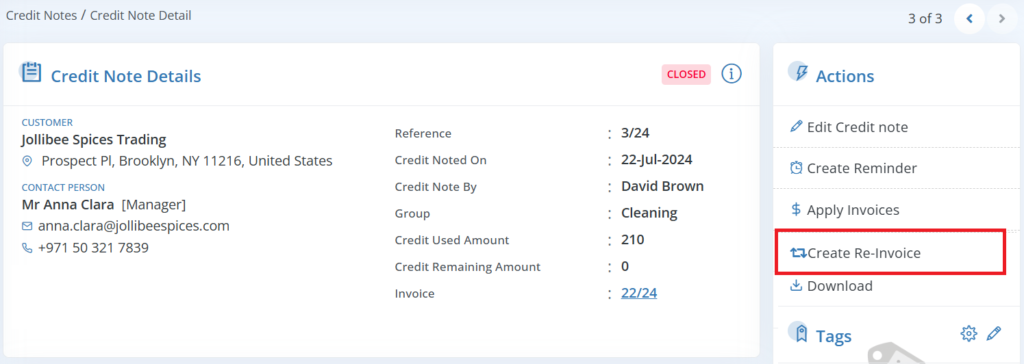
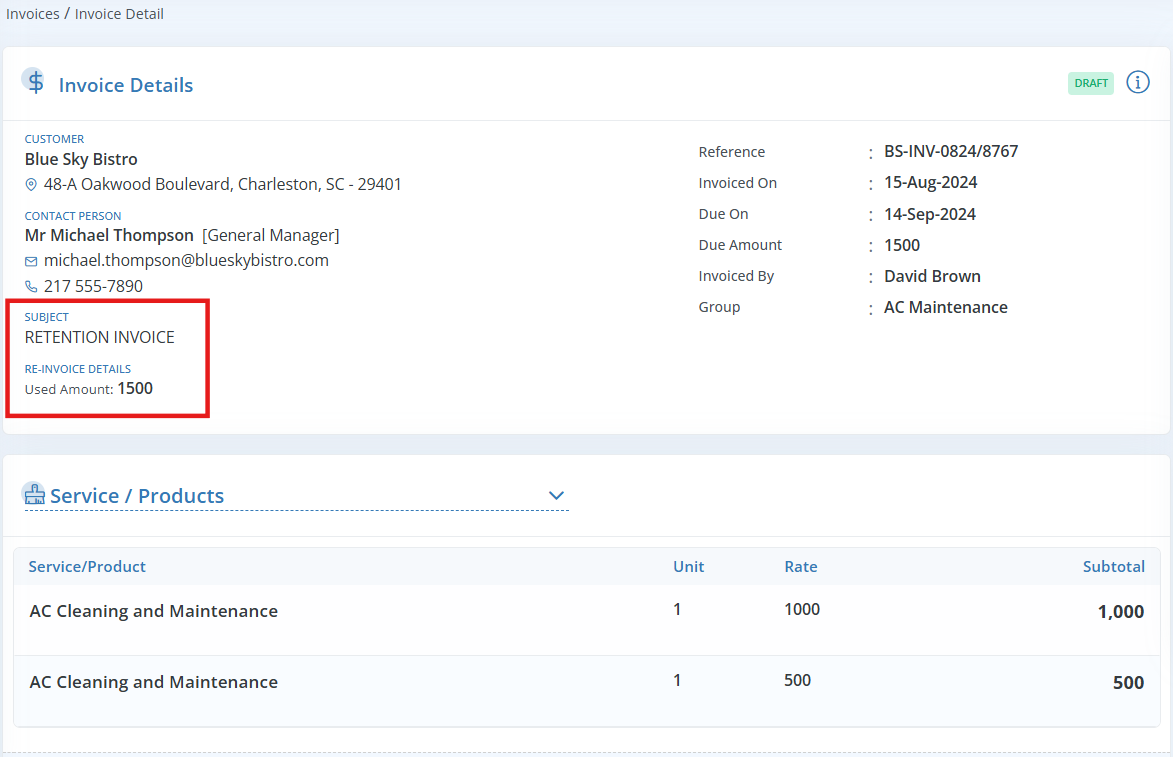
A new invoice will be created, and you can see the Re-Invoice details on the Invoice Summary page:
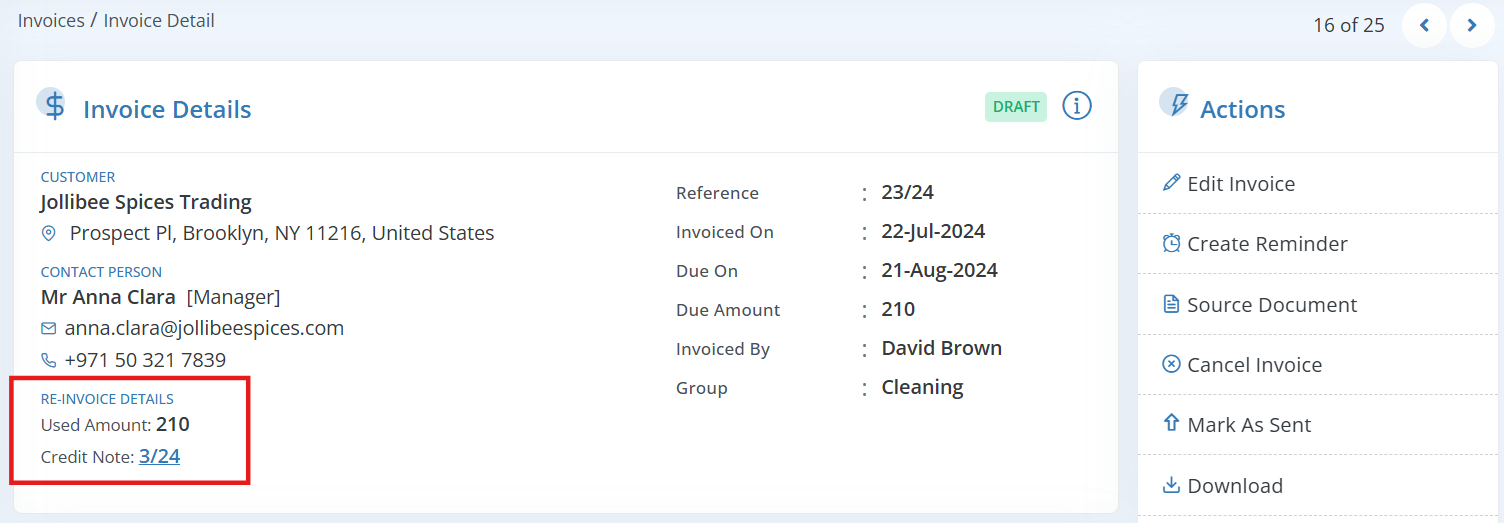
Invoice Retention
Invoice Retention is when a client holds back part of the payment from the customer until they’re sure the work is done well. After the project is finished, the customer can request this money and invoice for these held amounts. This helps cover any issues that might come up after the job is completed.
In Workstair, we use both the Credit Note and Re-Invoicing modules for retention invoicing. For any Invoice with a retention amount, an equivalent Credit Note is created. Once the retention period is over, these Credit Notes are re-invoiced to issue the final Retention Invoice.
Let’s consider an example scenario where we need to issue two Invoices, each for $10,000, with retention amounts of 10% and 5% respectively.
First, we’ll create an Invoice for $10,000, as shown below:
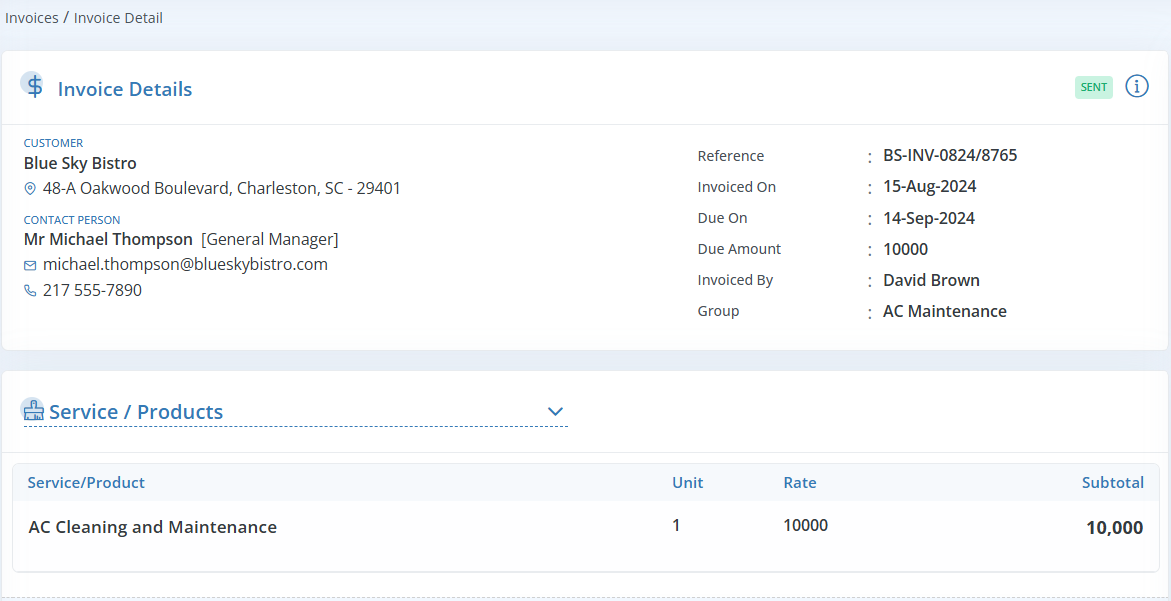
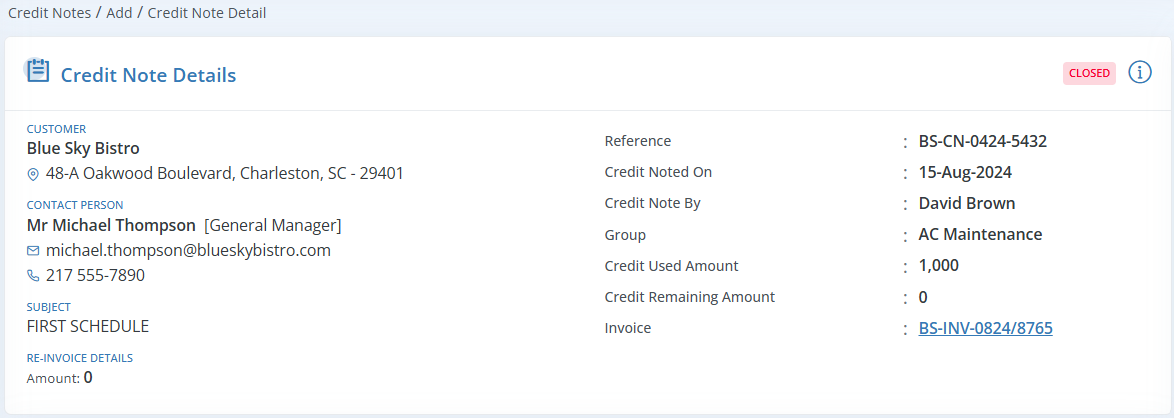
In the first Invoice, the client retains 10% of the payment. So, you can create a Credit Note for $1,000 (which is 10% of $10,000) with the Re-Invoicing checkbox enabled.
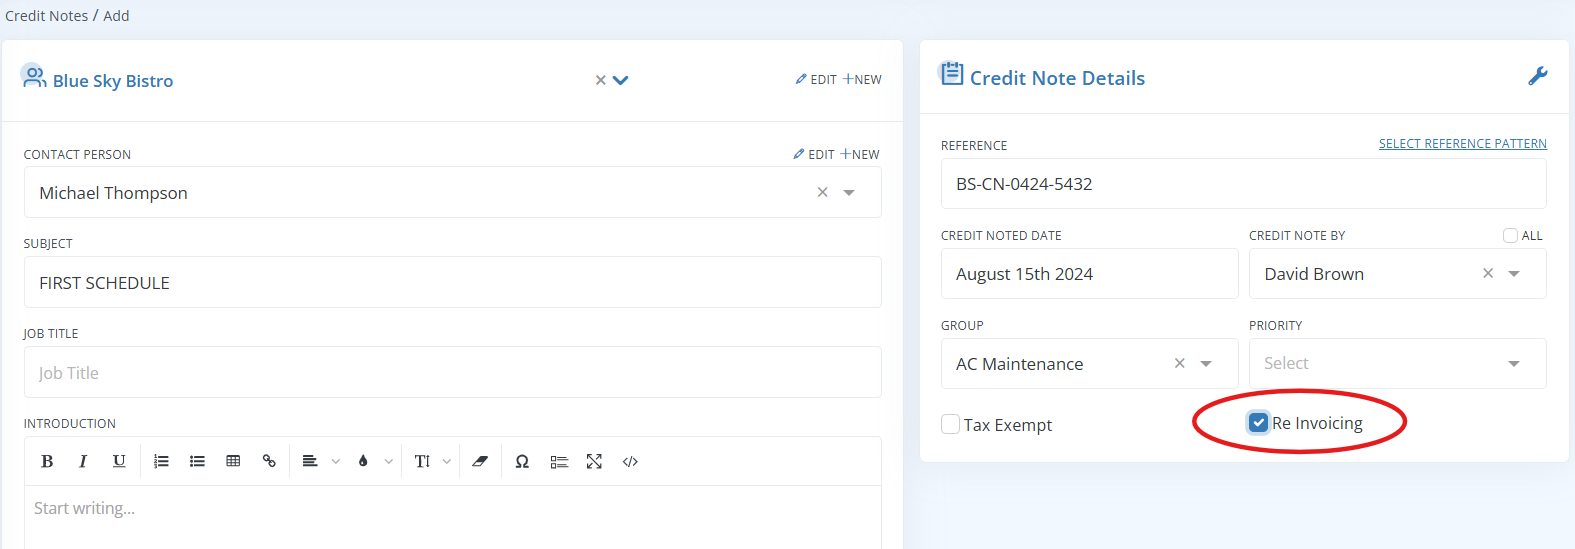
Later, in the second Invoice, the client retains 5% of the payment. Now you can create a second Credit Note for $500 (which is 5% of $10,000), with Re-Invoicing enabled.
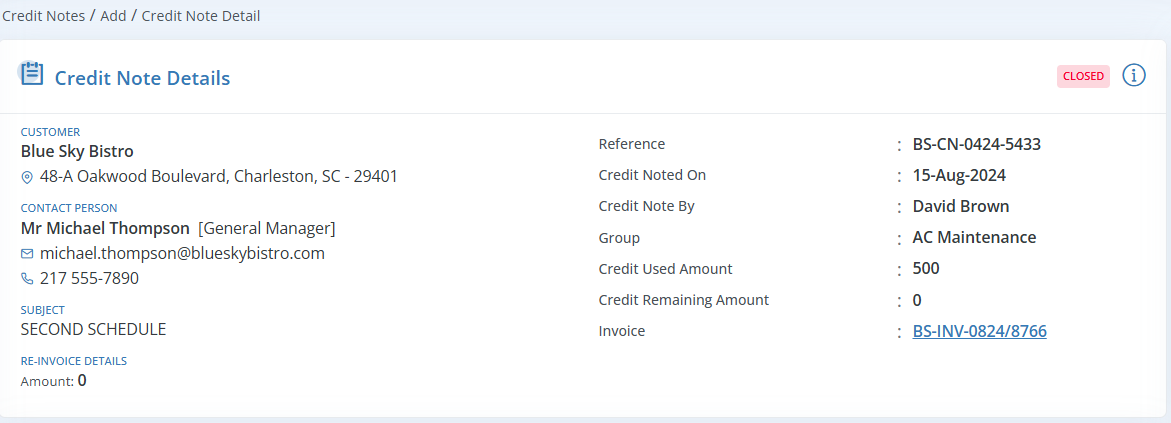
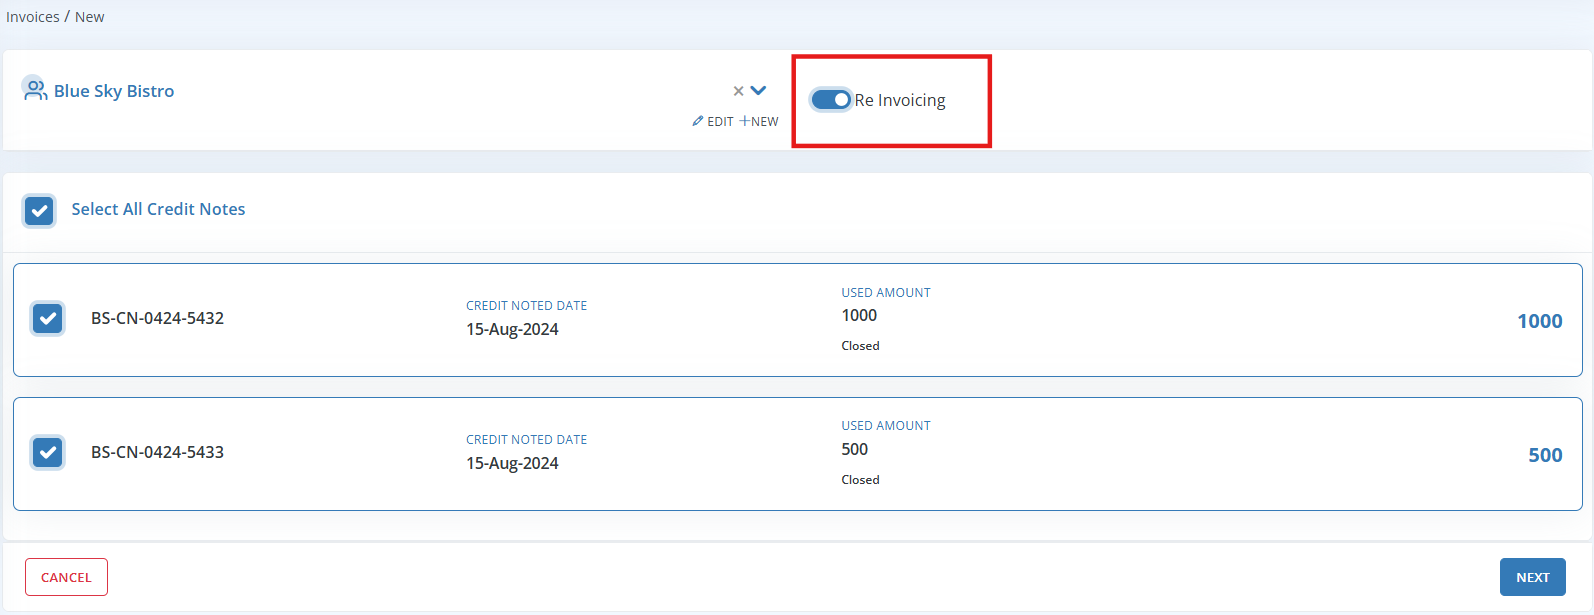
Once all the Invoices are completed, you can request for the retained payments by Re-Invoicing these Credit Notes and convert them into a single Invoice.
When you enable the Re-Invoicing checkbox, all credit notes marked for Re-Invoicing will appear, and you can choose the ones needed for the current Invoice.
