Table Of Contents
Jobs
A Job wraps up all of the important details you need to complete a work or service request from a customer. Jobs consist of schedules that outline each task-related visit to the customer site. These schedules are called Schedules in Workstair and are integral to keeping track of customer visits. There are two types of Jobs: one-off and recurring. One-off Jobs may have one or more schedules, but no repeating schedules. On the other hand, recurring Jobs have schedules that repeat for a specific period of time.
In Workstair, creating a Job is easy. You can easily set the visit frequency interval, and Workstair will generate all the schedule plans for you. Once you have your plan in place, you can convert it to an actual schedule, assign your team, and get the job done.
Creating a Job
Learn how to create a Job:
- Goto Menu > Jobs
- Click the +New button in the top right corner of the page.
- or click Create New > Jobs under the utility button at the top right corner.
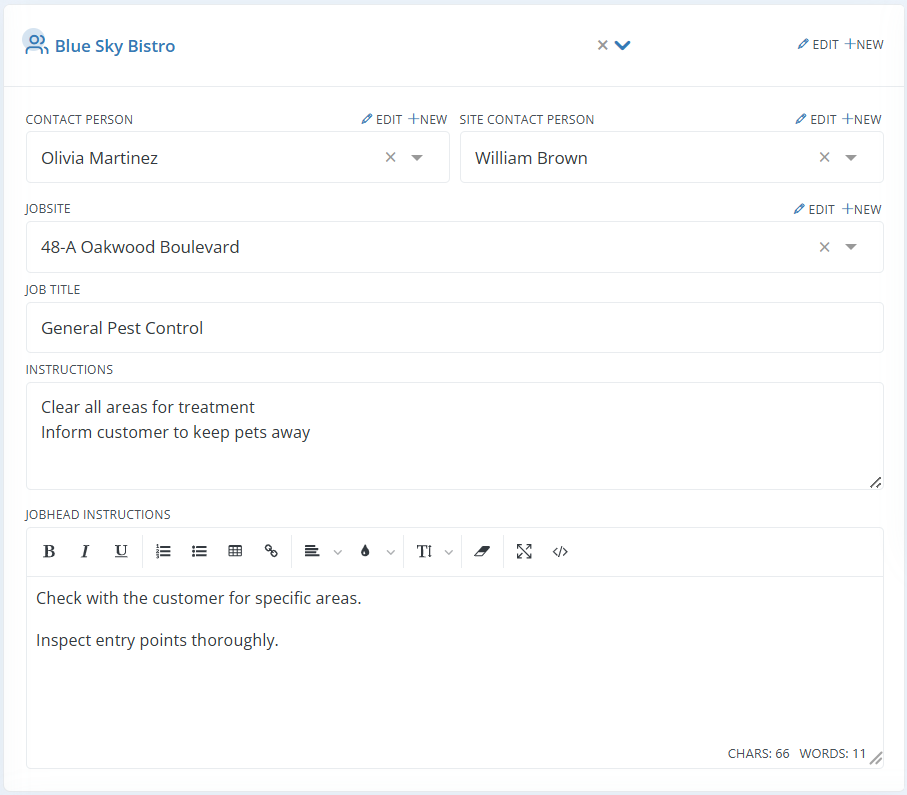
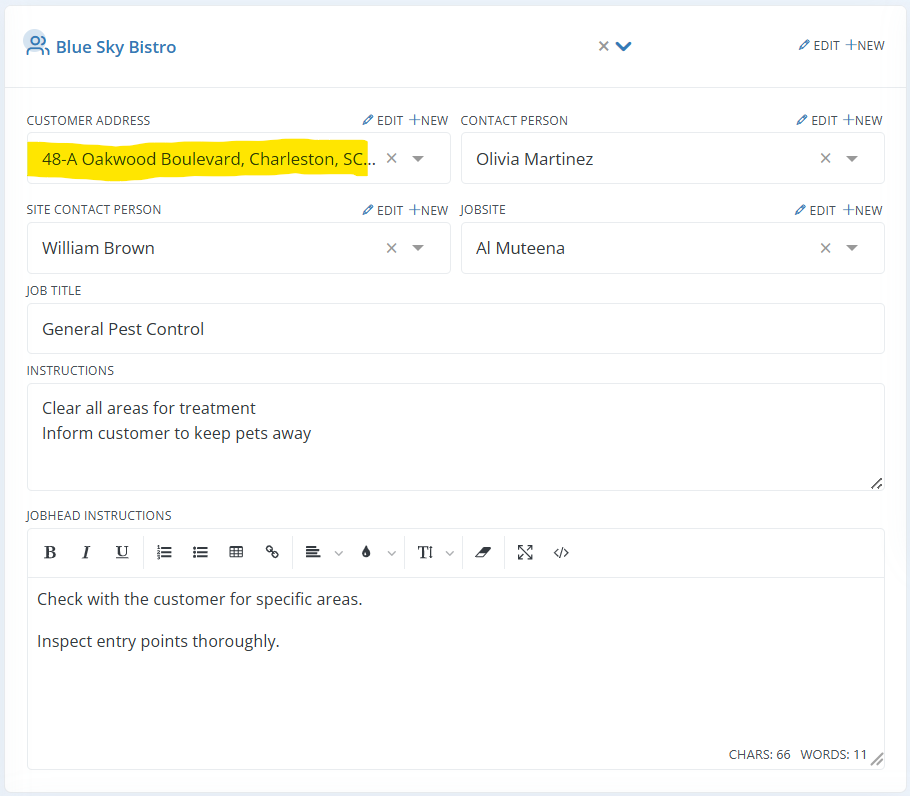
| Customer: | Select your customer from the list or you can add a new Customer by clicking the +New button. |
| Contact person: | Person who represents the customer and with whom you conduct all work-related conversations. You can choose a contact person from the drop-down list or add a new contact by clicking the +New button. A customer may have more than one contact person. Click here to learn how to add more than one contact person. |
| Site Contact Person: | In some circumstances, you might have a different point of contact who will be describing the technical aspects of the work You can choose or add a new site contact person. |
| Jobsite: | Jobsite can be selected from the list. The place where you will actually do the work is called the job site. When you assign work to the job head or field executive, the mobile app will display this job jobsite along with the schedule. |
| Job Title: | A short description related to the service that you are going to deliver can be entered as a job title. |
| Instructions: | It is general job-related instructions that should be followed in order to perform this job. It might be anything, such as getting permission to visit the job site or nothing the customer a few days in advance of scheduling the work. Have a look at the example in the screenshot. |
| Job Head Instructions: | Here, you can add instructions to the job head These instructions will be displayed on the Job Head’s mobile app. Look at the example screenshot where we have given the instruction “Check with the customer for specific areas”. |
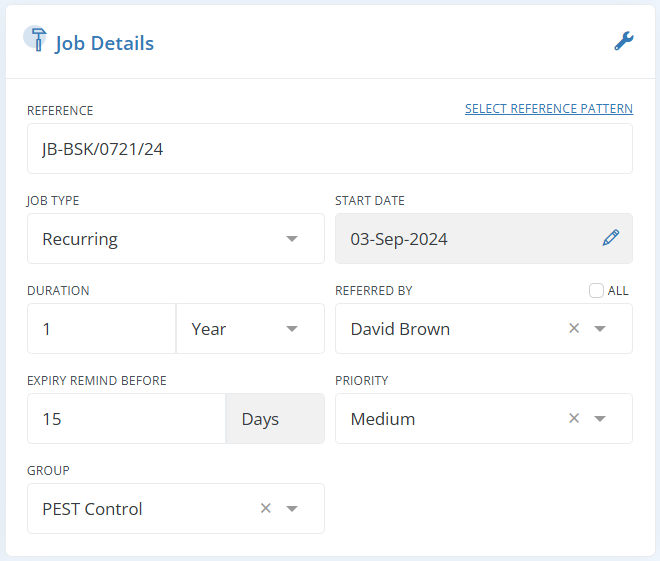
In the Job Details Section enter the following details:
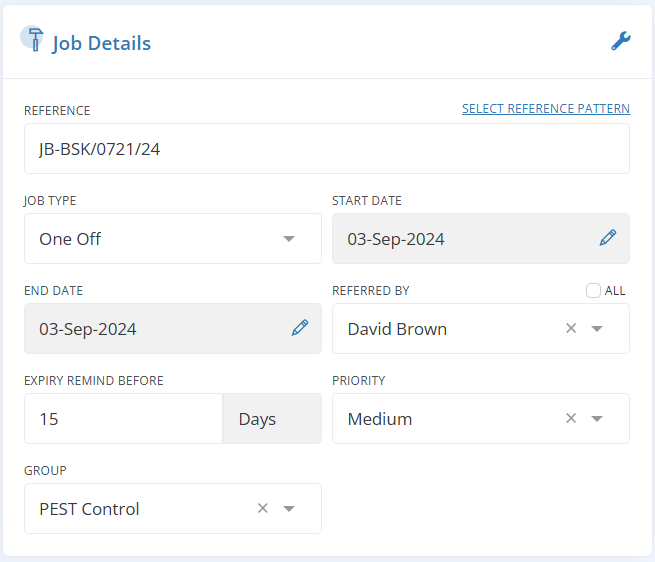
| Reference: | The reference number, often known as the document number, is the unique number used to identify each job. You can create a default job number pattern that will have a sequence number that is increased with each new job. It is possible to edit and manually input this reference number. While clicking on the edit icon, an option Select Reference Pattern will show, which is to select a pattern which is already saved under Settings > Reference Pattern. |
| Job Type: | It is the type of the Job. It might be One-Off, meaning that there will be one or more visits to the client site without a repeating schedule, or it can be Recurring, meaning that there will be many schedules with periodic visits for a particular period of time. |
| Start Date: | It is the start date of the job. If you and the customer have a formal contract, Then the job start date could be the start date of the contract. |
| End Date: | The date on which work completes. |
| Referenced By: | The individual who referred to this job. If your sales agent brought the job to you, include his name here. If your salesperson brings you this service order, you can add his name here in this field. |
| Expiry Remind Before: | It is a reminder that the job is about to expire. You can add in this field, the number of days for the job expiration reminder. Before the specified number of days, the dashboard will display a reminder of the job expiration. |
| Priority: | It is for internal use only to determine how much importance should be given to this job. There are three choices: low, medium, and high. |
| Group: | Choose a category to which this job belongs. The term group Can be applied to any classification inside your company. |
In Schedule Plan, Enter the following details:

| Start-End Time: | Specifies the start and end times for each Job Schedules. If exact time period is not specified, enable the “Anytime” checkbox. The schedule will then appear as an anytime schedule in the mobile app. |
| Day Part: | It is the day part of the job. There are four options: Day, Night, Evening and Morning. |
| Schedule Frequency: | Set the interval between Schedules, such as daily, weekly, monthly, yearly, or any custom frequency. You can also define your own frequency, such as every 20 days, every 2 weeks, the 15th of every month, the 2nd Monday of every month, and so on. |
| Remind Before: | This is a Schedule Reminder. You will get a dashboard reminder of each schedule before the specified number of days. |
| Convert First Plan to Schedule: | Select this option to automatically convert the first Schedule Plan into a Schedule when creating a Job. This is useful for one-off jobs with a confirmed schedule, or recurring jobs where the first schedule is confirmed. Click here to learn the difference between a Schedule and a Schedule Plan. |
In the line items section, you can enter the following details:
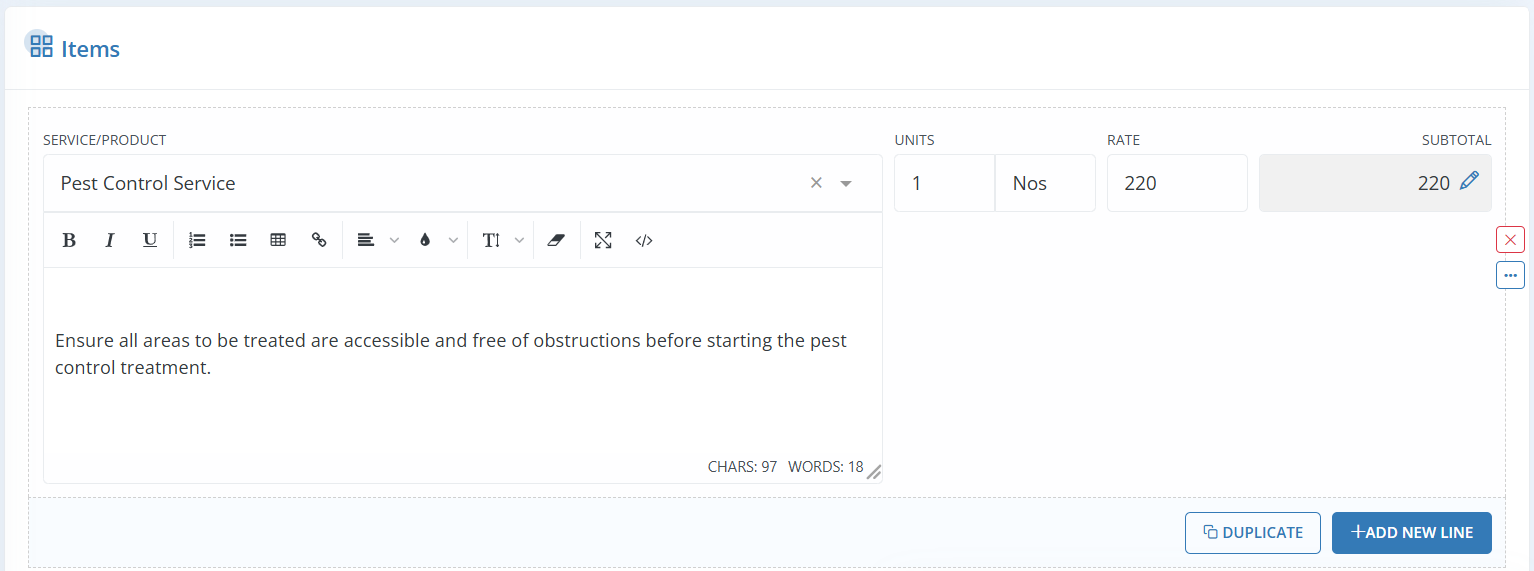
| Service/Product: | Choose the service or product from the drop-down list. You can add service items from a separate menu in the company setup; you cannot do so right here. Click here to know how to add new service/product. |
| Service Description: | Add your description about the service. It might be anything, such as details about the service, how it is used and supplied, and what all things clients will receive. |
| Units: | Add the unit of the service. |
| Unit Measurement: | Add the measuring unit, if needed. It depends on the service you offer. It could be Hours, Square feet, Square Meter, and so forth. |
| Rate: | It is the price per unit. |
| Subtotal: | It is the unit price multiplied by the total unit. This field is also editable, and when you make changes, the unit rate is updated based on the total units. |
| Duplicate: | Clicking the duplicate button will add the same service item with the same quantity and price to the job. |
| Add New Line: | Click this button to add a new service line item to the Job. |
In the bottom section, you can enter the following details:

| Remarks: | You can add any remarks on your job. |
| Cancel: | Click Cancel to return to the previous screen. |
| Reset: | Click Reset to undo all changes made to the job. |
| Save: | Click Save to save the Job and it will be in draft status. |
Recurring Job
Consider the following scenario:
You are creating a one-year job with Four schedules that repeat in every 3 months.
In the Job Details section:
- Select Job Type as Recurring.
- Set the Duration by adjusting the number field and choosing the time span as Year, Month, Week, or Day.
Create a Job from Service item
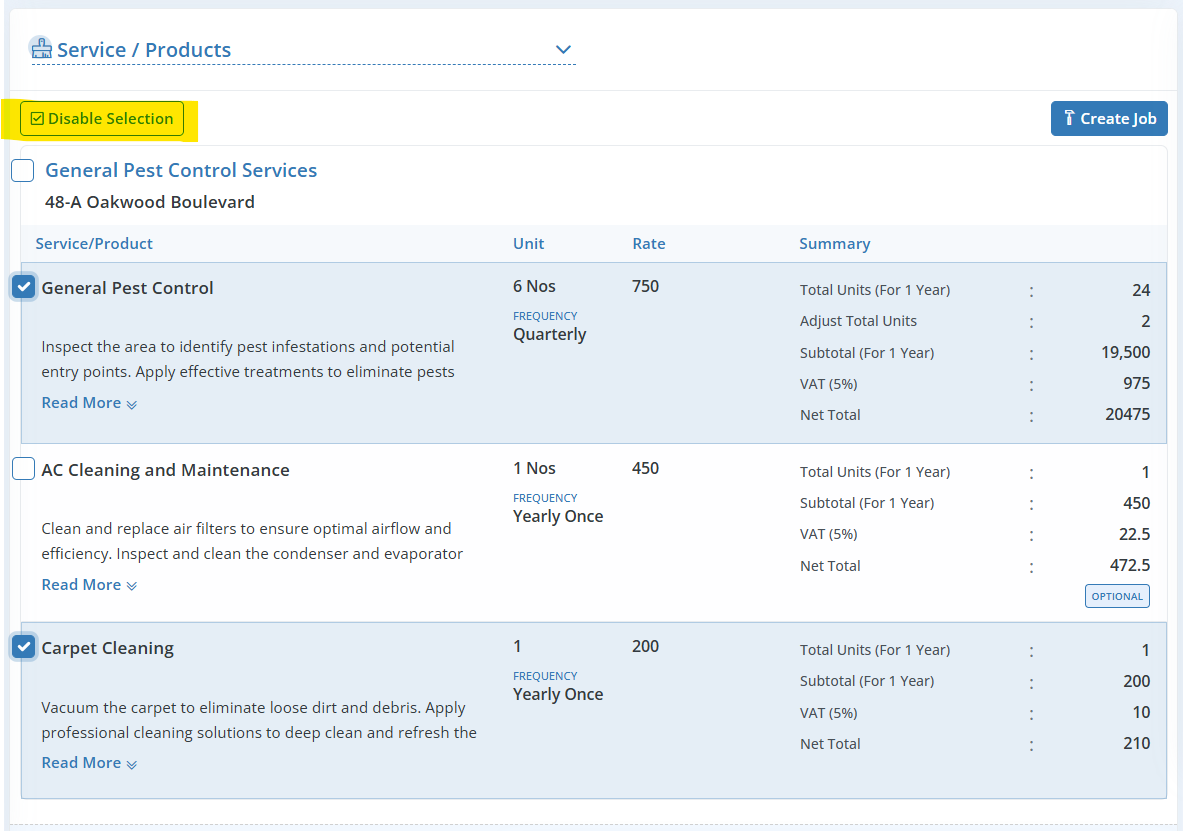
Workstair allows job creation directly from Service or Product items within Quotes or Contracts.
- Go to Service/Products section on the Quote or Contract Details page
- Click Enable Selection to choose the Services for which a Job is to be created
- Once the services are selected, click Create Job
- Then you’ll be redirected to the Job Edit page.
- Enter the relevant job details, plan the schedules and click Save
Additional Job configurations
The additional configuration button is found in the top right corner of the Job editing page.
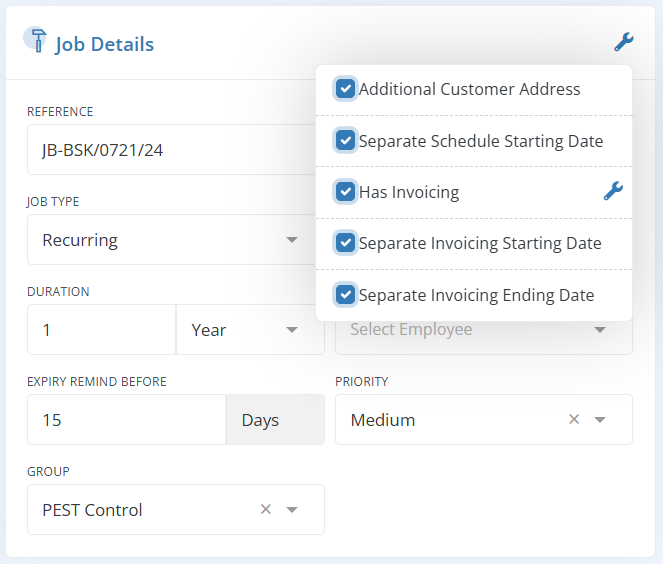
Additional Customer Address
In addition to the customers default address, you can add additional addresses. this address will be used when creating an invoice for this job.
Separate Schedule Starting Date
If you need to specify a separate start date for schedules, you can enable this; otherwise, the job start date will be the schedule start date.

Has Invoicing
Enable Has Invoicing if you want to generate invoices from the job itself.

| Billing Frequency: | Select the billing frequency here. Invoice reminders will be generated based on the frequency you set. The default selection will be not necessary. Choose one from the list: Daily, Weekly, Monthly, Yearly |
| Billing Method: | Choose between Schedule-Based Billing or Fixed-Price Billing |
Separate Invoicing Starting and Ending Date
| Separate Invoicing Starting Date: | If you need to specify a separate start date for invoice reminders, you can enable this; otherwise, the job start date will be the invoice reminder start date. |
| Separate Invoicing Ending Date: | If you need to specify a separate end date for invoice reminders, you can enable this; otherwise, the job end date will be the invoice reminder end date. |

Invoice Reminders
Workstair allows you to setup Invoice Reminders from Jobs, if the job Has Invoicing.
- Select the Billing Frequency from the dropdown.
- It can be of Yearly, Monthly, Weekly, Daily or Custom frequencies
- To setup Custom frequency, choose an interval from the drop-down menu: Day, Week, Month or Year
- Choose the Billing Method, which can be of Schedule based billing or Fixed price billing

For example, if you need the Billing Frequency to be the Last Day of Every Month: Choose Frequency as Month, Every as 1 Month, Select Type as Day of Month and choose the Last Day.


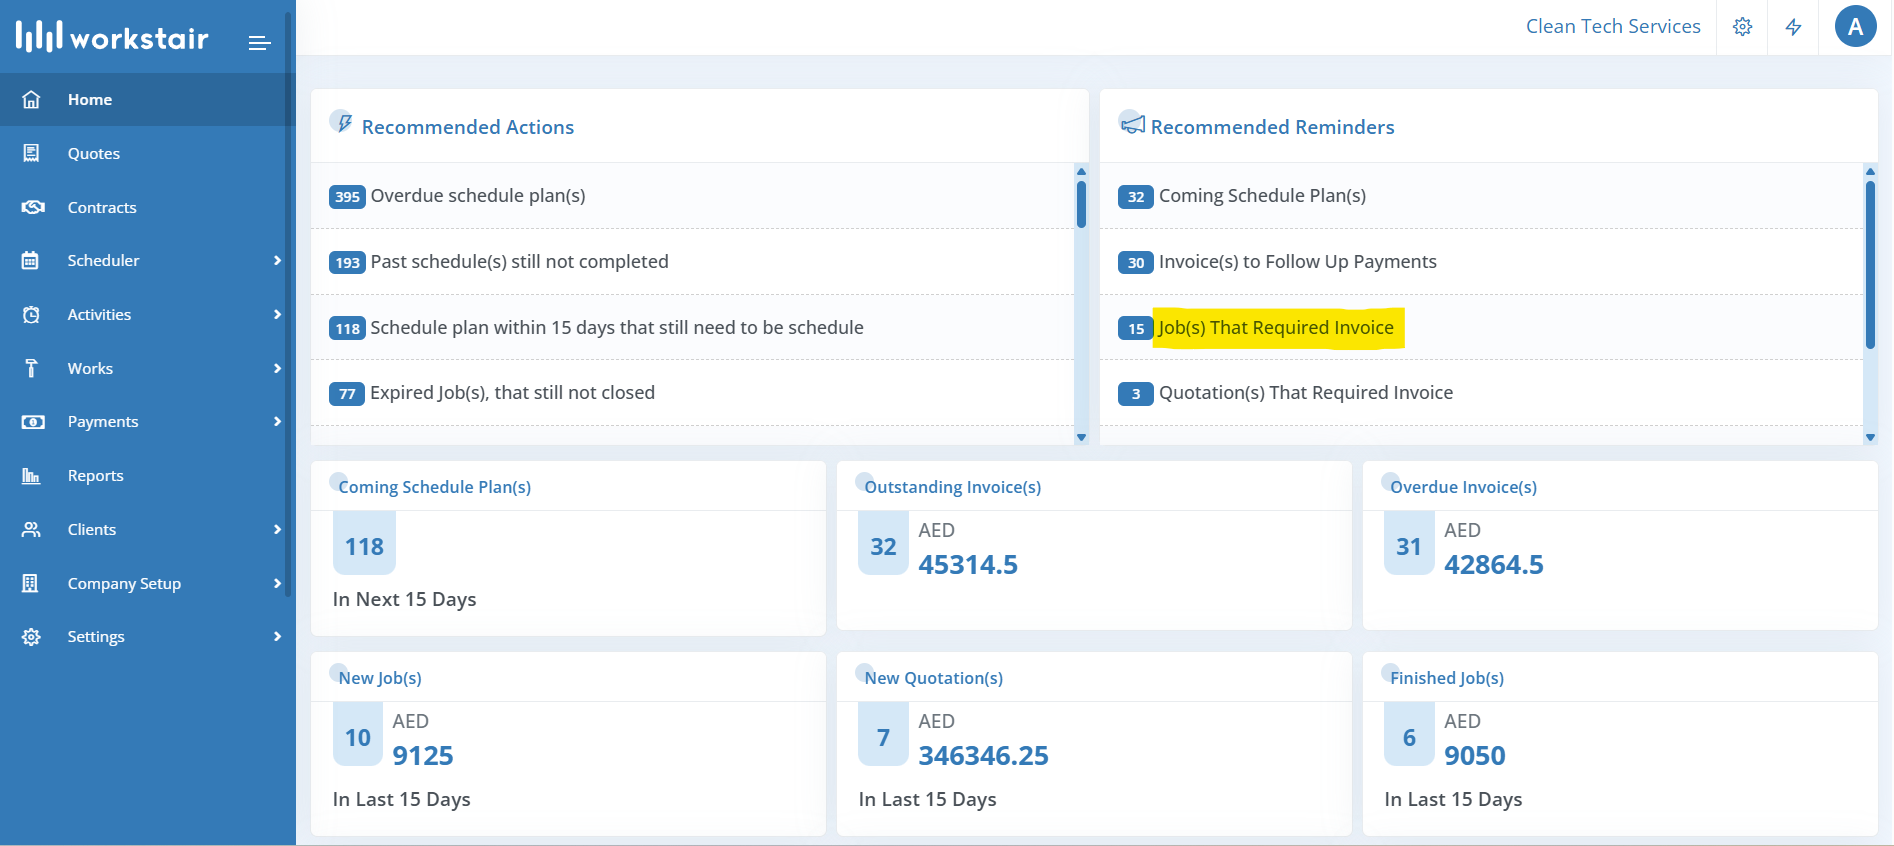
These reminders will then be appearing in the Dashboard accordingly. Clicking on a reminder will take you to the relevant Workstair page.
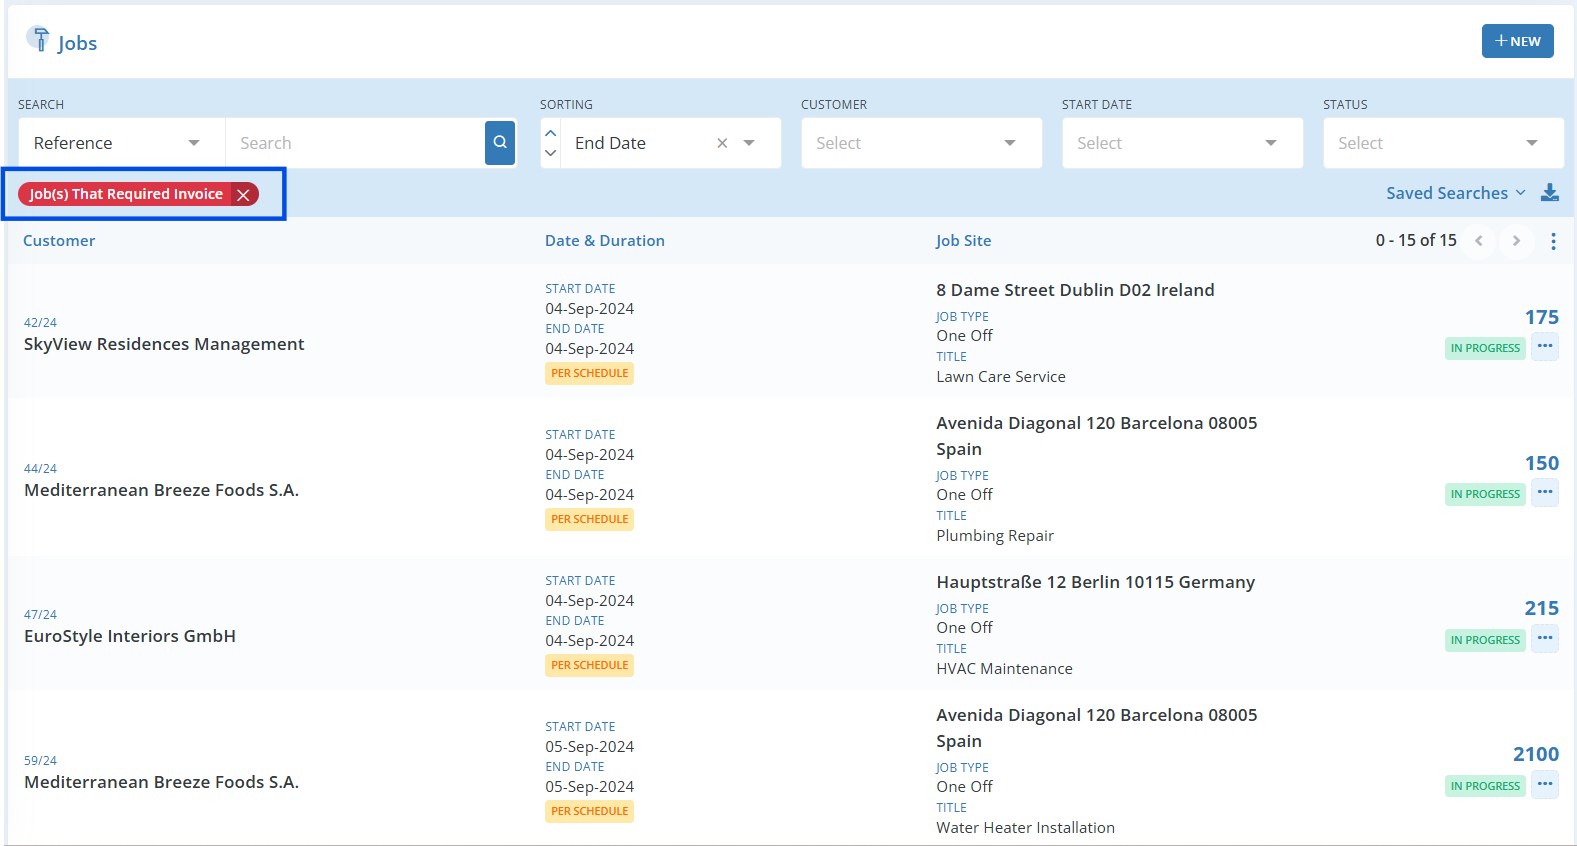
For example, Job that required Invoice will take you to those jobs which is yet to be invoiced.
More options in line item
On the service line-item area, go to the far-right corner for additional options button, then click to view the options as shown below.

| Duplicate: | Click Duplicate to add an identical service item to the job. (Use this option when you want to add a similar service item with a few minor changes.) | |
| Insert Item Above: | Adds a new service line item, above the current line. It is used to bring a service item above the existing item in the linear order. | |
| Set Item Name: | Adds an alternate name for the service line item. If an alternative name is specified, the actual service item name will be replaced with the given name. | |
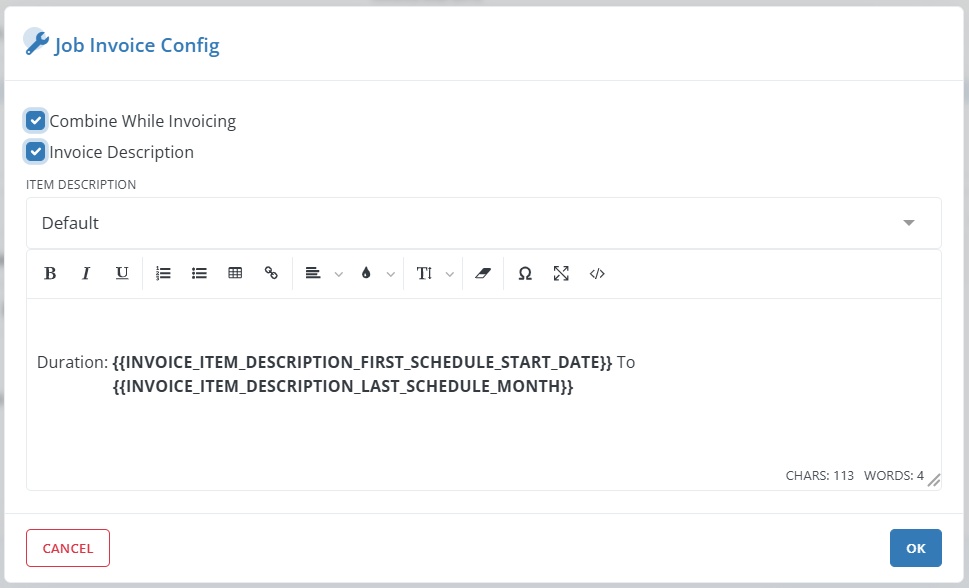
| Invoice Configuration: | When you click on “Invoice Configuration,” a popup window will appear with two checkbox options: “Combine While Invoicing” and “Invoice Description.” |
To combine similar Services within a Job to a single Invoice, enable Combine While Invoice.
To enter the Invoice item description, enable the Invoice Description.
More Actions
You can perform certain actions once a job is created. Some of them are:
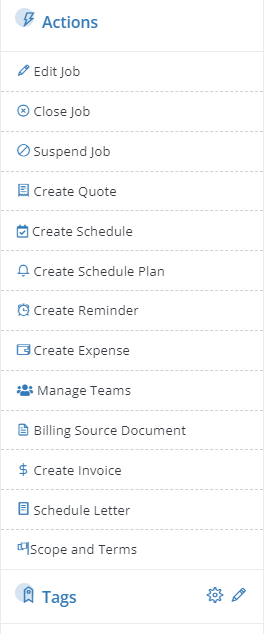
| Edit Job: | You can make changes on an already saved job. Editing a job Fields such as Job Type, Duration, Schedule start date, schedule frequency and Billing Frequency will display a warning popup with the text “Editing this schedule will clear all schedule plans from this job and new schedule plans will be created using the updated information. Editing this schedule will clear all invoice reminders from this job and new invoice reminders will be created using the updated information. Schedules that are out of range exists for this job” and a I Agree Checkbox. Checking the checkbox will enable the Update Button. |
| Close Job: | You can close the Job once it is completed. All schedule plans will be deleted, and schedules will be cancelled when a job is closed |
| Suspend a Job: | A job is kept idle for some period of time for some reason. All schedule plans and schedules will be kept as it is when you suspend a job. You can open a job when it is needed. |
| Create Quote For Job: | You can easily create a quote from a job. All the information you entered in the job will be automatically transferred to the quote editing page. |
| Create a schedule: | you can use this option to add additional schedules to a Job. Some scenarios you may have to add additional schedules to an existing job. For example, you may have to add a follow up service to a job then you can simply add a new schedule with follow up service. |
| Create a schedule plan: | More schedule plans can be added to a job. |
| Invoice against: | You can save details of a reference document in a job and these details will be shown in an invoice when it is generated. For example, if you want to generate an invoice against an LPO, you can add this LPO details in the job and later when you create the invoice this LPO details will be shown. |
| Create Invoice: | You can create invoices against schedules in a job using this option. |
| Reopen Job: | Jobs having status Completed will have this option in Actions pane to Reopen the job. |
| Resume Job: | Jobs having status Suspended will have this option in Actions pane to Resume the suspended work. |
| Tags: | You can add one or more tags on a job. |
| Manage Team: | You can add a team to a job immediately after creating it. If you assign a team to a job, it will be automatically copied to each schedule when you convert or create a schedule from that job. |
Terminating a Job
If a customer wishes to stop a Job without completing it, Workstair provides the option to terminate it.
- Navigate to the Job you want to terminate.
- From the Actions pane, click Close Job.
- A popup will appear asking, “Do you want to Close this Job?” Click Yes to proceed.
- A second popup will ask for confirmation to delete all Schedule Plans and any incomplete Schedules.
- Click Confirm.
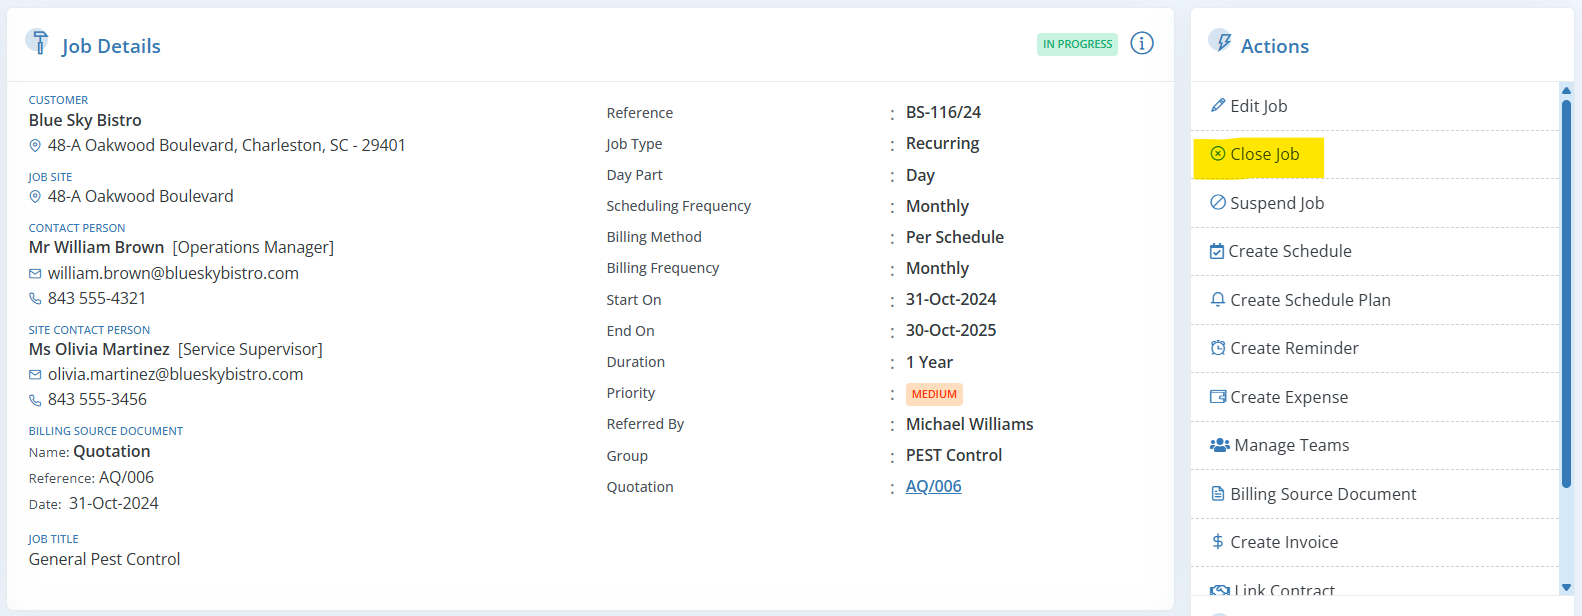
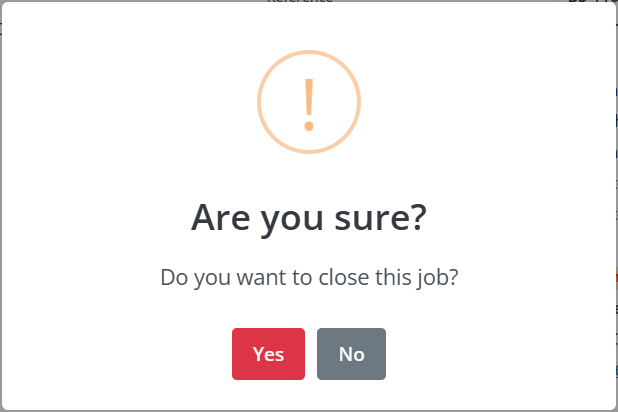
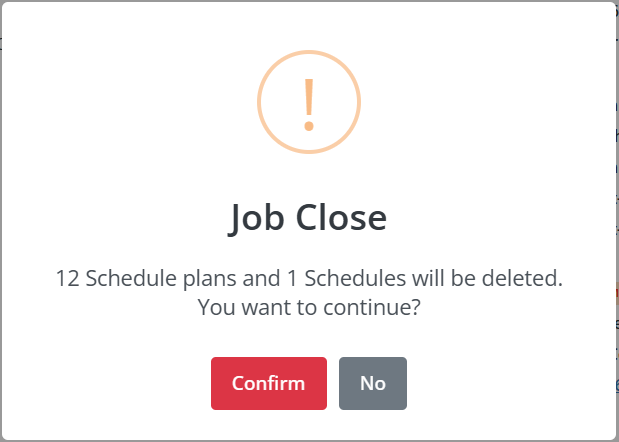
Once you click Confirm, the Job status will change to Closed and all corresponding Schedule Plans and incomplete Schedules will be automatically deleted.
Scope and Terms in Jobs
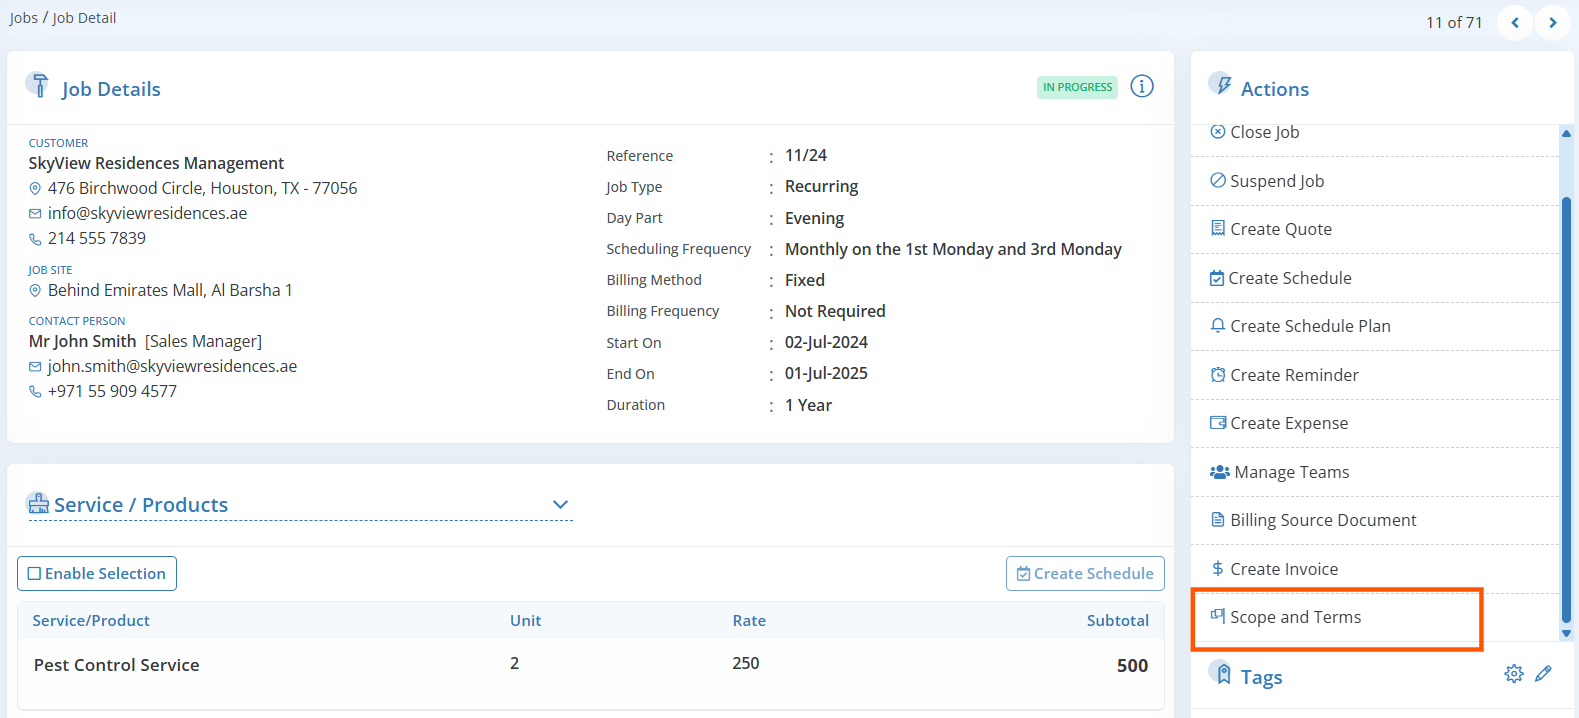
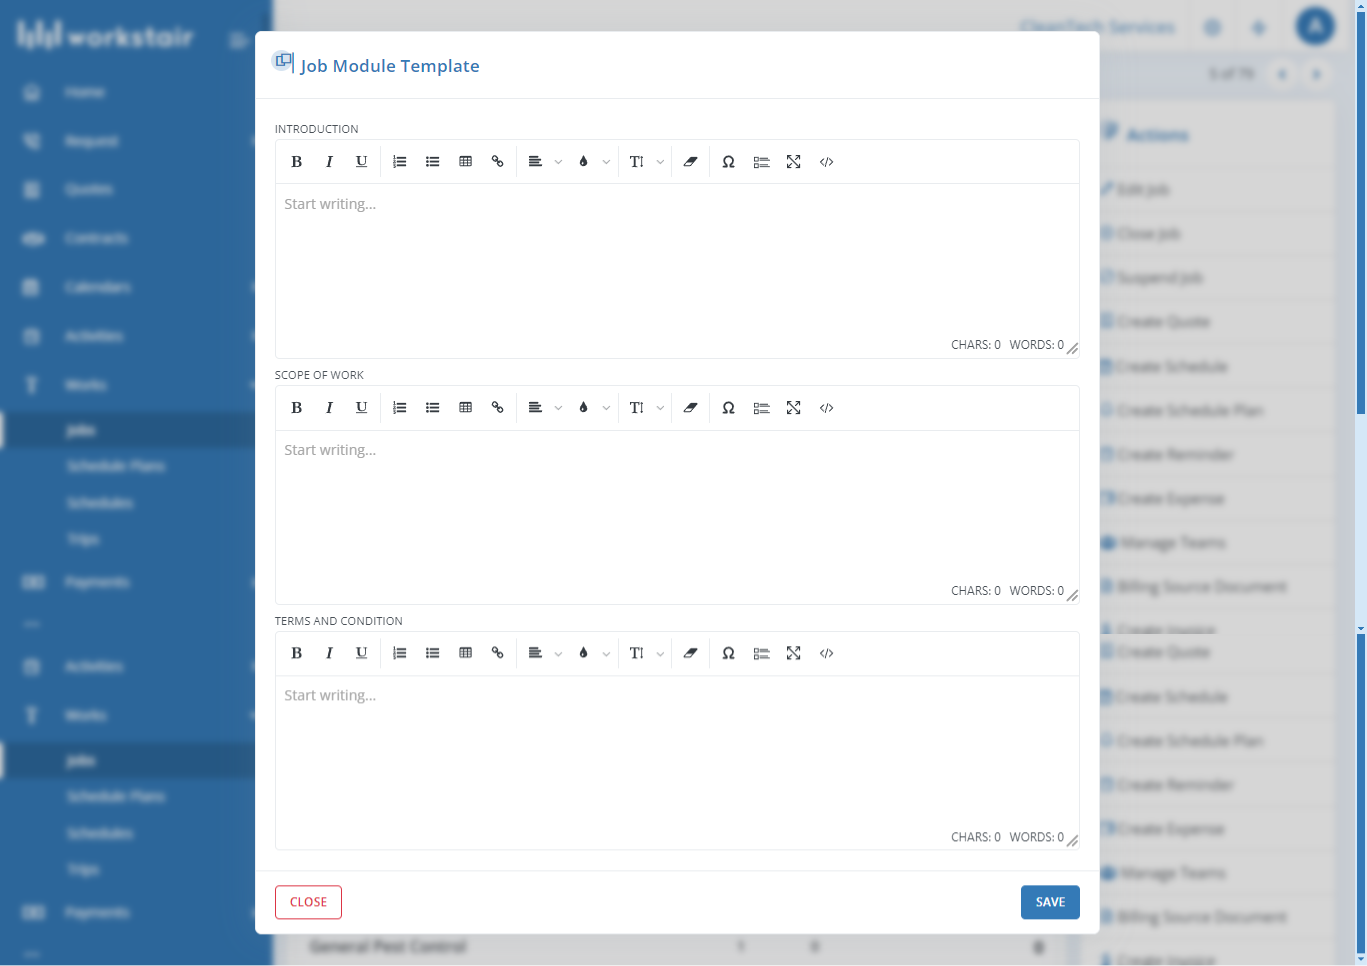
In service industries, there are often details associated with jobs. You can add these details directly to the job, including Introduction, Scope of Work, and Terms and Conditions. This provides a comprehensive view of job specifications, ensuring clarity and alignment between stakeholders.
Here are the steps to add it:
- Navigate to the Job summary page.
- Click on Scope and Terms in the Actions Menu.
- In the popup form, input the Introduction, Scope of Work, and Terms and Conditions.
- Click Save.
Schedule Letter
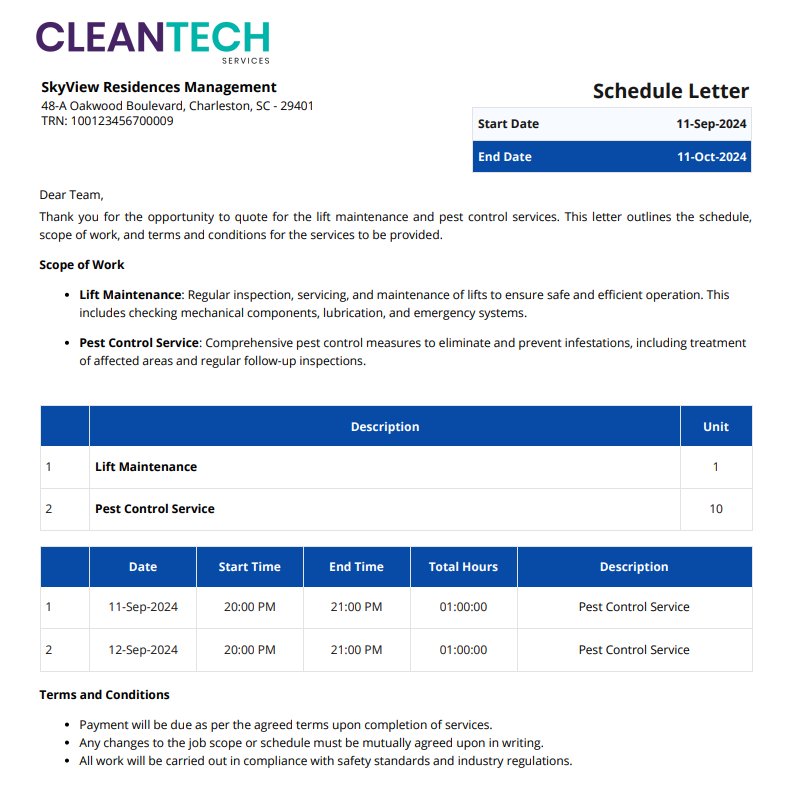
You can create and send detailed service schedule letters to customers or team members directly from Workstair, ensuring everyone is well-informed about service schedules and details for improved coordination and efficiency.
Generate Schedule Letter
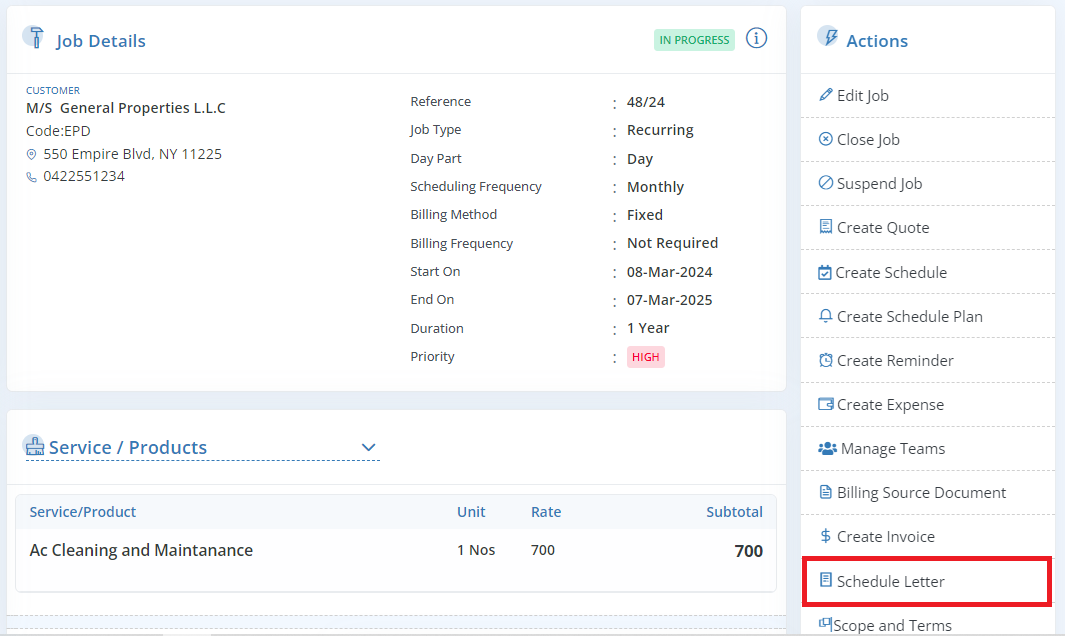
You can create a schedule letter directly from the Job, and it will automatically include the Job’s Scope and Terms. You can choose which specific Schedules or Schedule Plans to include.
Follow these steps to generate the letter:
- Navigate to the Job summary page.
- In the Action menu, click Schedule Letter.
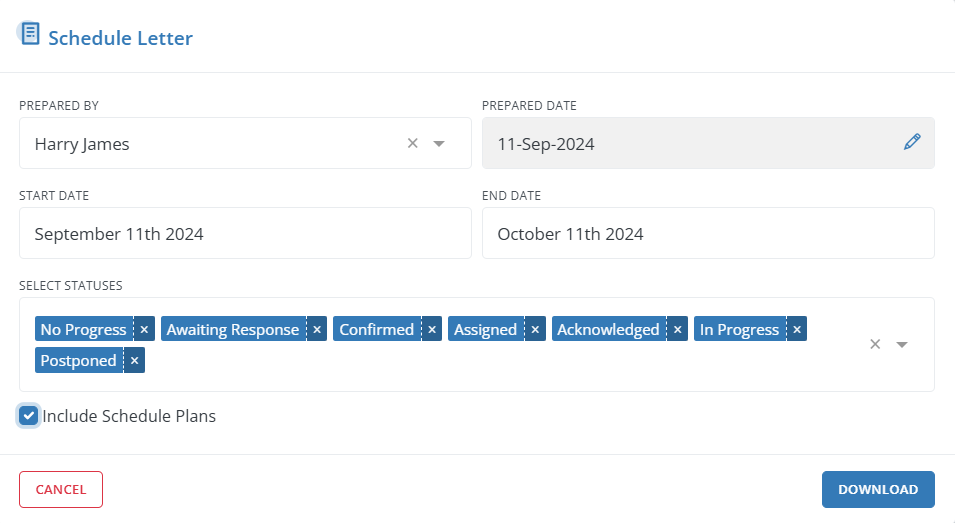
- Fill in the following details:
- Prepared By
- Prepared Date
- Period of the Schedule/Schedule Plan to be included in the letter
- Select which status Schedules to be included in the letter
- Choose whether Schedule Plan should be included in the letter
- Finally, click Download to generate the letter.
Note: Click here to learn how to add Scope and Terms to a Job.
Job Statuses
| No Progress: | A job without any schedule plans or schedules. |
| Planned: | A job with at least one plan. Job status will be planned when you create a job with at least one plan. |
| In Progress: | A Job status will be set to In Progress when the first schedule is created. |
| Completed: | A job which is completed. You can reopen it when in need by clicking on the Reopen Job option in Actions pane. |
| Suspended: | A job which is suspended for some reason. You can resume it when in need. |
Searching a Job
The advanced search option in Workstair allows you to search documents in many ways.
To Search for a Job in workstair:
- Goto Left menu bar>Jobs
- Search Job by Job title, reference, customer, Start date or status.
To Sort Jobs: Select available criteria such as Reference, created at, updated at, Status Updated at, Start date, End Date or priority.

For more search options:
- Click untitled filter button.
- There you can search jobs for multiple customers, job sites, tags, statuses.
- Click Save to save a search with a name with search fields filled.

It is possible Later, when you click on this saved search, Jobs will be displayed based on the saved criteria. Click here to learn more about Saved Searches!
Schedule Plans
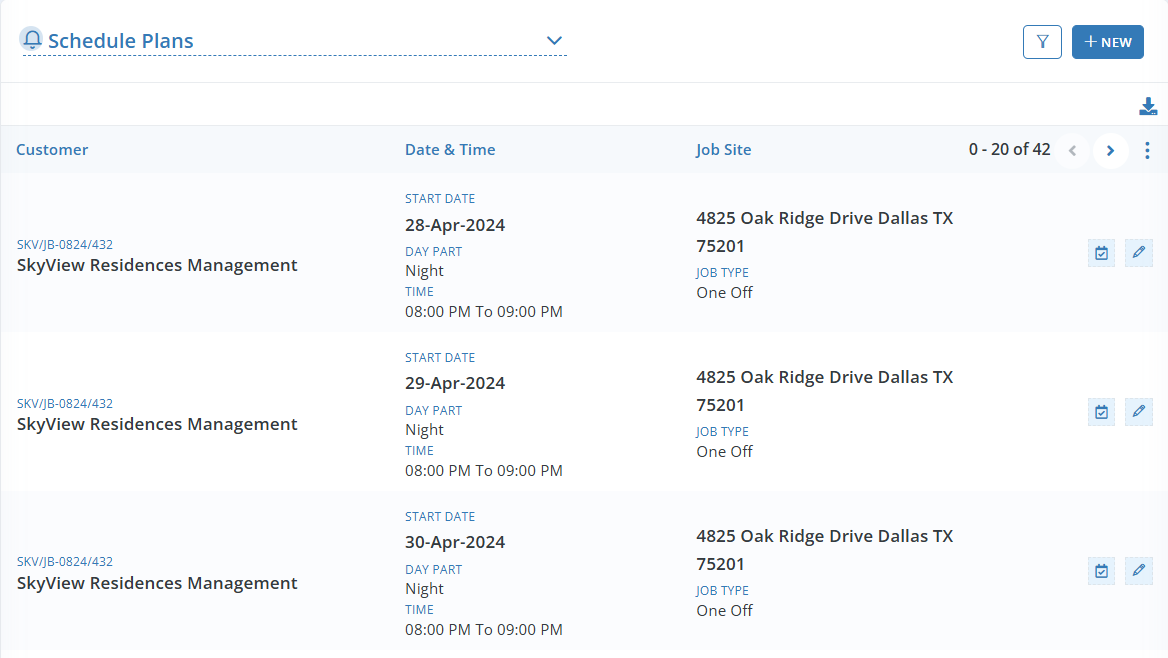
In Workstair, Schedule is the actual work schedule on which teams are allocated and invoices are generated whereas Schedule plans (PPM) are basically a list of upcoming work plans that are generated when a job is created. All schedule plans will be generated and added to the job automatically based on the Schedule Frequency you specify when you create the job. You can also manually add schedule plans to a job. It is a blueprint of schedule with minimal information such as customer details, date and time of the schedule. Once you start planning to visit the customer and confirm the schedule, you can convert this Schedule Plan to a Schedule.
Schedule plans can be shared with your customer for their acknowledgement once a job is created. You cannot create a schedule plan separately without a job. also adding more schedule plans to a job even after the job creation is possible.
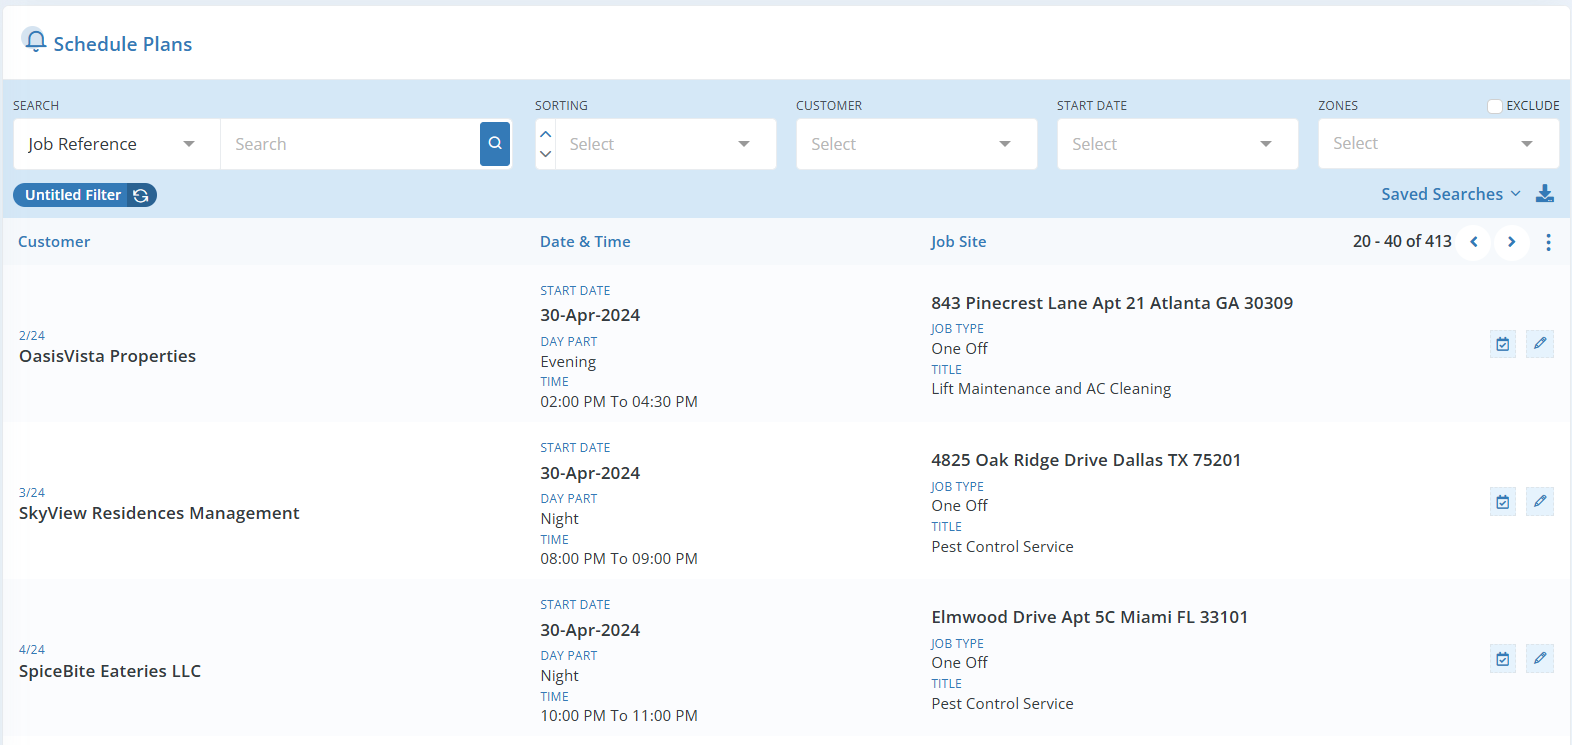
By clicking on a Schedule Plan in this page, a popup window with minimum details of Schedule Plan will appear.
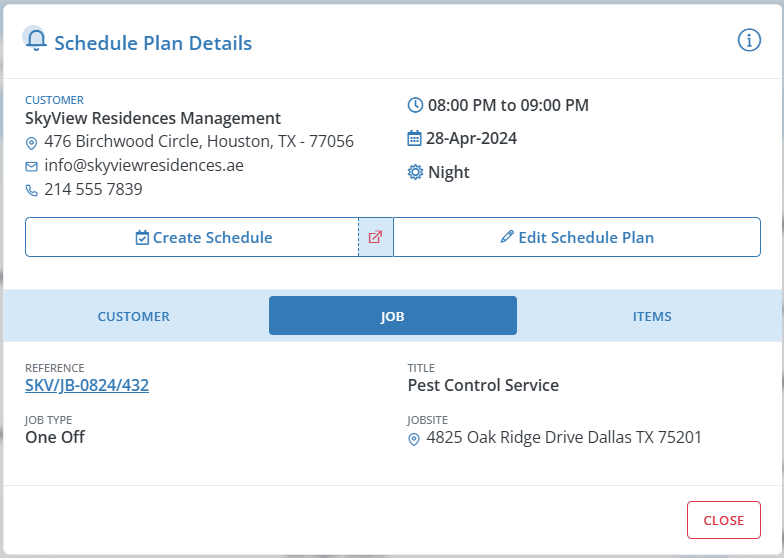
| Create Schedule: | To create a Schedule from the Schedule Plan, click Create Schedule and enter the necessary information. Once a Schedule Plan is converted to a Schedule, the original plan will be deleted. |
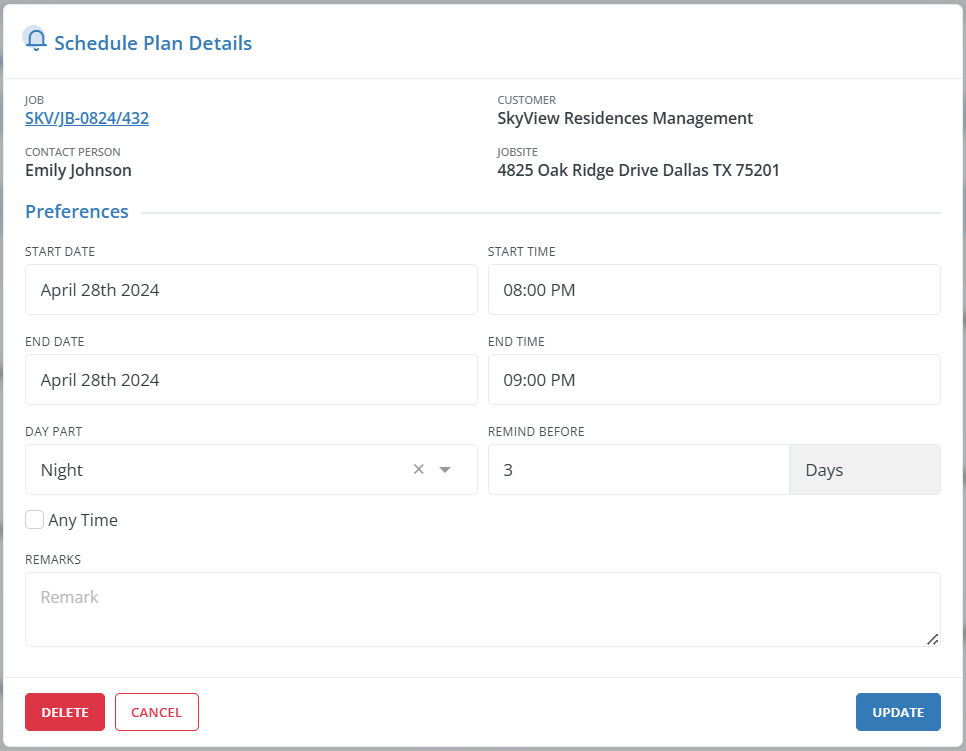
| Edit: | To edit a Schedule Plan, click on the Edit option, update the necessary information, and then click Update. You can edit the Schedule Plan any time before it is converted to a Schedule. There are also options to Cancel changes or Delete the existing schedule plan. |
Once the Job is created, you can view all Schedule Plans associated with it on the Schedule Plans tab on the Job Summary page, as shown below:
Schedules
Schedules represent the actual work visit at the client site. You can either manually add Schedules to a Job or convert a Schedule Plan to a Schedule.
Each work visit at the customer site is actually called a Schedule in Workstair whereas a Job is the whole duration of the entire work schedules. A job wraps up all schedules in it. In Workstair, you can add a Schedule to an existing job, or you can convert an existing Schedule Plan to a Schedule. You can allocate a team to a schedule while the schedule is being created. Schedule represents a work visit and it consists of all information about the work. Invoices, timesheets and expenses are derived from the Schedules. At this point of the schedule creation process, actual team allocation is taking place. When the status of the schedule is set to “assigned”, field technicians will receive a notification on their mobile app. Using a mobile app, they can mark the beginning and ending of the schedule while on the go, and the schedule’s status will be updated as a result. Additionally, invoices can be created directly from a schedule.
Create a Schedule
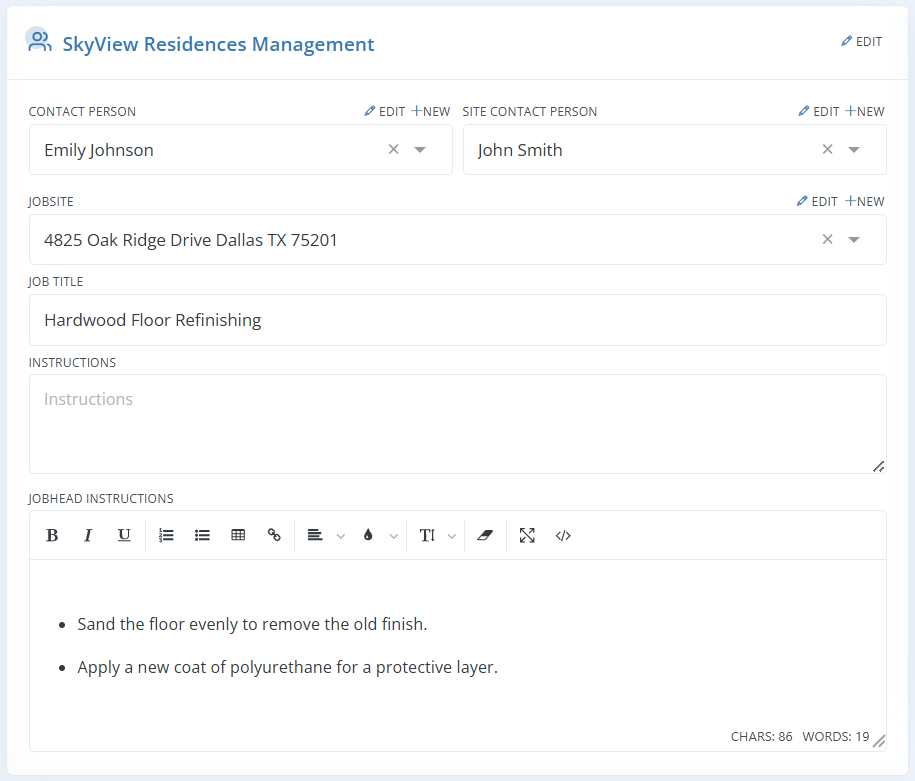
| Customer: | Choose the Customer for whom the job is being performed. You can choose an existing Customer from the drop-down list or create a new one by clicking the +New button (Complete the details of Customer and Save). |
| Contact Person: | A person who represents the Customer and with whom you conduct all work-related conversations. You can choose a Contact Person from the drop-down list or add a new contact by clicking the +New button. A Customer may have more than one Contact Person. Click here to learn how to add more than one Contact Person. |
| Site Contact Person: | In some cases, there may be a different Contact Person for discussing the technical details of the job. You can select an existing one or add a new site Contact Person. |
| Jobsite: | The location where the actual work will be performed. Select a jobsite from the list, and it will appear in the Mobile App for the assigned Job Head or field executive along with the Schedule. |
| Job Title: | A short description related to the service that you are going to deliver can be entered as a Job Title. |
| Instructions: | Add job-related guidelines that should be followed to perform the job. For e.g., obtaining permission to visit the job site or notifying the customer in advance for scheduling the work etc. |
| Job Head Instructions: | Here, you can add instructions for the Job Head that will be displayed on the Job Head’s mobile app. These notes provide guidance for the Job Head to follow while on-site. |
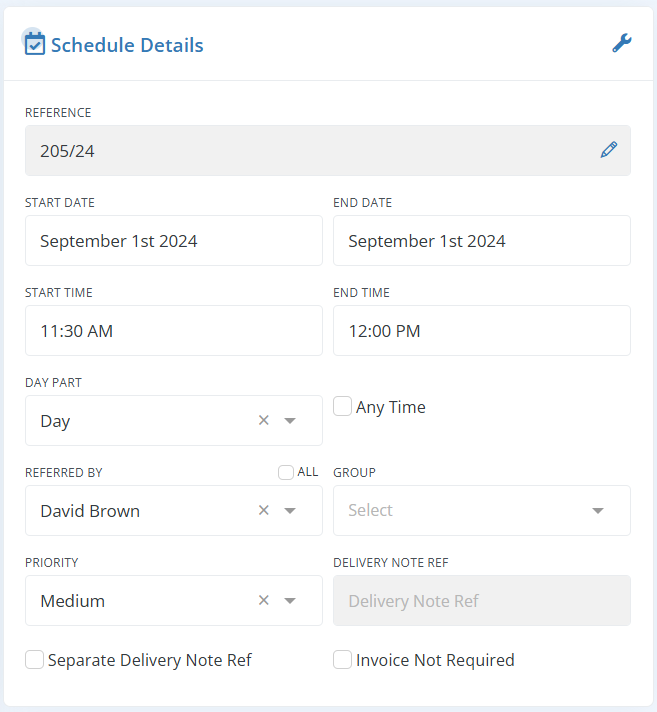
| Reference: | The reference number, often known as the document number, is the unique number used to identify each Schedule. You can create a default schedule number pattern that will have a sequence is number that is increased with each new job. It is possible to edit and manually input this reference number. |
| Start Date: | It is the start date of the Schedule. By default, the Job start date will be the start date of the Schedule. After then, it can be modified. |
| End Date: | It is the end date of the Schedule. Then the schedule start date will be the start date of the job by default. It can be then edited. |
| Start Time: | Set the start time for the job schedule. |
| End Time: | Set the end time for the job schedule. |
| Any Time: | If exact start time or end time is not specified for your schedule, enable the Anytime checkbox. The technician’s schedule will also appear as an anytime schedule in the mobile app. |
| Referenced By: | The individual who referred this job. If your sales agent brought the job to you, include his name here. If your salesperson brings you this service order, you can add his name here in this field. |
| Group: | Choose a category to which this job belongs. The term group Can be applied to any classification inside your company. |
| Priority: | It is for internal use only to determine how much importance should be given to this job. There are three choices: low, medium, and high. |
| Delivery Note Ref: | Check Separate Delivery Note Ref checkbox to enable Delivery Note Ref Box |
| Invoice Not Required: | Enable the checkbox if Invoice for this Schedule is not required. |
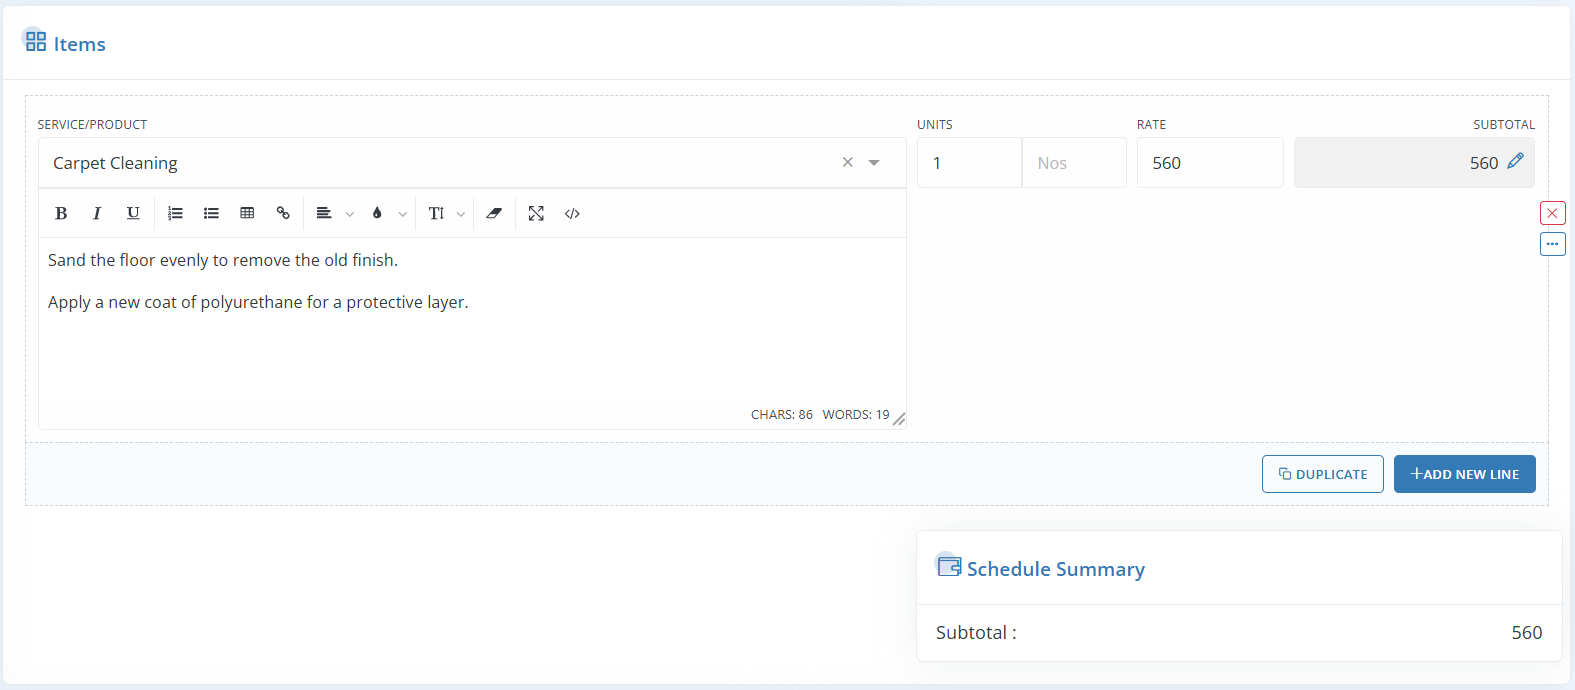
| Service/Product: | Choose the service or product from the drop-down list. You can add service items from a separate menu in the company setup; you cannot do so right here. Click here to know how to add new service/product. |
| Service Description: | Add your description about the service. It might be anything, such as details about the service, how it is used and supplied, and what all things clients will receive. |
| Units: | Add the unit of the service. |
| Unit Measurement: | Add the measuring unit, if needed. It depends on the service you offer. It could be Hours, Square feet, Square Meter, and so forth. |
| Rate: | It is the price per unit. |
| Subtotal: | It is the unit price multiplied by the total unit. This field is also editable, and when you make changes, the unit rate is updated based on the total units. |
| Duplicate: | Clicking the duplicate button will add the same service item with the same quantity and price. |
| Add New Line: | Click this button to add a new service line item to the Schedule. |
| Schedule Summary: | It will the Subtotal of all the services listed in the Items pane. |

| Job Head: | Choose the Job Head From the dropdown based on their availability. |
| Teams: | Choose Team members from the dropdown by Checking the checkbox infront of the members name. |
| Remarks: | You can add any remarks on the Schedule. |
| Cancel: | Click Cancel to bring back to previous screen. |
| Reset: | Click Reset to cancel all the changes you made in the Schedule. |
| Save: | Click Save to save the Schedule. |
Additional Schedule Configuration
The additional configuration icon is found in the top right corner of the Schedule Details Pane.
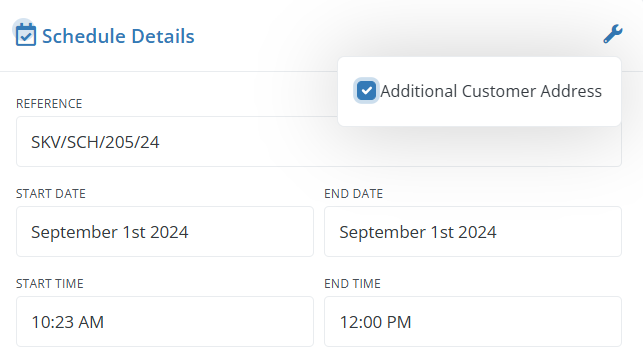
| Add Additional Customer Address: | In addition to the customers default address, you can add additional addresses. this address will be used when creating an invoice for this job. |
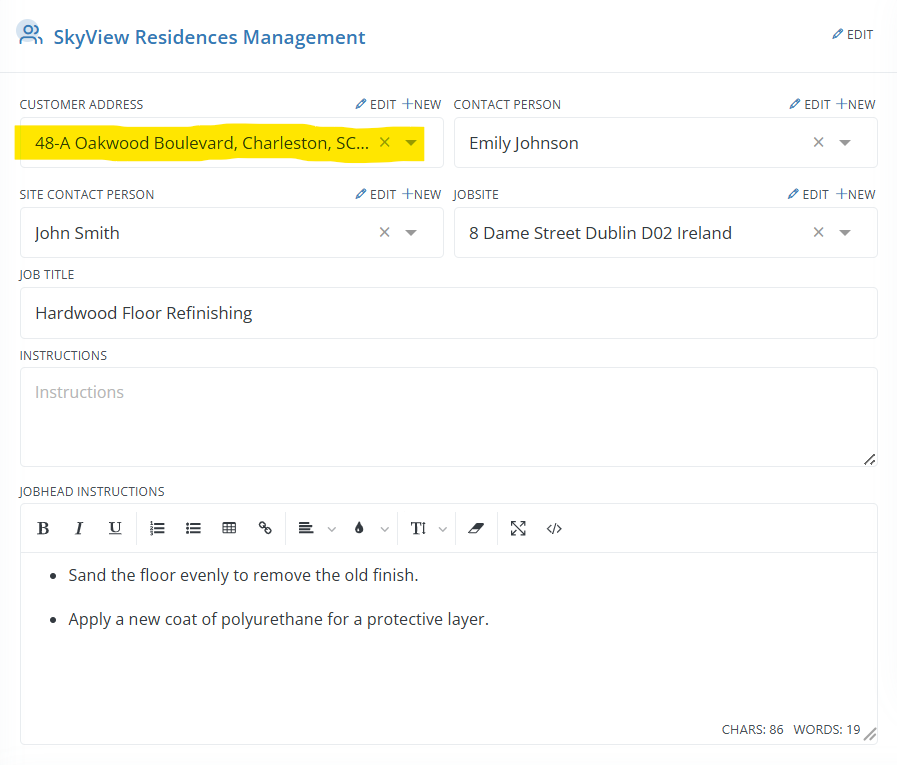
More options in line item
On the service line item area, go to the far-right corner for additional options button, then click to view the options as shown below.
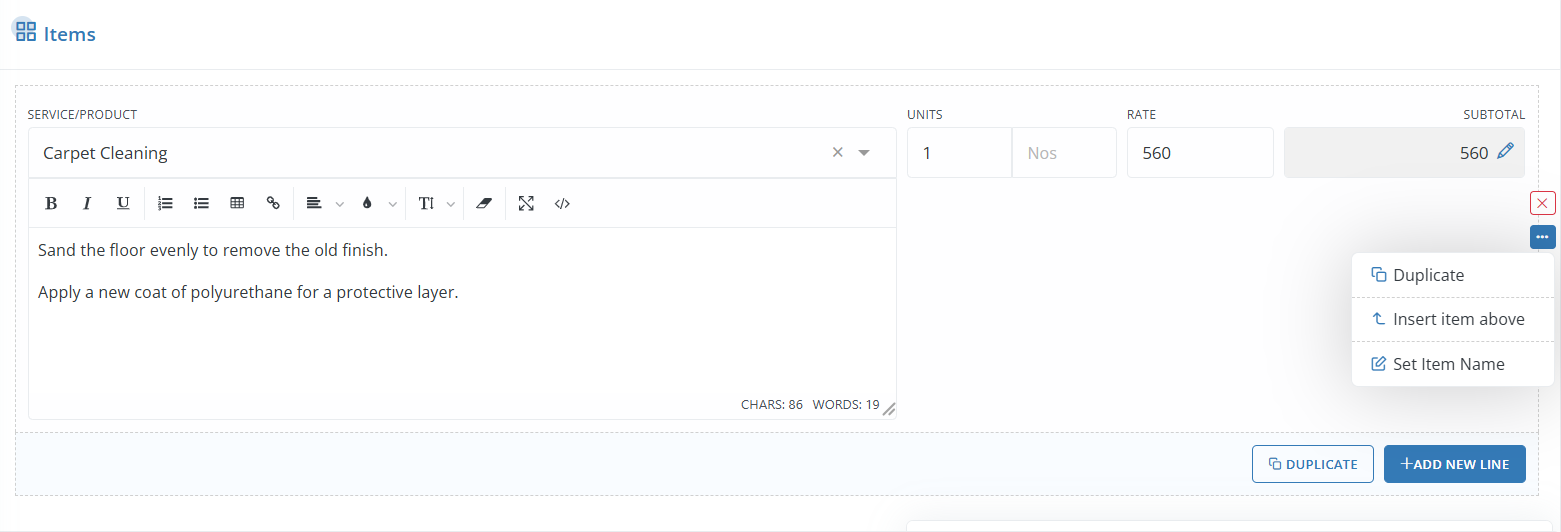
| Duplicate: | Click Duplicate to add an identical service item to the schedule. (Use this option when you want to add a similar service item with a few minor changes.) | |
| Insert Item Above: | Adds a line item above this line item. It is used to bring a service item above the existing item in the linear order. | |
| Set Item Name: | Adds an alternate name for the service line item. If an alternative name is specified, the actual service item name will be replaced with the given name. |
Schedule Statuses
Available statuses for schedules are:
| No progress: | Schedule in which work has not Started. |
| Awaiting response: | schedule which is waiting for the response from customer. |
| Confirmed: | Schedule with confirmed work date and time. |
| assigned: | Schedule with team allocated for the work. |
| In progress: | Work which is in progress. |
| Postponed: | Date of the work got postponed. |
| Completed: | Work completed. |
| Cancelled: | Cancelled schedule. |
Invoicing From Schedules
In Workstair, every job schedule is connected to Invoices, ensuring you never miss any accounts and receive timely reminders.
- Go to Works > Schedules
- Navigate to the Schedule Details page
- From Actions pane, click Create Invoices

Here, you’ll see a list of all job schedules for the selected customer that have not yet been invoiced.
- To create invoices for all job schedules at once, Select All Jobs.
- Or manually choose the job schedules you wish to Invoice.
- A popup message will appear: “Do you want to change the status for overdue schedules in selected schedules to completed?”
- Click OK if you’d like to update the schedule status to completed.

Then click Next, fill in the required Invoice details, and click Save.
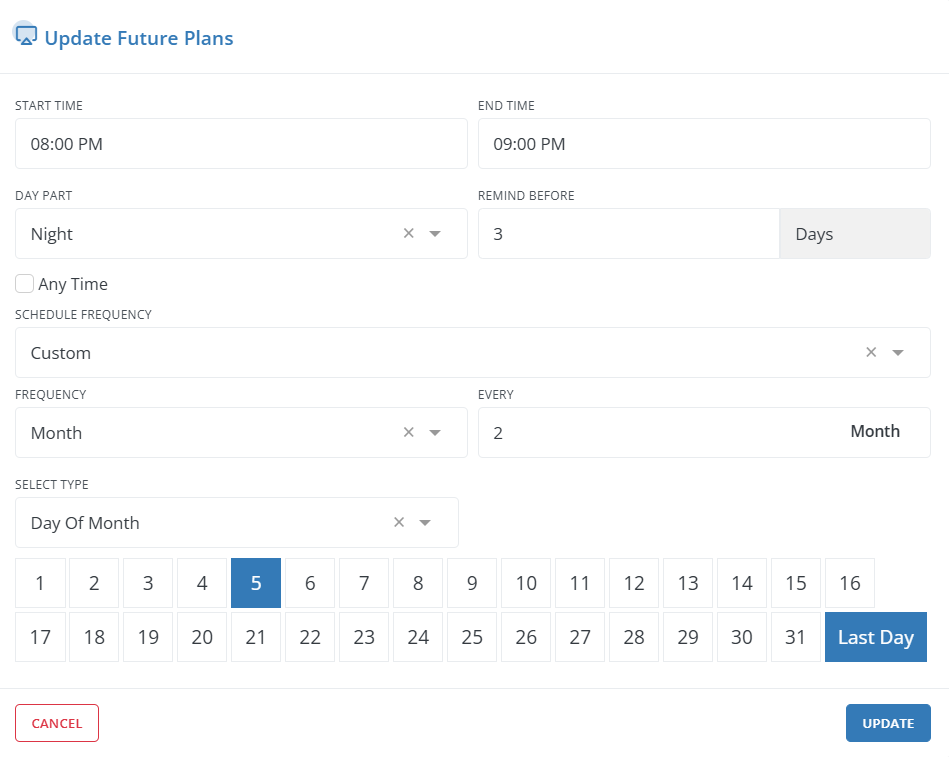
Update Future Plan
Update Future plan feature in Workstair helps you to reschedule all upcoming schedules in one go if any one of the schedules is changed due to any reason.
For example, if you have schedules at 10th of every two months for a duration of one year and a schedule is postponed to 5th for some reason, and you can update all upcoming schedules to 5th of every two months in a single click.
Automated Schedule Plan Conversion
This option allows you to automate the conversion of Schedule Plans (schedule reminders) to schedules without the need for manual intervention each time a schedule time arrives. This feature can be enabled for recurring Jobs. Once activated, when you mark a schedule as “complete” by changing its status, the next schedule plan will automatically be converted to a schedule. By consistently updating the status of each schedule, you no longer have to manually convert plans to schedules; the application will handle this process automatically. You can also configure the same functionality for schedule cancellations.
To enable Schedule Auto Conversion feature, follow these steps:
- Navigate to Settings
- Go to Module Configurations
- Select Jobs
- In the Common Configurations, enable Schedule Auto Conversion
Once enabled, the Plan To Schedule Auto Conversion module will appear in the Specific Configurations, allowing you to choose the following options by checking the respective checkboxes:
| While Last Schedule Completed: | Automatically converts the upcoming Schedule Plan to a Schedule once the last schedule is completed. |
| While Last Schedule Cancelled: | Automatically converts the upcoming Schedule Plan to a Schedule if the last schedule is cancelled. |
| Schedule Status While Auto Creating: | Set the default status for Schedules when they are automatically created. |
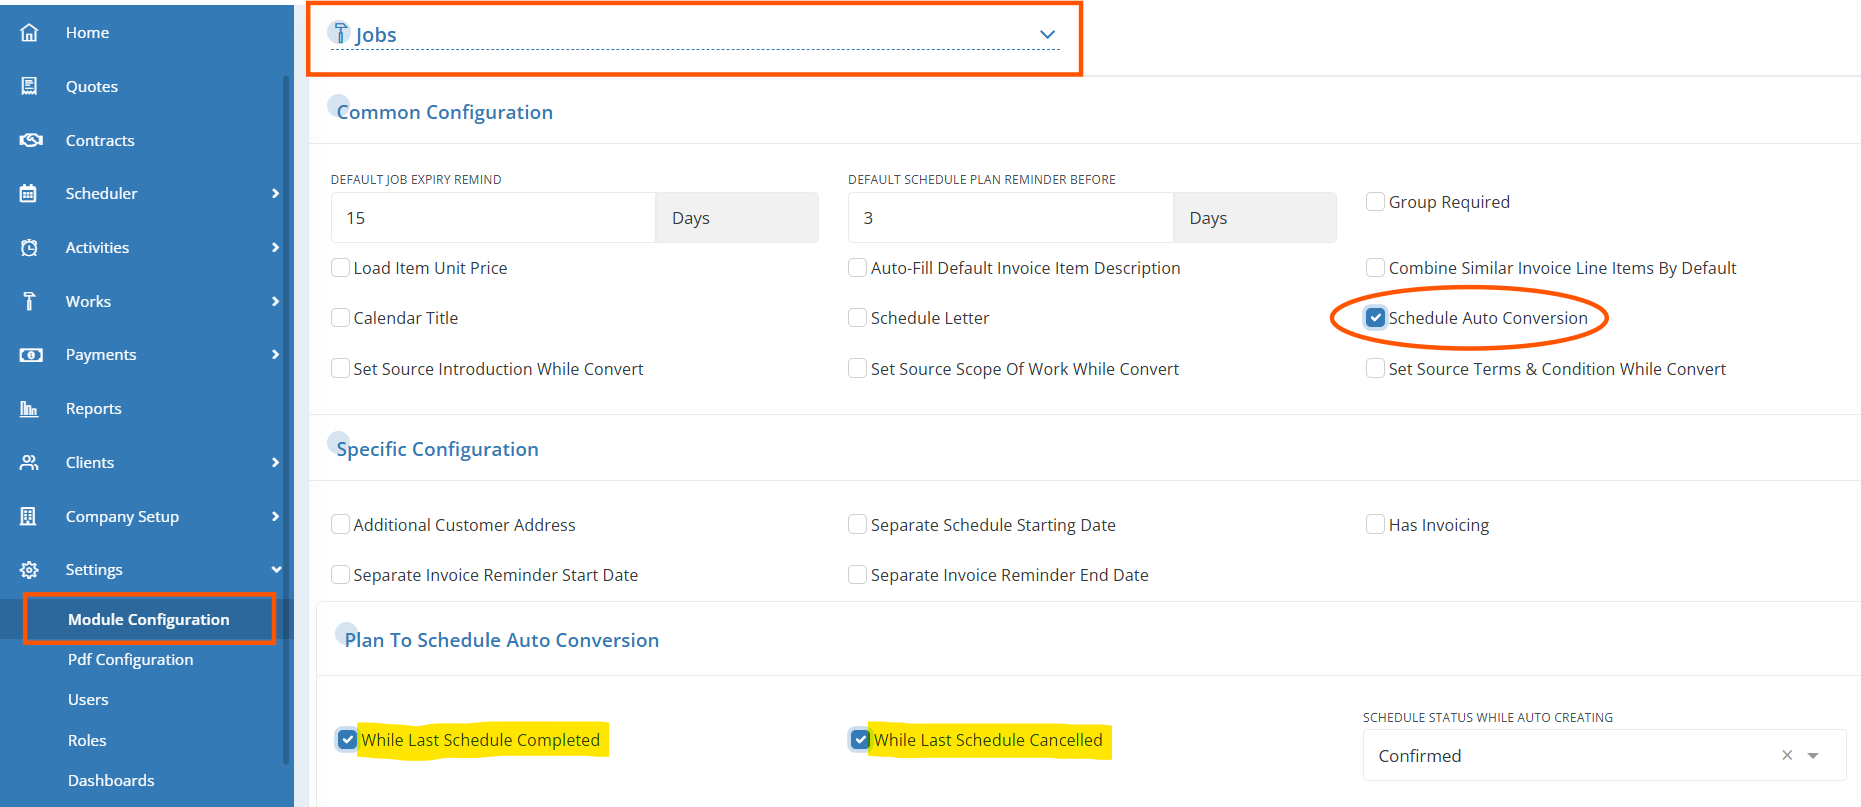
You can also enable or disable this feature at the individual job level. To do this, navigate to the Job Edit page and, under Plan To Schedule Auto Conversion, toggle the enable/disable option as needed.

Quick Schedule Creation
You can create Schedules directly without having to create a Job first. This is particularly useful for One-off jobs, providing both flexibility and time savings. When a Schedule is created, a parent Job is automatically generated, and additional schedules can be added to it later if needed.
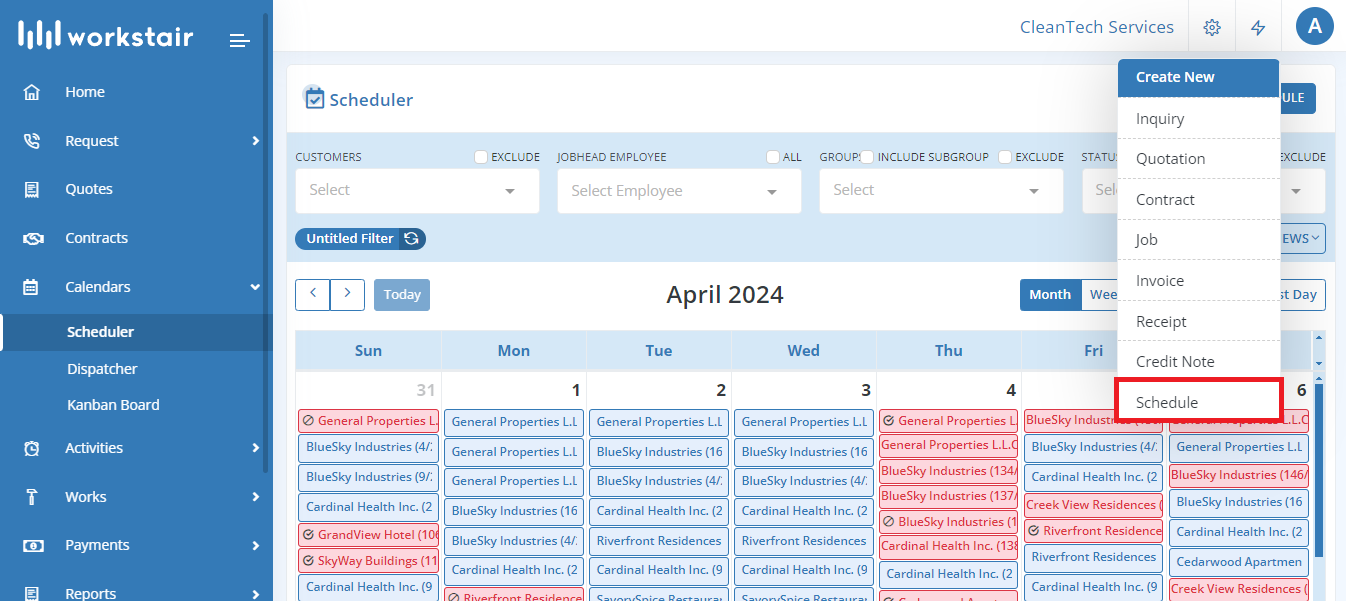
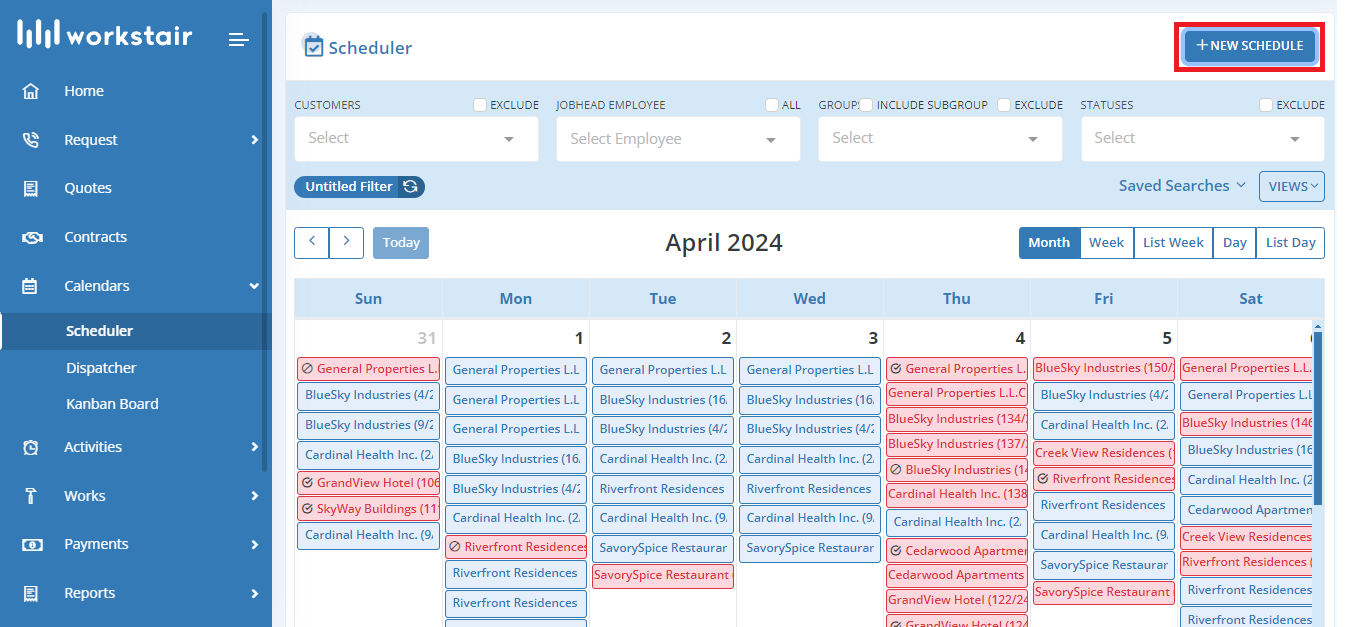
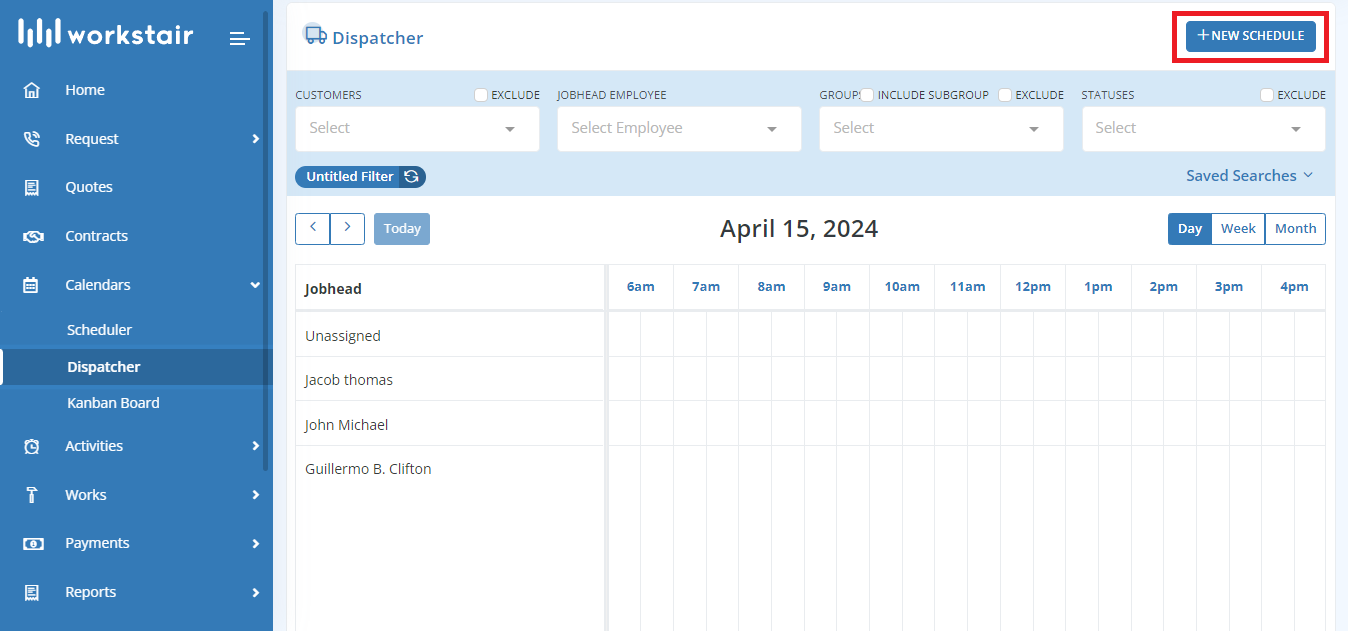
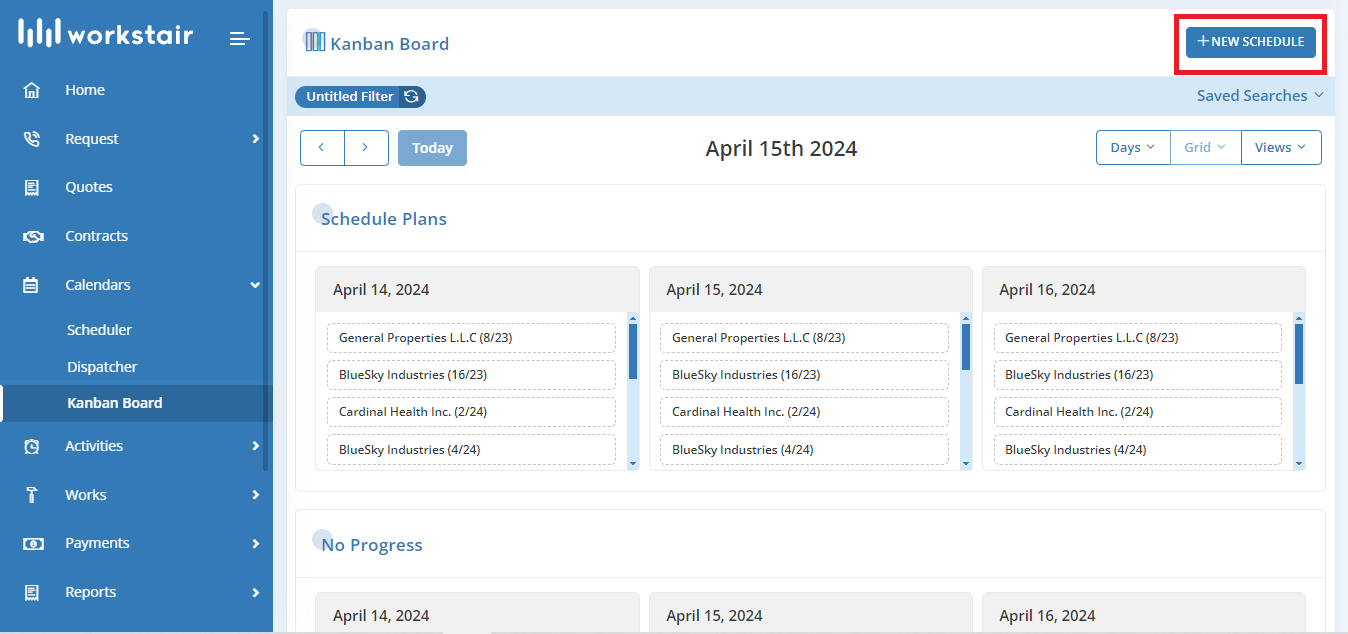
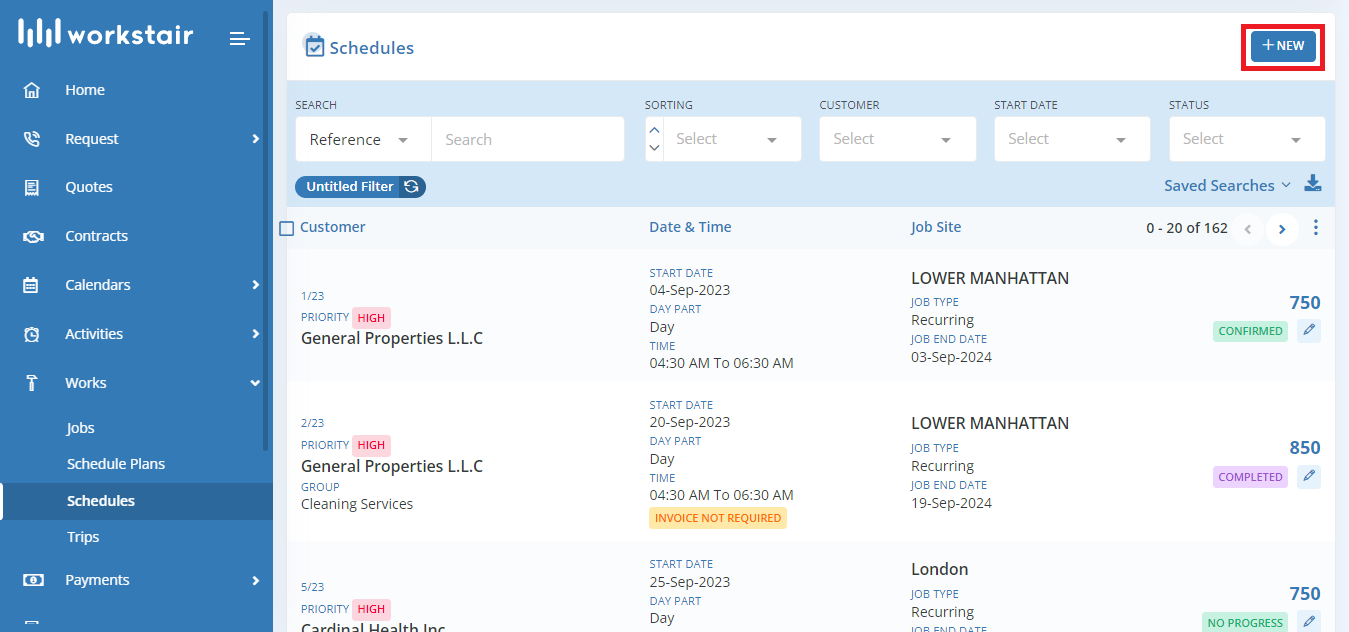
You can create Schedules directly from the following places:
- Quick Create Menu
- Schedule List Page
- Calendar
- Dispatcher
- Kanban Board
Quick Action Buttons in Scheduler
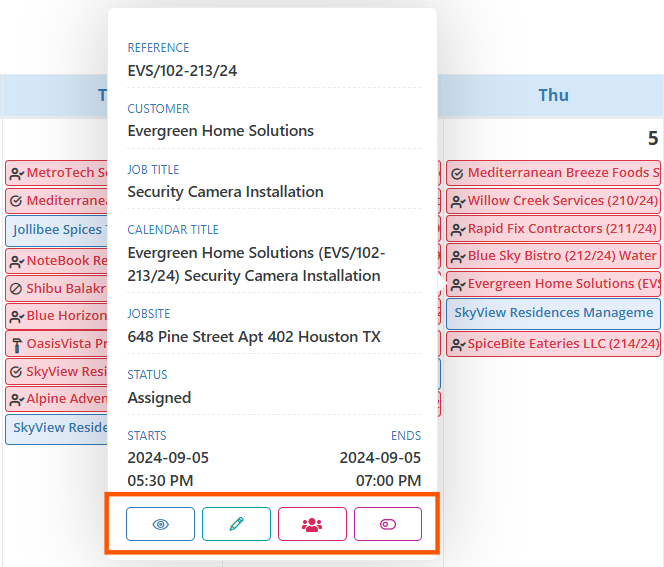
The Scheduler calendar’s Schedule Overview Popover includes quick action buttons that aid in performing actions quickly.
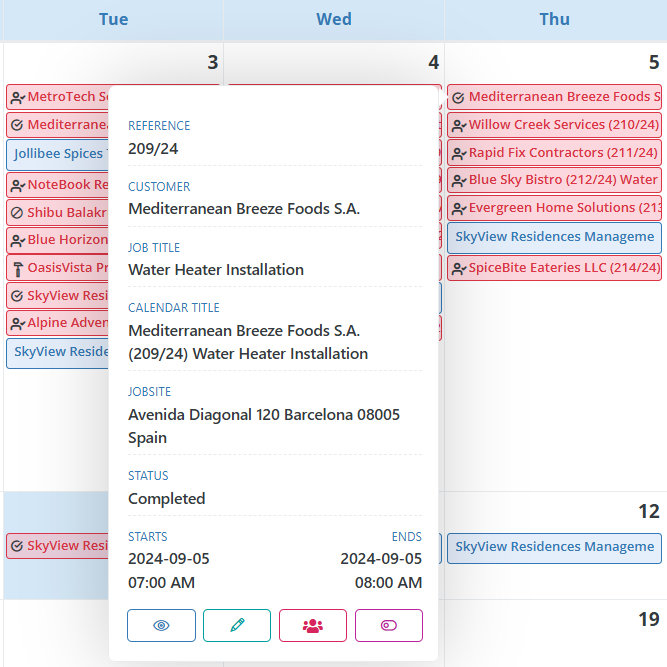
Quick action buttons in Schedule Plan
| Detail Button: | This button opens the Schedule Plan Detail Popover, offering more information about the Schedule Plan. |
| Edit Button: | Use this button to modify the selected Schedule Plan. |
| Create Schedule Button: | Use this button to create a Schedule from a Schedule Plan. |
| Convert to Schedule Button: | Instantly converts a Schedule Plan into a Schedule, copying all details from the plan. If modifications are needed, select the Schedule and make the necessary edits. |
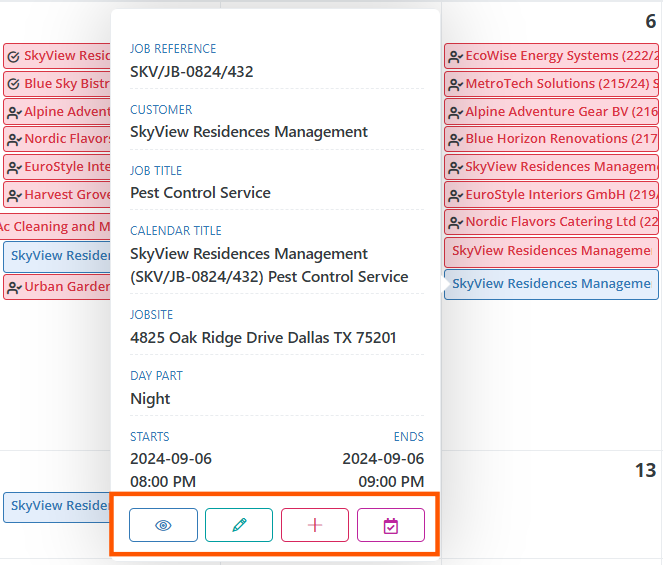
Quick Action Buttons for Schedules
| Detail Button: | This button opens the Schedule Detail popover, where you can view additional information about the schedule. From the popover, you can create an Invoice, change the status, and update future plans etc. |
| Edit Button: | Click this button to modify the selected Schedule. |
| Manage Team Button: | Use this button to manage your team. You can edit the current team, change the Jobhead, or modify team members. |
| Change Status Button: | Update the Schedule status with a single click. |
Follow Up Schedule
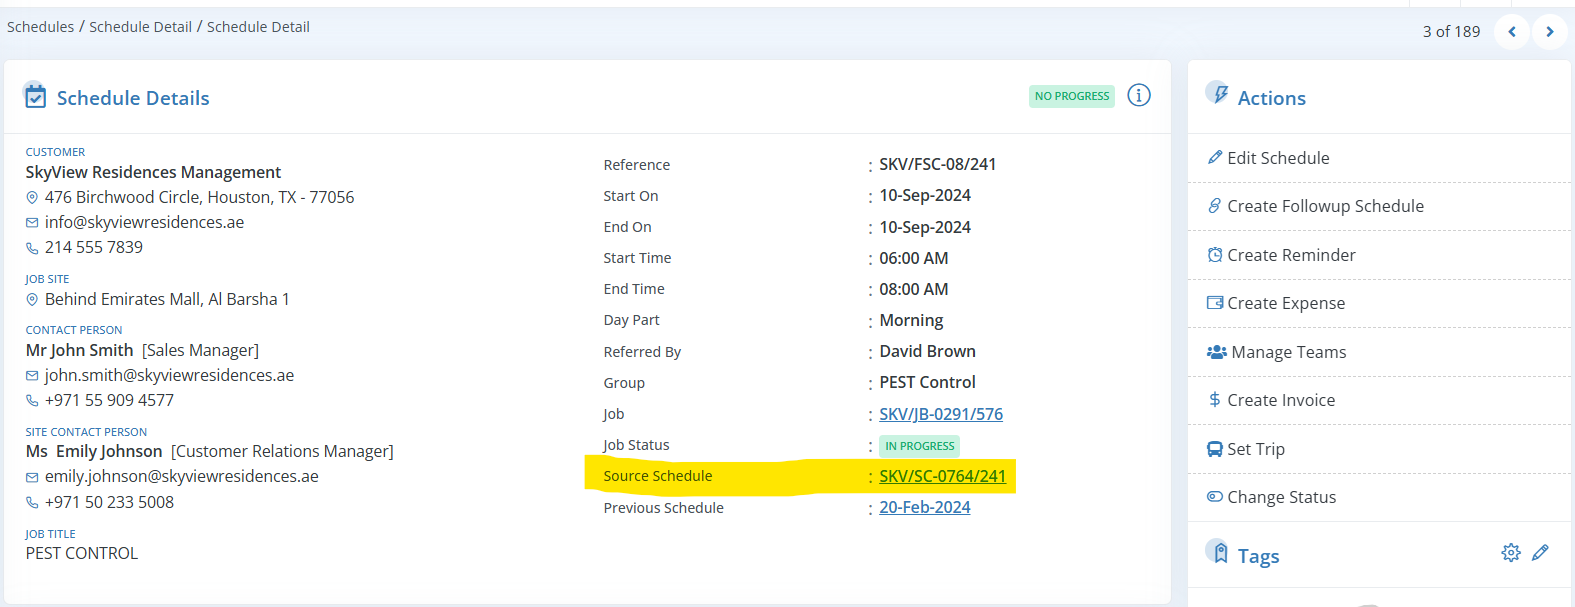
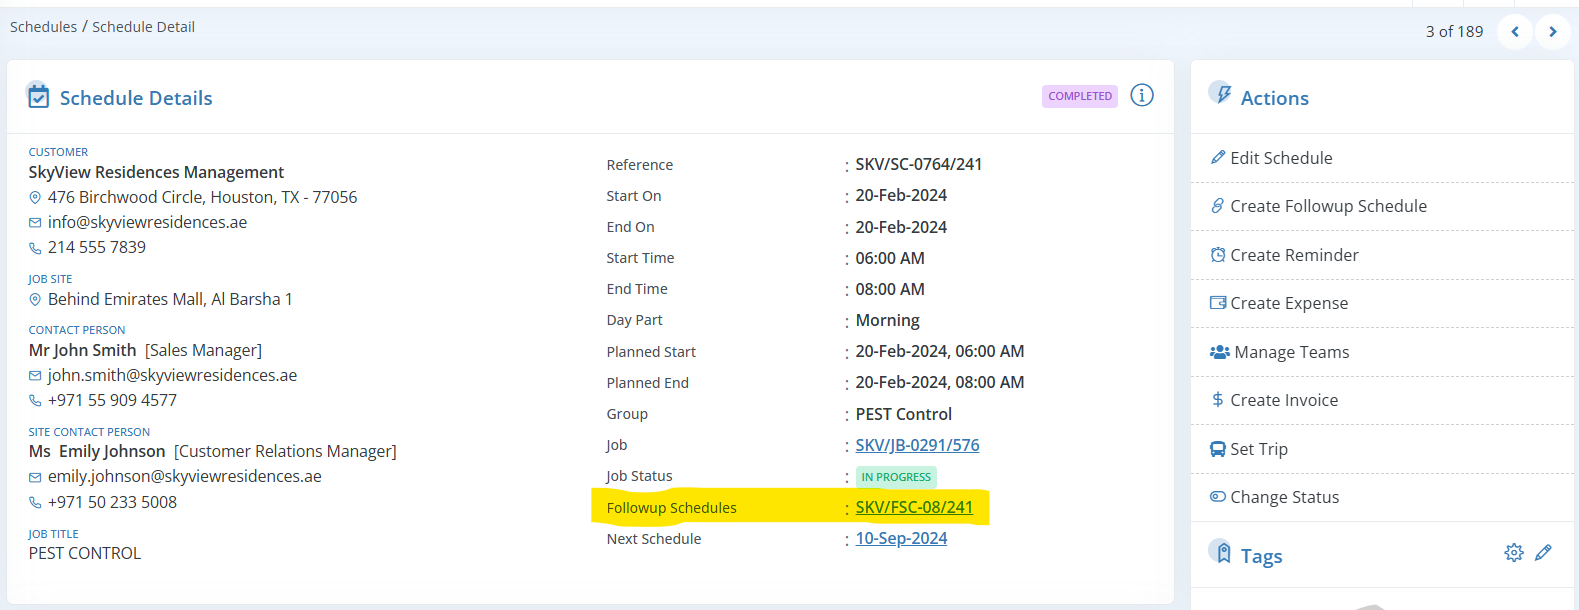
Add one or more follow-up schedules to an existing schedule for improved scheduling efficiency. This feature is especially beneficial when you have subsequent schedules related to a specific schedule. Follow-up schedules possess similar characteristics to regular schedules, allowing for seamless integration. Maintain a clear link between the source schedule and its follow-up schedules to ensure smooth and accurate tracking.
Creating a Follow-Up Schedule
To create a follow-up schedule, go to the Schedule Detail Page and select the “Follow Up Schedule” option from the Actions menu.
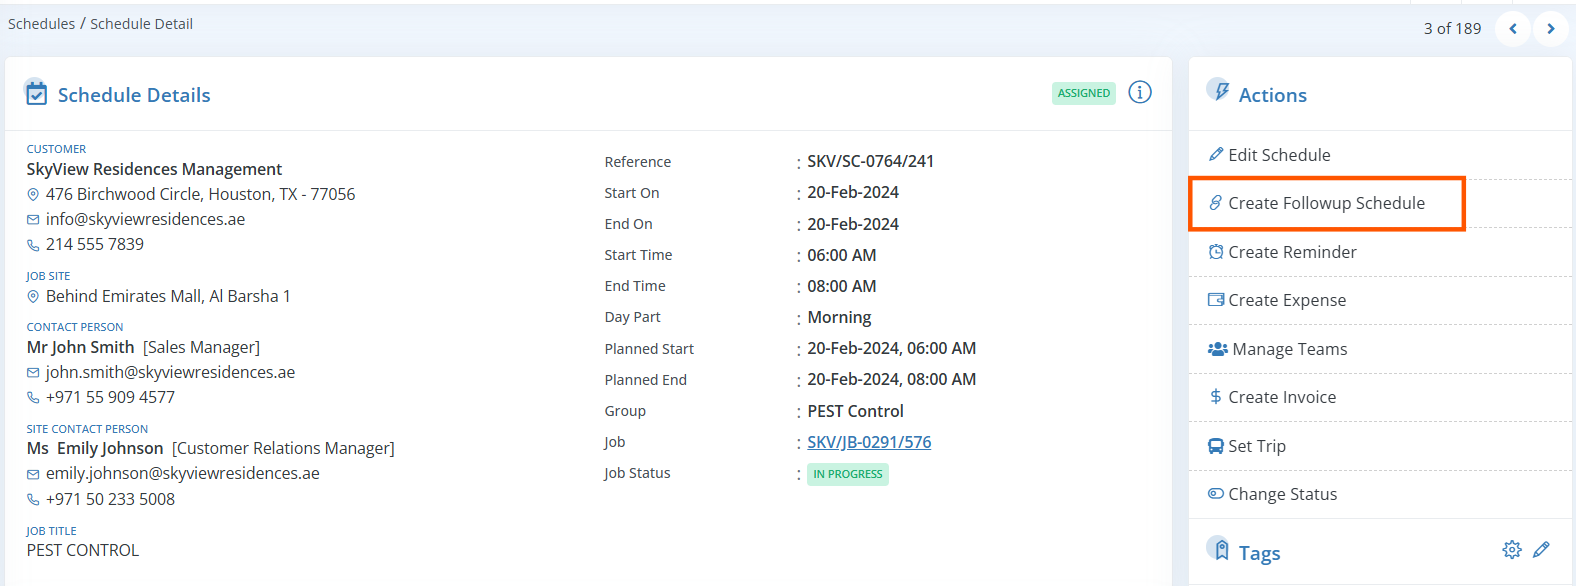
You can create multiple Follow-up Schedules for a single Schedule, and a link will be established between the source Schedule and each Follow-up Schedule.
Calendar Title
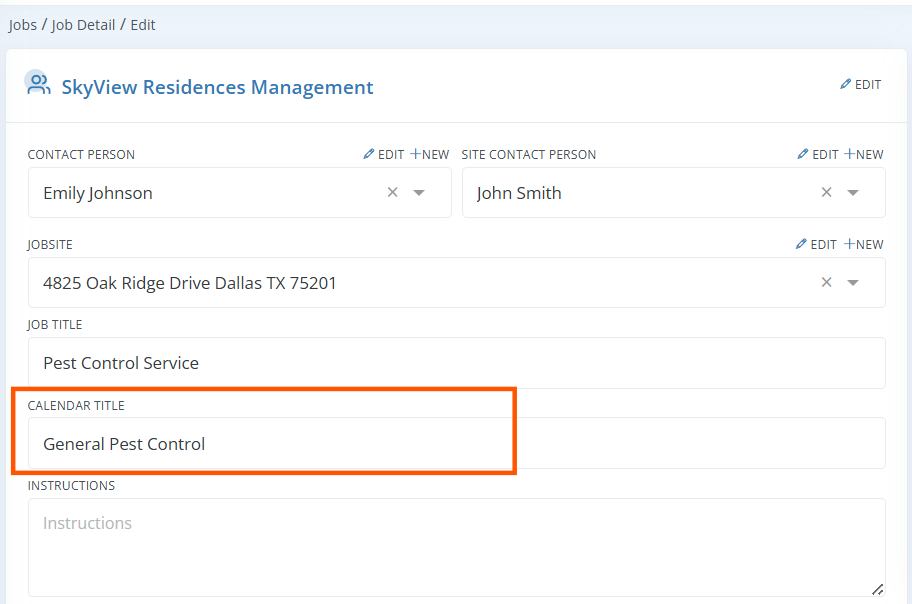
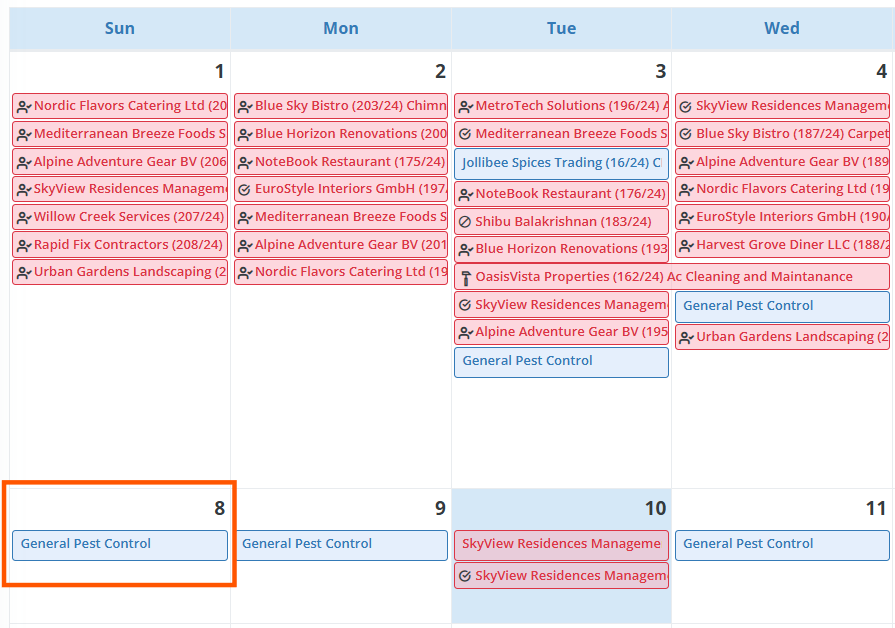
You can personalize the name displayed for schedules in the calendar. When creating a job, you have the option to assign a calendar title, which will be automatically applied to each schedule created from that job. Additionally, when creating an individual schedule, you can also provide a title at that time. This ensures flexibility, as you can add a title at both the job and schedule levels. The assigned title will then appear on the scheduler calendar, making it easier to identify and manage your schedules.
Managing Calendar Title Settings
For Jobs:
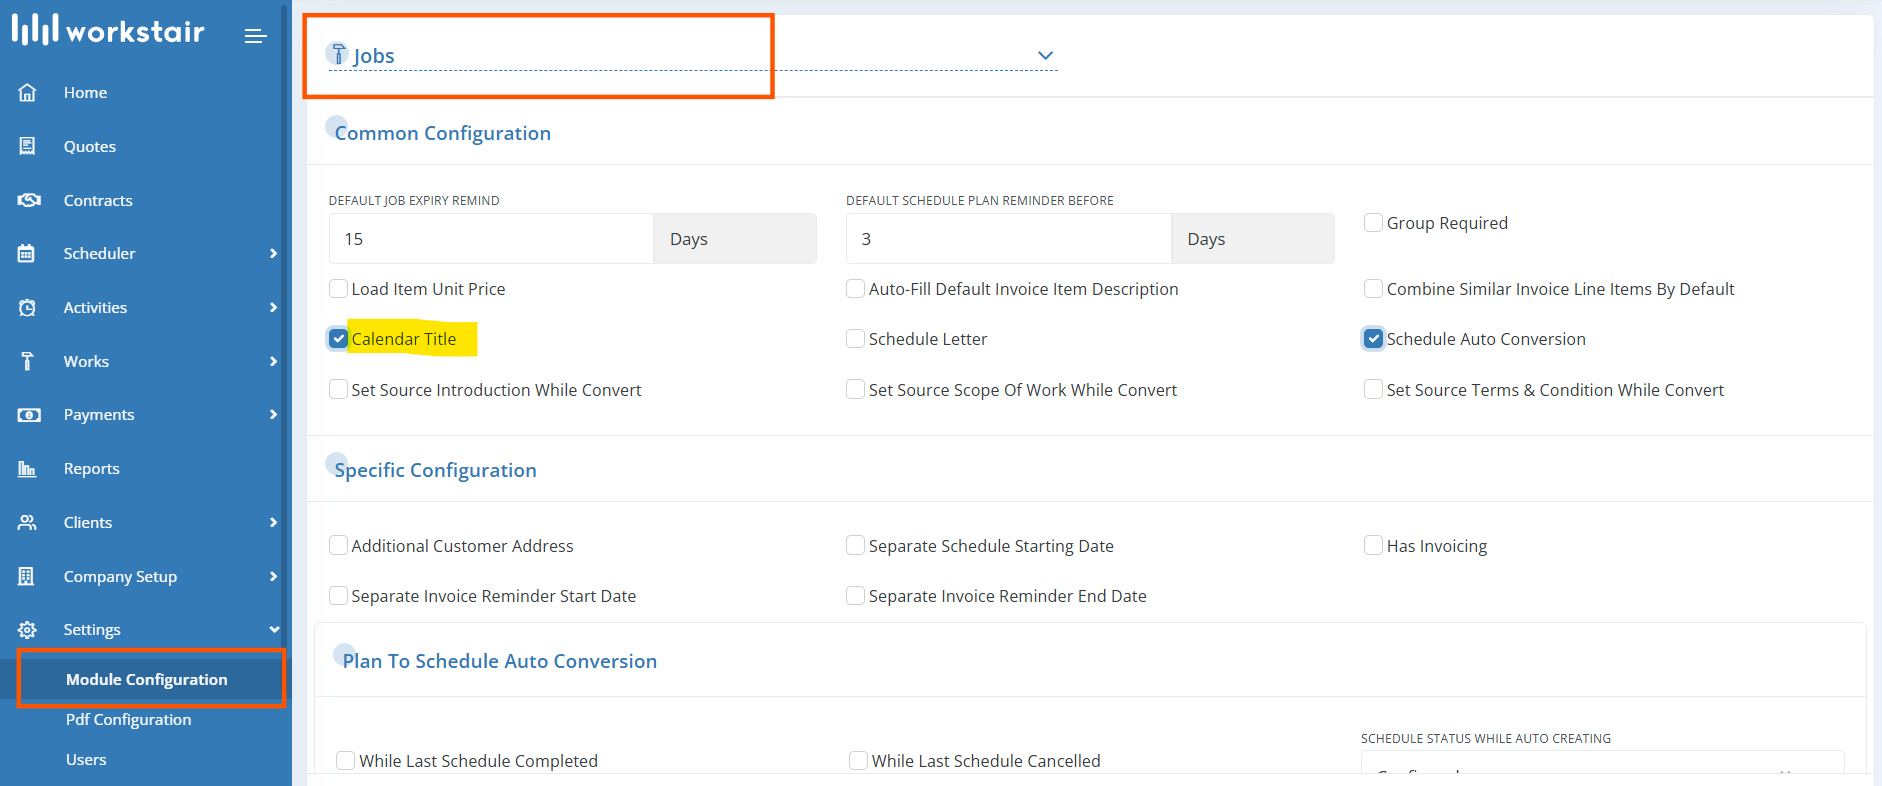
- Go to the Settings menu.
- Select Module Configuration.
- Click on Jobs.
- In the Jobs section, you will find the Calendar Title checkbox.
- Enable or disable the calendar title feature based on your preference.
For Schedules:
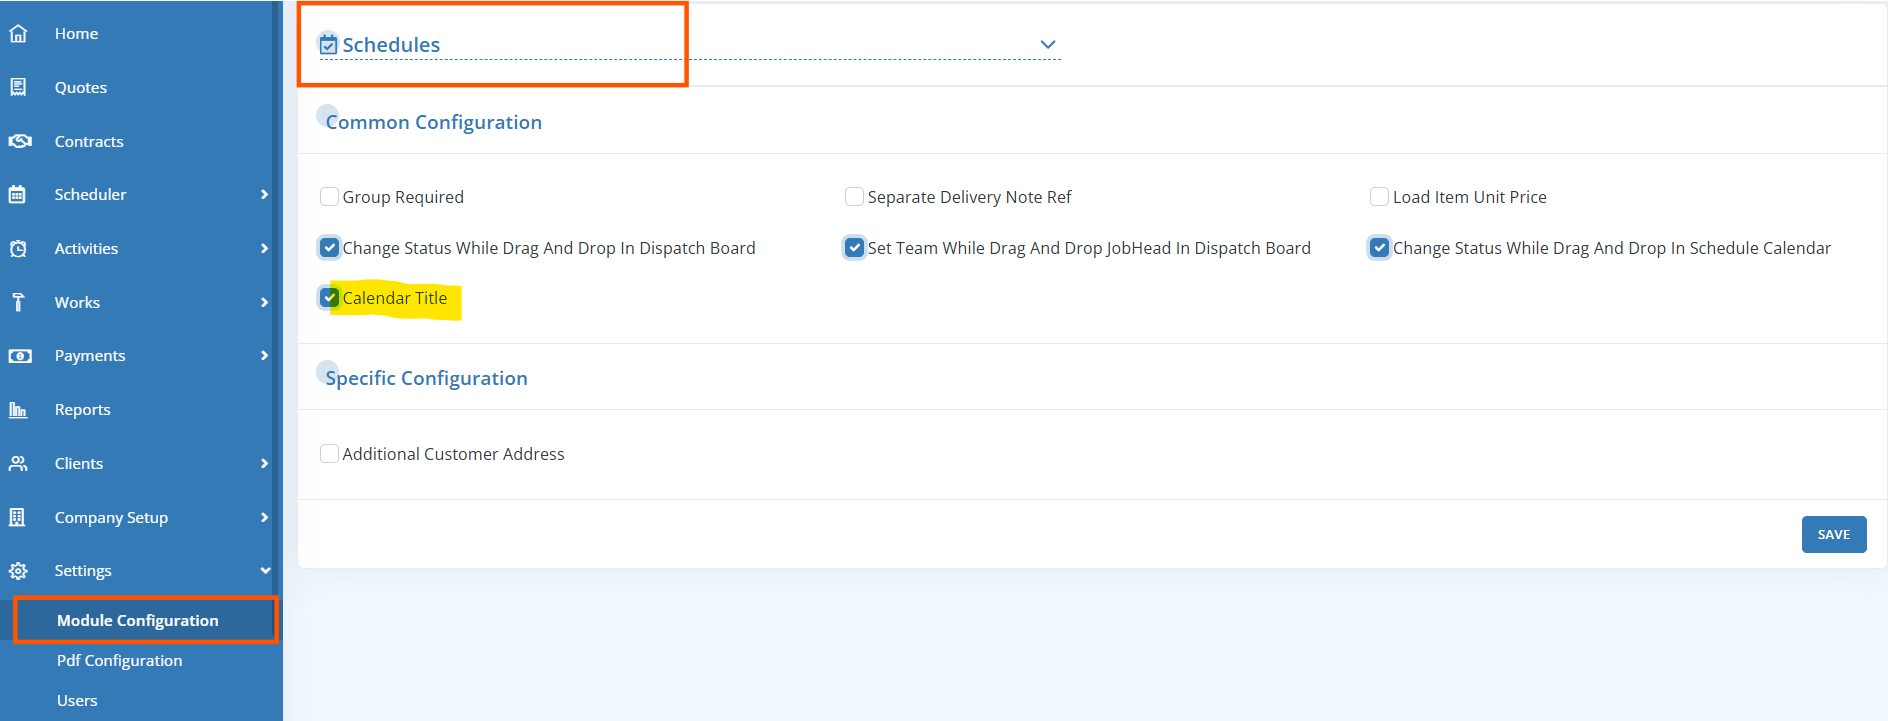
- Access the Settings menu.
- Navigate to Module Configuration.
- Select Schedules.
- In the Schedules section, locate the Calendar Title checkbox.
- Toggle the option to enable or disable the calendar title feature as per your requirement.
Team Management
You can simplify team management in Workstair by creating teams in advance. This is useful for organizations with predefined team structures. You no longer have to manually select each team member every time you create a schedule. Once your teams are set up, selecting the Jobhead will automatically populate the team members, saving you time and effort.
Team Management in Dispatcher
In Dispatcher, you have the option to manage schedules as teams. By enabling the Team Setup feature, when you assign a schedule to a Jobhead, their team members will be automatically added. To enable Team Setup in Dispatcher, navigate to the Schedules section in Module Configuration and check the box labeled “Set Team While Dragging and Dropping Jobhead in Dispatch Board.”
To create a team, follow these steps:
- Select the Jobhead employee from the Employees list (make sure their designation level is set as Jobhead).
- On the Employee Details page, click on the “Manage Teams” option in the Actions menu.
- Add the members under the selected Jobhead to form the team.


Multiple Schedule Allocation to a Team
In Workstair, it is possible to allocate multiple schedules to a team, all in a single go.
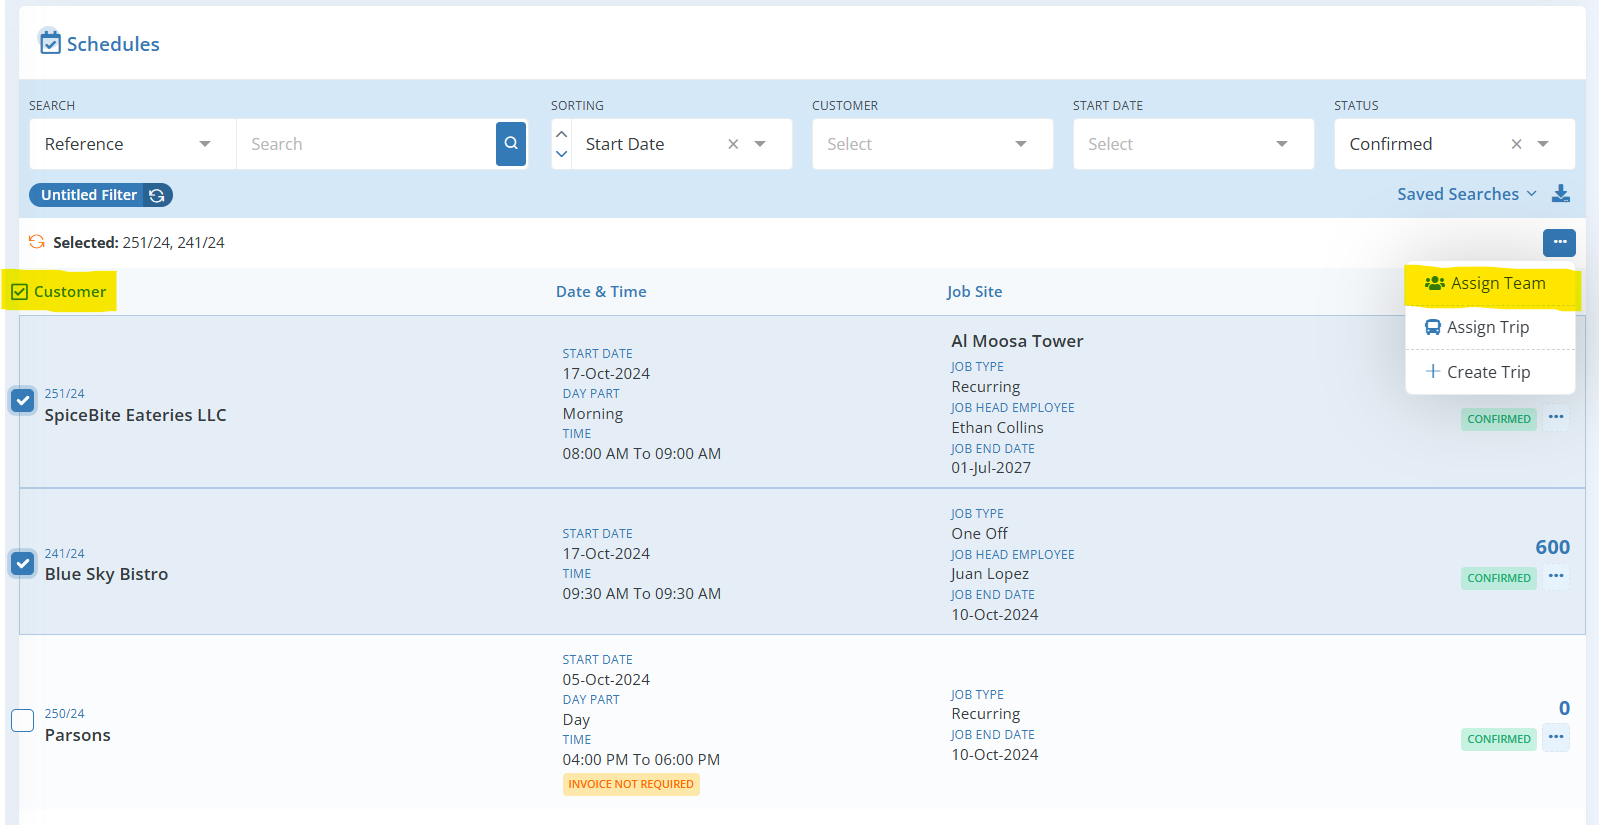
- Go to Schedules and enable the Customer checkbox
- Select all the Schedules which is to be assigned to the team
- Navigate to more settings and click Assign Team
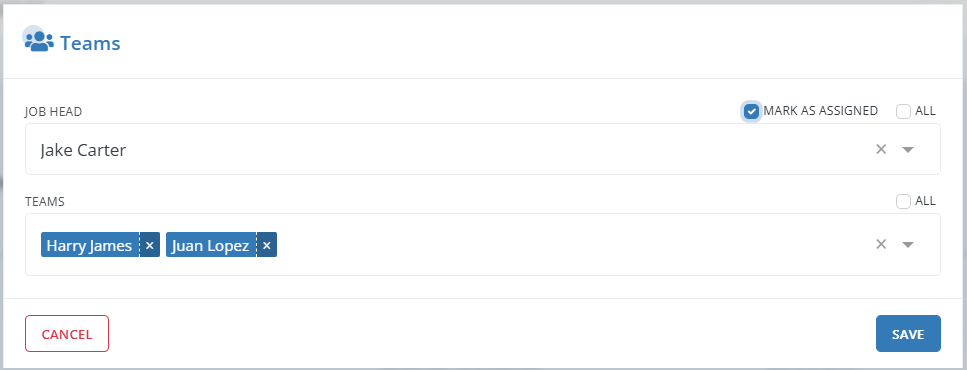
- In the dialogue box, select the Jobhead and choose the Team Members
- Click Save
