Table Of Contents
Contract Overview
A contract is a work-agreement between two parties that creates an obligation to perform a particular task. In Workstair, you can create and send the contract to the customer once the customer approves a quotation. It includes time frames for beginning and completing the work, additional due dates if needed, and other procedures and details involved in the job.
Creating a Contract
Learn how to create a contract:
- Goto Menu > Contracts
- Click the +New button in the top right corner of the page.
- Or click Create New > Contract under the utility button at the top right corner.
You can convert an existing Quote into a Contract. Simply select the Customer, add the Scope of Work and Terms of Service, or load them from saved templates. Save and share the Contract with your customer within minutes.
In Customer details, Enter the customer information:
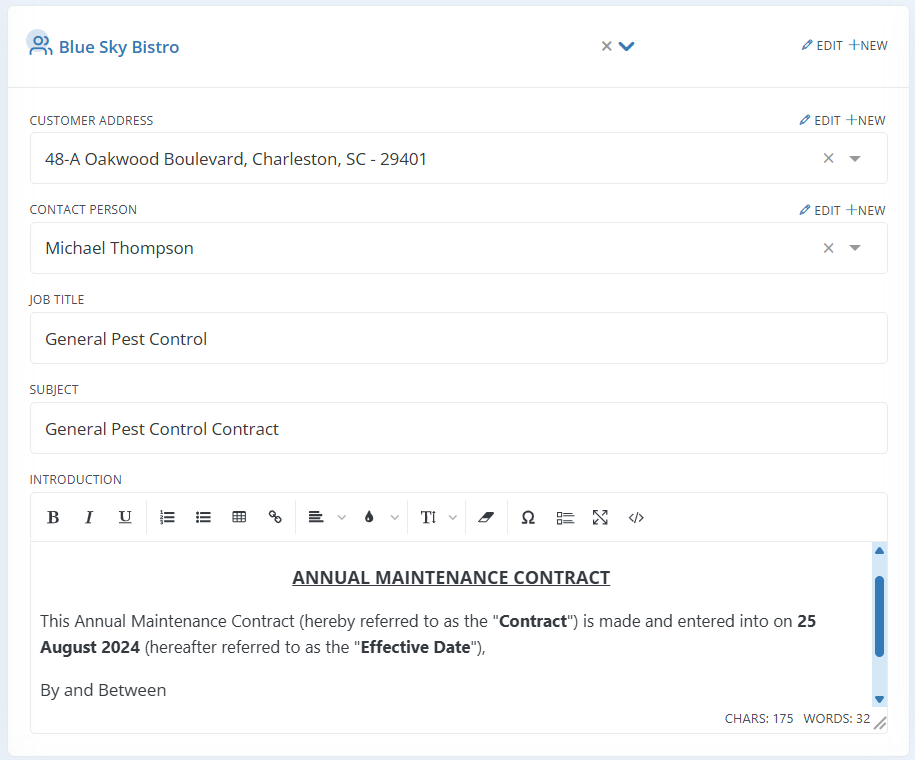
| Select Customer: | Choose the customer to whom you will send this contract. Select an existing customer from the drop-down list or create a new one by clicking the +New button. Complete the customer details and click Save. |
| Contact Person: | Choose the person representing the customer with whom you will handle all work-related communications. Select from the drop-down list or add a new contact by clicking the +New button. A customer can have multiple contact persons. Click here to learn how to add more than one contact person. |
| Job Title: | Provide a brief description of the service that will be used internally within the system. |
| Subject: | Enter a subject for the contract. For example, “Contract for Building Cleaning and AC Maintenance.” |
| Introduction: | Provide a brief overview of your company, including key details and context that help the customer understand who you are and what your organization offers. You can also load an introduction from pre-set templates. |
In the Contract details section, you can enter the following details:
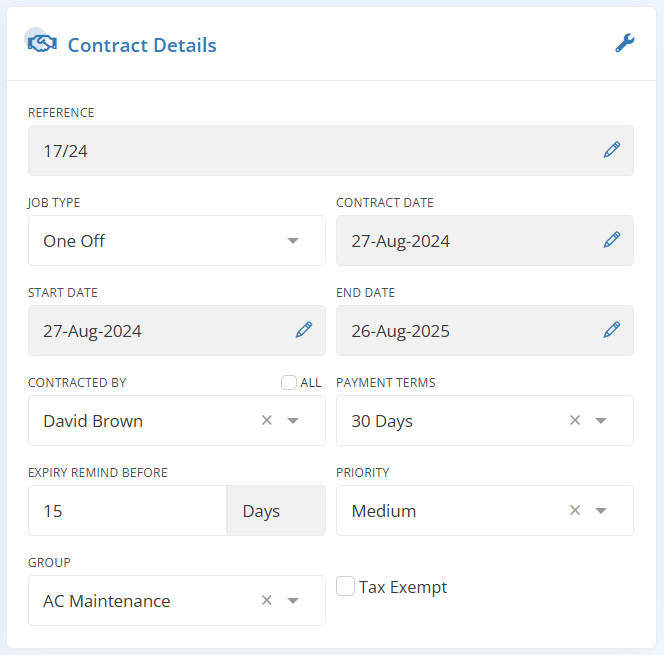
| Reference: | The reference number, often known as the document number, is the unique number used to identify each Contract. You can create a default contract number pattern with a sequence that increases with each new contract. This reference number can be edited and manually entered. When clicking the edit icon, you’ll see the option Select Reference Pattern to choose a pattern already saved under Settings > Reference Pattern. |
| Job Type: | The job type can be either One-off or Recurring. Choose “One-off” if the service is needed just once and select “Recurring” if your proposal includes services that will be repeated on a regular schedule. Learn how to create a recurring Contract by clicking here. |
| Contract Date: | The date of the Contract is commonly referred to as the Contract date. The default date will be the current date, but you can also modify it by selecting the date from the calendar. |
| Start Date: | The date on which you enter the Contract is referred to as the “Contract Start Date”. |
| End Date: | Choose the date until which the contract remains valid. |
| Contracted By: | Choose the employee who represents this Contract on your company’s side. When the Contract is printed, the Contract by information can be displayed. |
| Payment Terms: | The number of days within which payment should be made after receiving the invoice. You can manage payment terms under Company Setup > Company Profile > Manage Payment Terms. |
| Expiry Remind Before: | By inputting the days in this fields, you can specify when the expiry reminder should happen. |
| Priority: | Priority is a simple priority labeling for the Contract that is used internally in your organization. The available options are: low, medium, and high. |
| Group: | Choose a group to which this Contract belongs. Any classification inside your organization can be considered a group. |
| Tax Exempt: | When you tick this checkbox, all tax-related values will be removed from each line item of the Contract. |
In the Items header section, you can enter the following details:

| Title: | The title for the scope of work. Check the Jobsite as title checkbox to replace the title with the jobsite. This will not be printed by default in the Contract, but it can be used as a Variable within any content. |
| Jobsite: | Jobsite is the physical location where the work is done. You can choose a job site from the drop-down list. You can use the “jobsite variable” to display the jobsite anywhere in the Contract content. Click here to know how to add multiple job sites for a customer. |
| Scope of Work: | You can add your scope of work here in this field. The Scope of Work is the area in an agreement where the work to be performed is described and it may contain any milestones, reports, deliverables, and end products that are expected to be provided by you. |
In the line items section, you can enter the following details:

| Service/Product: | Choose the service or product from the drop-down list. You can add service items from a separate menu in the company setup; you cannot do so right here. Click here to know how to add new service/product. |
| Service Description: | A service description is a detailed explanation or documentation of a service, which outlines what the service provides, how it functions, and how it can be accessed. It typically includes information such as the service’s features, benefits, limitations, how it is used and supplied, and what all things clients will receive |
| Units: | Add the unit of the service. |
| Unit Measurement: | Add the measuring unit, if needed. It depends on the service you offer. It could be Hours, Square feet, Square Meter, and so forth. |
| Rate: | It is the price per unit. |
| Subtotal: | It is the unit price multiplied by the total unit. This field is also editable, and when you make changes, the unit rate is updated based on the total units. |
| Duplicate: | Clicking the duplicate button will add the same service item with the same quantity and price to the Contract. |
| Add New Line: | Click this button to add a new service line item to the Contract. |
In the bottom section, you can enter the following details:
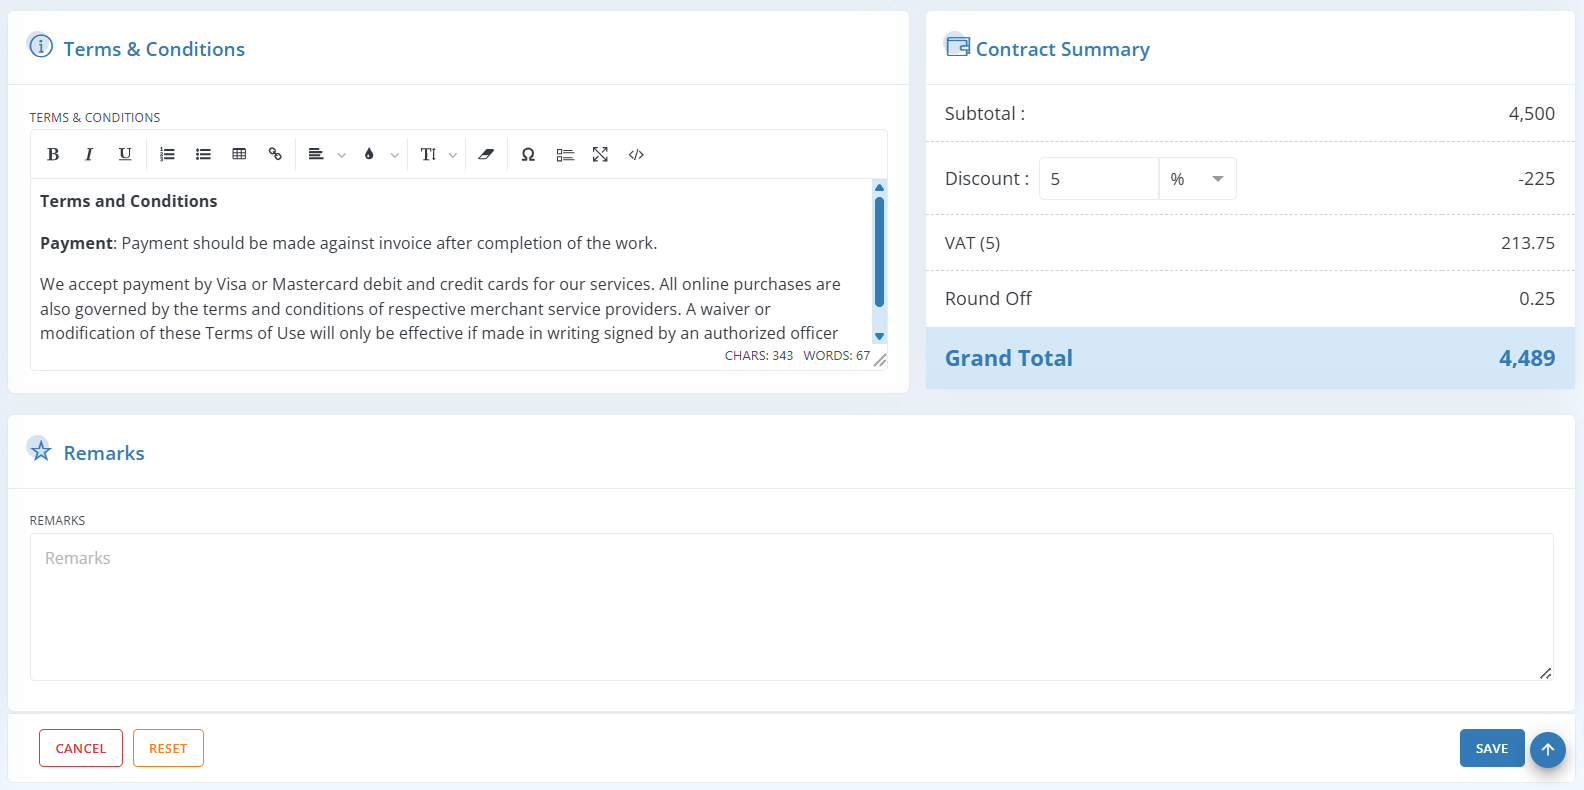
| Terms and Conditions: | Add terms and conditions to clarify things like payment terms, warranty terms or any other terms. |
| Subtotal Amount: | Total of all Contracted prices, without any discounts or taxes. |
| Discount Amount: | You can add any discount on the entire Contract here in this discount field. |
| Tax Amount: | Total Tax amount in the Contract. |
| Grand Total: | The final amount after everything is added up; the sum of other totals. |
| Remarks: | You can add any remarks on your Contract. |
| Cancel: | Click Cancel to bring back to previous screen. |
| Reset: | Click Reset to cancel all the changes you made in the Contract. |
| Save: | Click Save to save the Contract and it will be in draft status. |
Add Optional Item
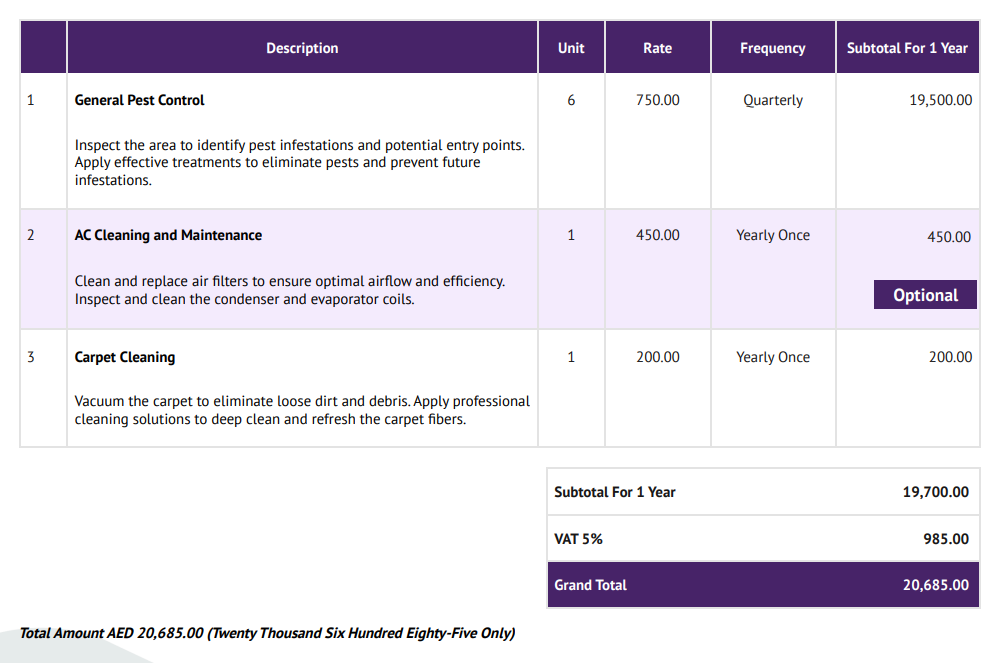
The Optional feature allows you to add any optional services to your Contracts. These services will be clearly labeled as Optional in the output and will not contribute to the Grand Total amount, providing clarity for your clients.
To enable the Optional Item feature:
- Navigate to Settings > PDF Configurations > Contracts.
- Under Common Configurations, enable Add Optional Item.
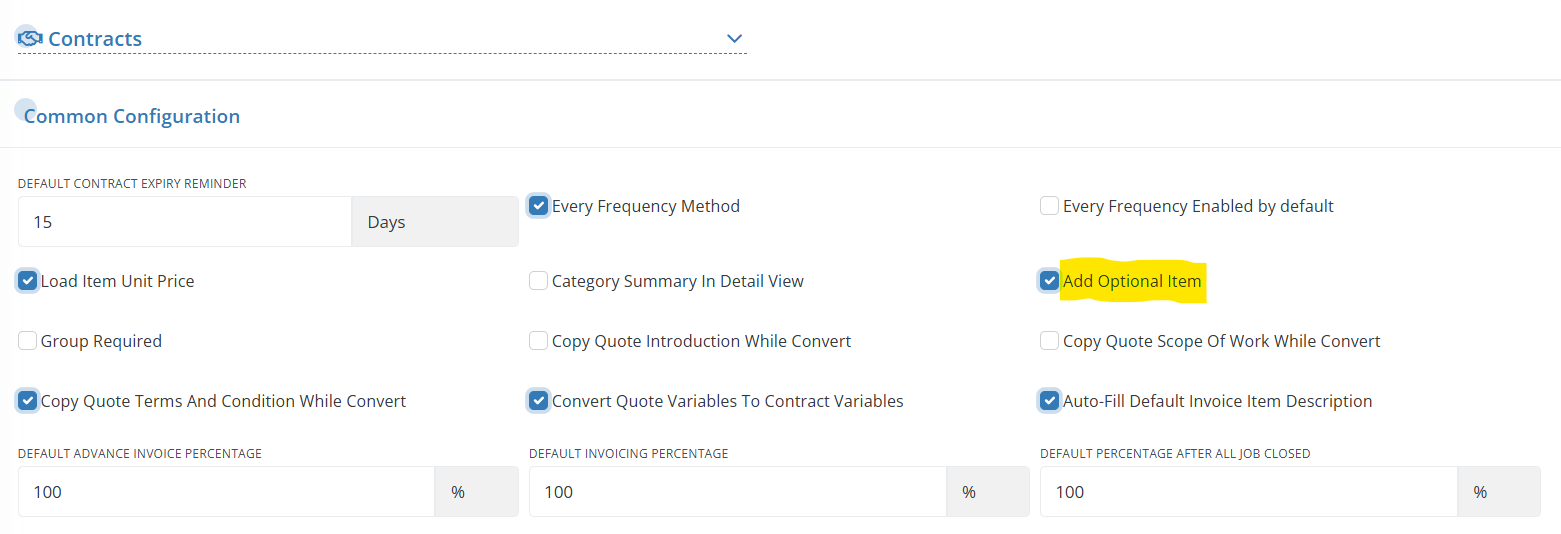
Once enabled, you’ll find the Optional module in the Edit Contract page. Here, you can add services as optional by checking the Optional checkbox. Services marked as optional will not be included in the Grand Total amount.

To customize the appearance of optional services:
- Go to Settings > PDF Configurations > Contracts.
- Under Common Configurations, adjust the background color, font color, and other settings.
- Click Save to apply your changes.

Below is an example of how the PDF output will look:
Additional Contract configurations
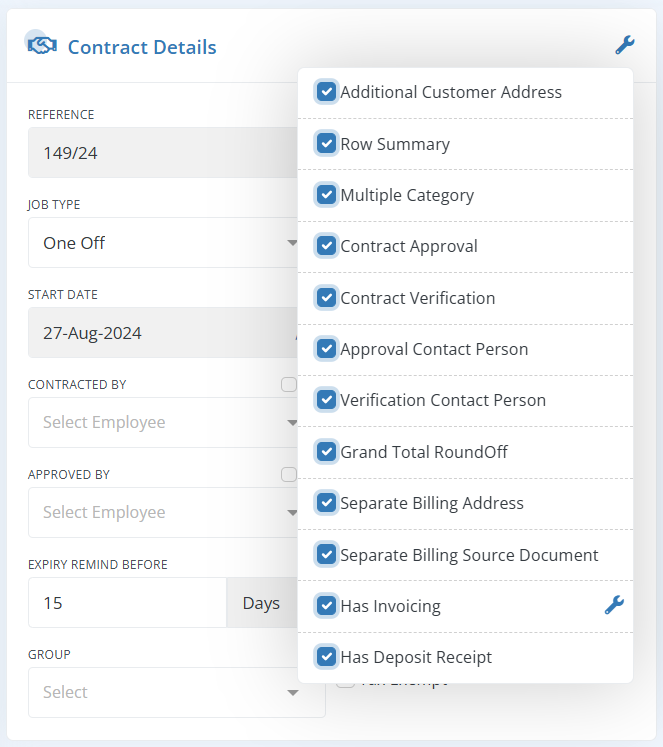
The additional configuration button is found in the top right corner of the Contract editing page.
Additional Customer Address
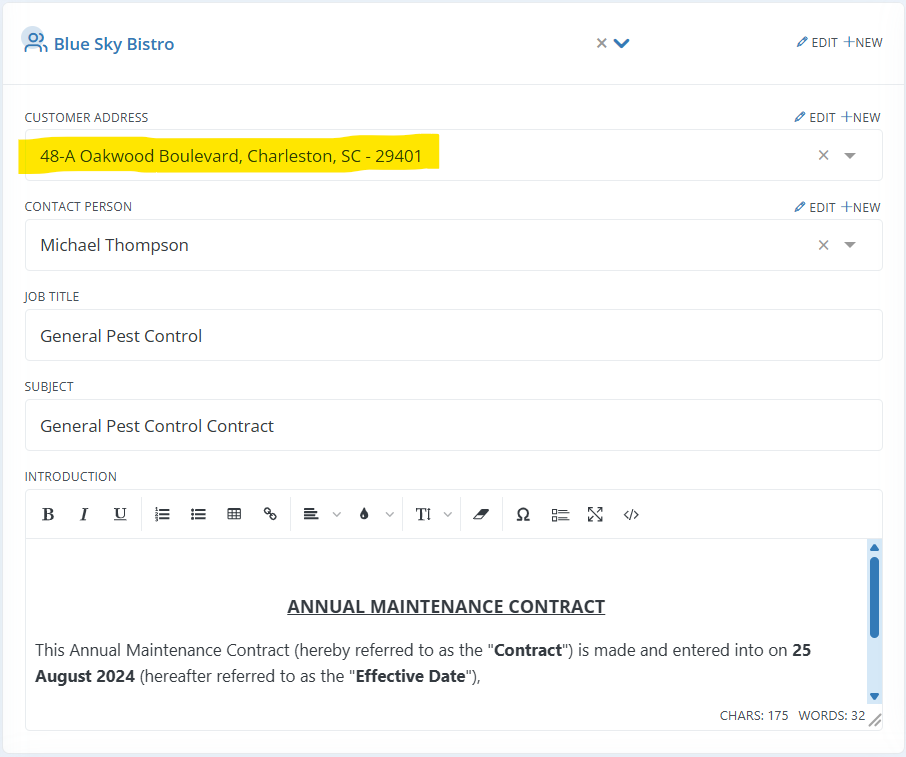
- To add more than one Customer address, enable Additional Customer Address.
Row Summary
Enable Row summary, to display Subtotal, Discount, Tax and Grand Total in the row itself.
| Subtotal: | Calculated as unit price multiplied by total units. This field is editable, and any changes will adjust the unit rate accordingly. |
| Discount: | Apply a Discount to the service item, if applicable. |
| Tax: | The Tax amount applied to the service item, which can be configured in Company Setup >Taxes |
| Grand Total: | The final amount after all additions, discounts, and taxes are applied |
- It is necessary to Enable Show row summary if you want to add any discounts to the line item. Adding a Discount is as simple as clicking the colored $ label.
- If the row summary is enabled, you can also add, change or remove taxes from the line item.

Multiple Category
- You can add multiple categories within a single Contract. For instance, if you need to offer the same service at different job sites with varying prices, you can add multiple categories.
- Tick the Multiple Category checkbox to enable More Options and +Add Category at the bottom of the service line-item section
- Under More Options, you can choose to Duplicate, Insert, or Delete a category.

Contract Approval and Verification
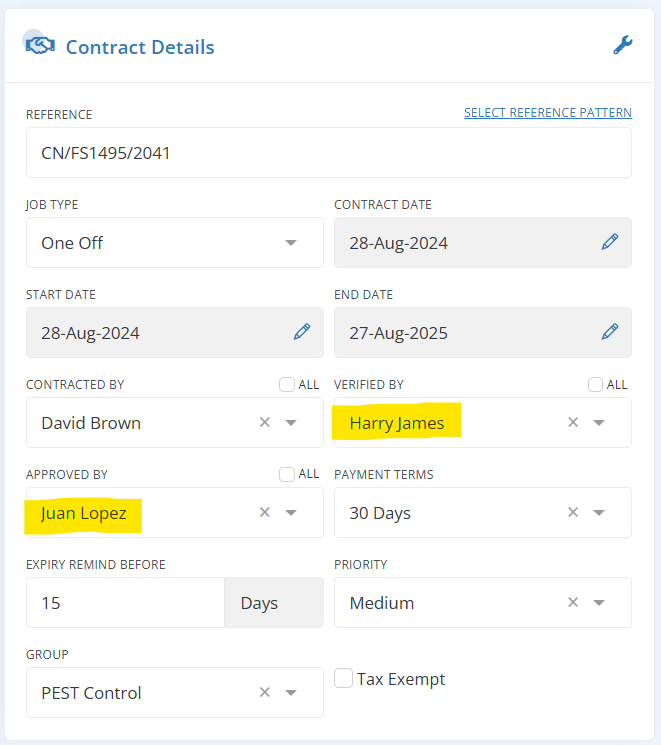
- Enable Verified By to add the name of the customer-side employee who has confirmed their understanding of the service or product to be provided.
- Also, enable Approved By to specify the person who has approved the process.
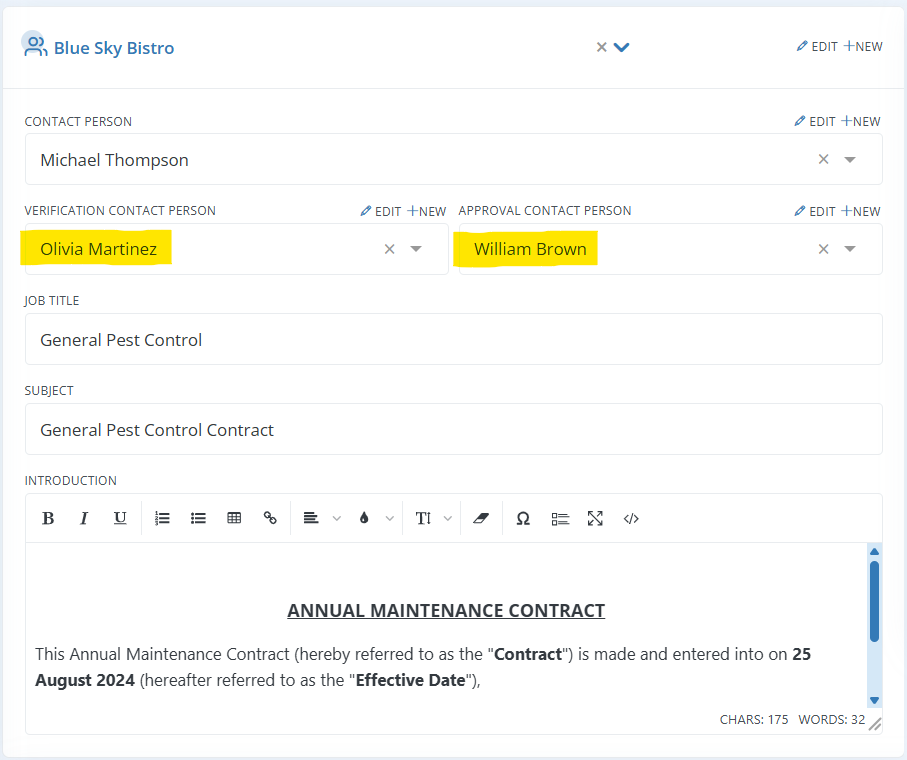
Verification and Approval Contact Person
- Enable Verification Contact Person to add the person you can contact regarding the verification of contract.
- Enable Approval Contact Person to add the person you can contact regarding the approval of contract.
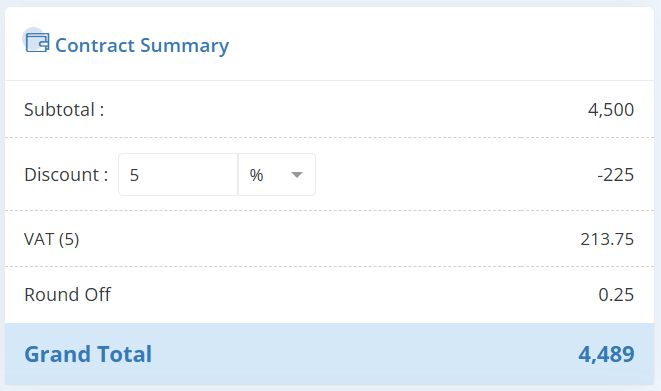
Grand Total RoundOff
Enable Grand Total RoundOff to Round off the grand total value to the nearest lower/higher whole number.
For example: if the grand total is 1237.6 then it will round to 1238.
Separate Billing Address

| Billing Customer: | Choose the Billing Customer from the list. |
| Billing Contact Person: | Choose the Billing Contact Person from the dropdown list. To add a new billing contact person, click the +New button in the top right corner of this field. |
| Billing Customer Address: | Choose the Billing Customer Address from the dropdown list. |
Separate Billing Source Document
A Billing Source Document is a reference document, such as a Purchase Order (LPO), that provides essential details for billing purposes and helps ensure accuracy and consistency throughout the service workflow.
You have the option to include a Billing Source Document in the Contract, such as an LPO (Purchase Order). When adding the document, you can provide details like the Documented date, Document reference number, and Document name.

Note: Once added, the Billing Source Document will automatically carry over across the entire workflow. Whether you renew a Contract, create a Job, add Schedule Plans and Schedules, or ultimately generate an Invoice, the source document details will remain attached throughout each stage.
This functionality isn’t limited to Contracts alone—any document where you add a Billing Source Document will maintain those details across the entire cycle, ensuring consistency and traceability.

Has Invoicing
Enable Has Invoicing if you want to generate invoices from the Contract itself.

| Invoice End Date: | Choose the invoice end date for invoice reminders from the calendar. |
| Invoice start Date: | Choose Invoice start date for invoice reminders from the calendar. |
| Billing Frequency: | Select the billing frequency here. Invoice reminders will be generated based on the frequency you set. The default selection will be not necessary. Choose one from the list: Daily, Weekly, Monthly, Yearly |
| Advance Invoice: | Enabling this field will create Invoice reminder in advance. |
| Invoice after all job closed: | Check the Invoice After All Closed checkbox to send reminder after closing all jobs |
Invoice Reminders
Workstair allows you to setup Invoice Reminders from Contracts, if the contract Has Invoicing.
- Enter the Invoice Start and End dates and setup the Billing Frequency.
- Billing frequencies can be of Daily, Weekly, Monthly, Yearly or you can setup Custom frequencies.
- To setup Custom frequency, choose an interval from the drop-down menu: Day, Week, Month or Year

For example, if you need the Billing Frequency to be the Last Day of Every Month: Choose Frequency as Month, Every as 1 Month, Select Type as Day of Month and choose the Last Day.


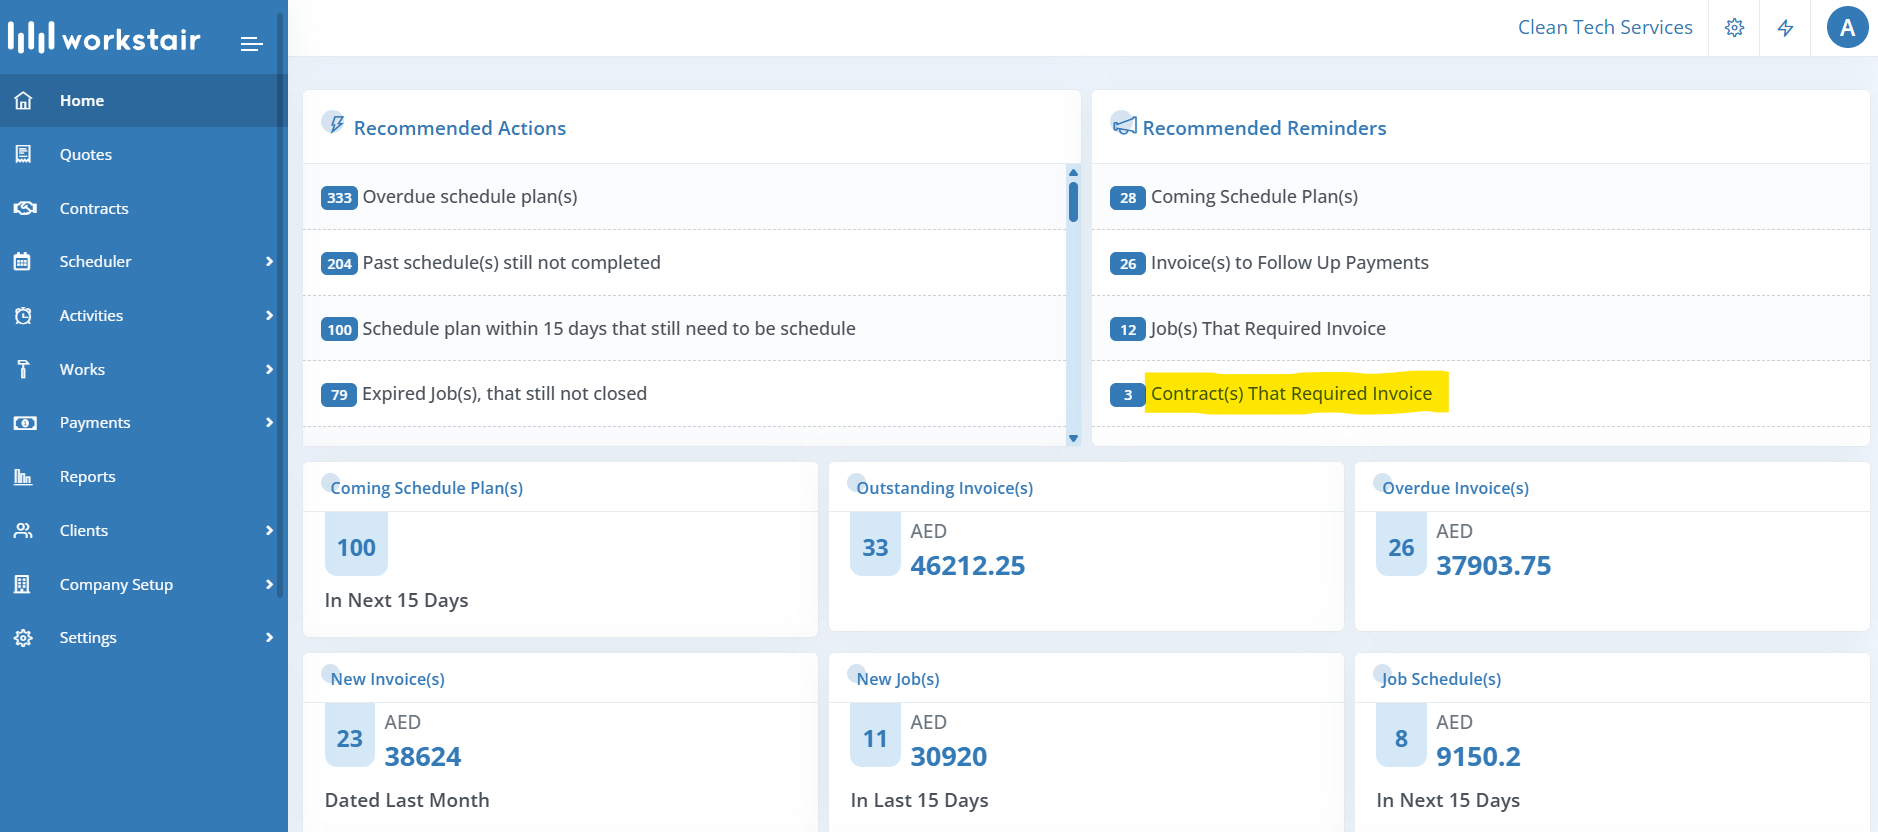
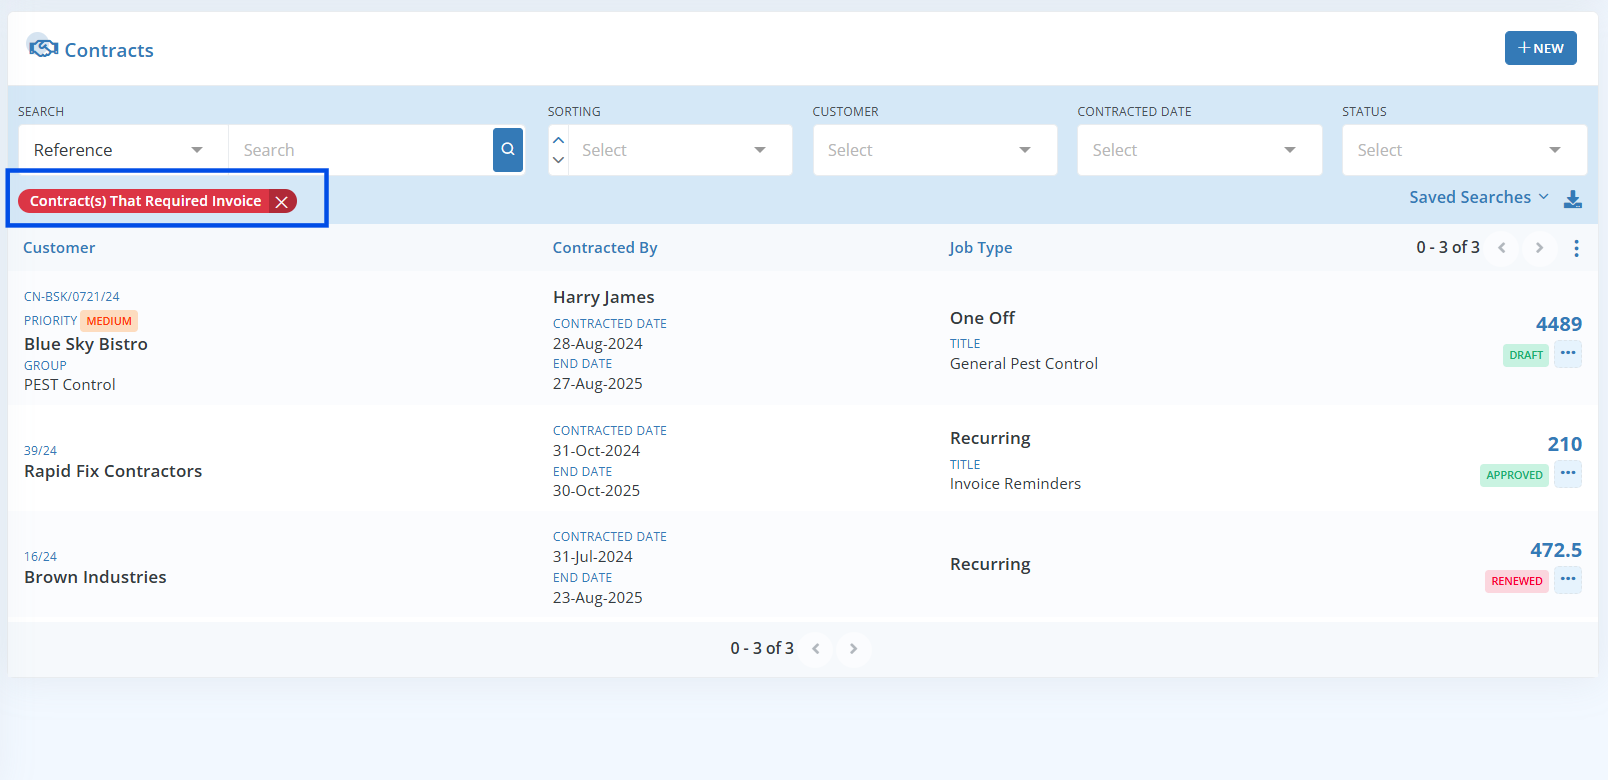
These reminders will then be appearing in the Dashboard accordingly. Clicking on a reminder will take you to the relevant Workstair page.
For example, Contracts that required Invoice will take you to those contracts which is yet to be invoiced.
Advance Invoicing
In Workstair, Advance Invoicing lets you set invoice amounts in Contract. You can specify initial, subsequent, and completion amounts for jobs. This feature gives you flexibility to set amounts per item, choosing fixed amounts or percentages.
Here are the steps to set up advance invoicing in a Contract:
- On the Contract Edit page, enable Has Invoicing under Configuration Settings.
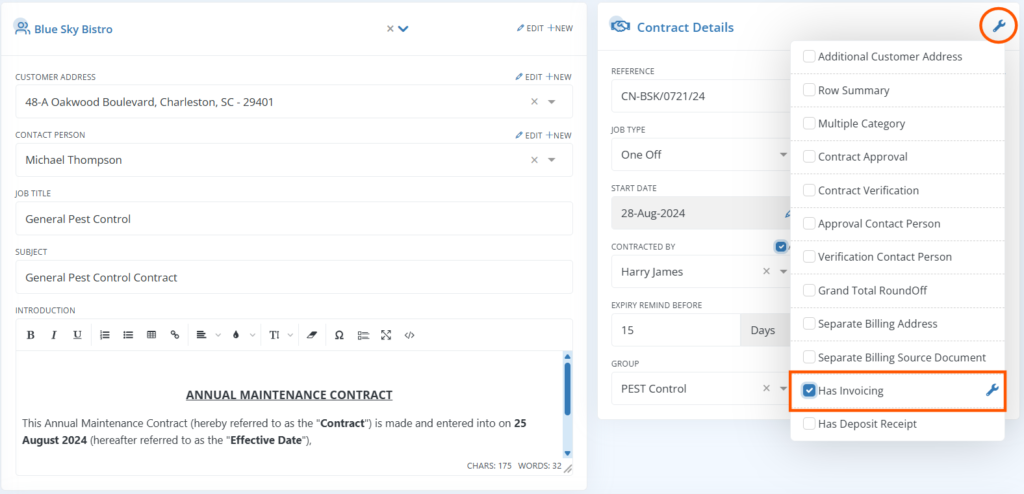
2. Enable Advance Invoice and Invoice after all jobs closed in the Invoice Reminder section.
Note: If you want to set a specific amount for the first invoice only, enable ‘Advance Invoice’. If you need to set a specific amount after all jobs are completed, enable ‘Invoice After All Job Closed.’

3. Click the More button in the Service Item section, then select Invoice Configuration.

4. In the pop-up window, configure the following settings:
- Invoicing Type: Choose between Percentage or Amount.
- Invoicing: Set the normal invoicing amount to be generated.
- Advance Invoice: Specify the initial invoice amount.
- After All Jobs Closed: Set the invoiced amount after all jobs are completed. This amount will be included in the invoice only when all the jobs from the contracts are completed.

Note: You can set different percentages or amounts for each item.
With these settings, invoices created from Contract will follow your setup automatically.
Recurring Contract
Consider the following scenario:
We are creating a recurring Contract for a one-year job with Four schedules that repeat every 3 months.
In the Contract details section:
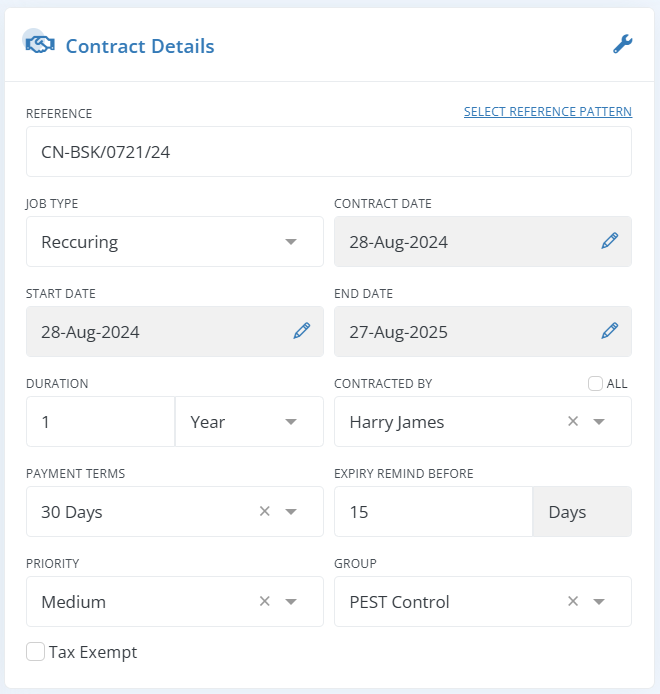
- Select Job Type as Recurring.
- Set any duration by adjusting the number field and changing the time span to Year, Month, Week, or Day.
In Service/Product Item section:

| Frequency: | Enter the Frequency of job occurrence here. Tick Every checkbox, to set the schedule frequency for “every given time duration”. |
| Summary: | Total units will get adjusted in accordance with duration and frequency. The Subtotal will be adjusted in accordance with the frequency selection. |
More options in line item
The basics of service items, including how to add a service item, change the quantity, and set a pricing, have been covered in this section.
On the service line item area, go to the far right corner for additional options button, then click to view the options as shown below.

| Duplicate: | Click Duplicate to add an identical service item to the Contract.(use this option when you want to add a similar service item with a few minor changes.) |
| Insert Item Above: | Adds a line item above this line item. It is used to bring a service item above the existing item in the linear order. |
Once you select Set Item name ,Set Frequency Term and Adjust Total units, Then Service/Product pane will appear like this.

| Set Item Name: | Adds an alternate name for the service line item. If an alternative name is specified, the actual service item name will be replaced with the given name. |
| Set Frequency Term: | The given custom frequency term will replace the default frequency term (system generated) in the PDF document. For example you can give “Quarterly” for any service that is provided for “every 3 months”. |
| Adjust Total Units: | It is used when you want to change the number of service units in the system-calculated units. The subtotal price will be recalculated when you adjust the total units. In the above example, 2 additional units will be added, for a total of 6 units. |
Contracted By Signature
To enable contracted by Signature in Workstair is quite easy.
- Go to Settings > PDF Configurations
- Select Contracts from the dropdown

- In the Common Configurations, enable the Signature module
- Customize the Signature label, Font size and Signature Position
- Click Save to apply the changes

Note: Ensure the employee with Signature is selected as the Contracted By contact.
Contract Renewal
In Workstair, renewing an existing contract is quick and simple with just a single click.
- Go to the Contract Details page.
- In the Actions pane, click Renew Contract.
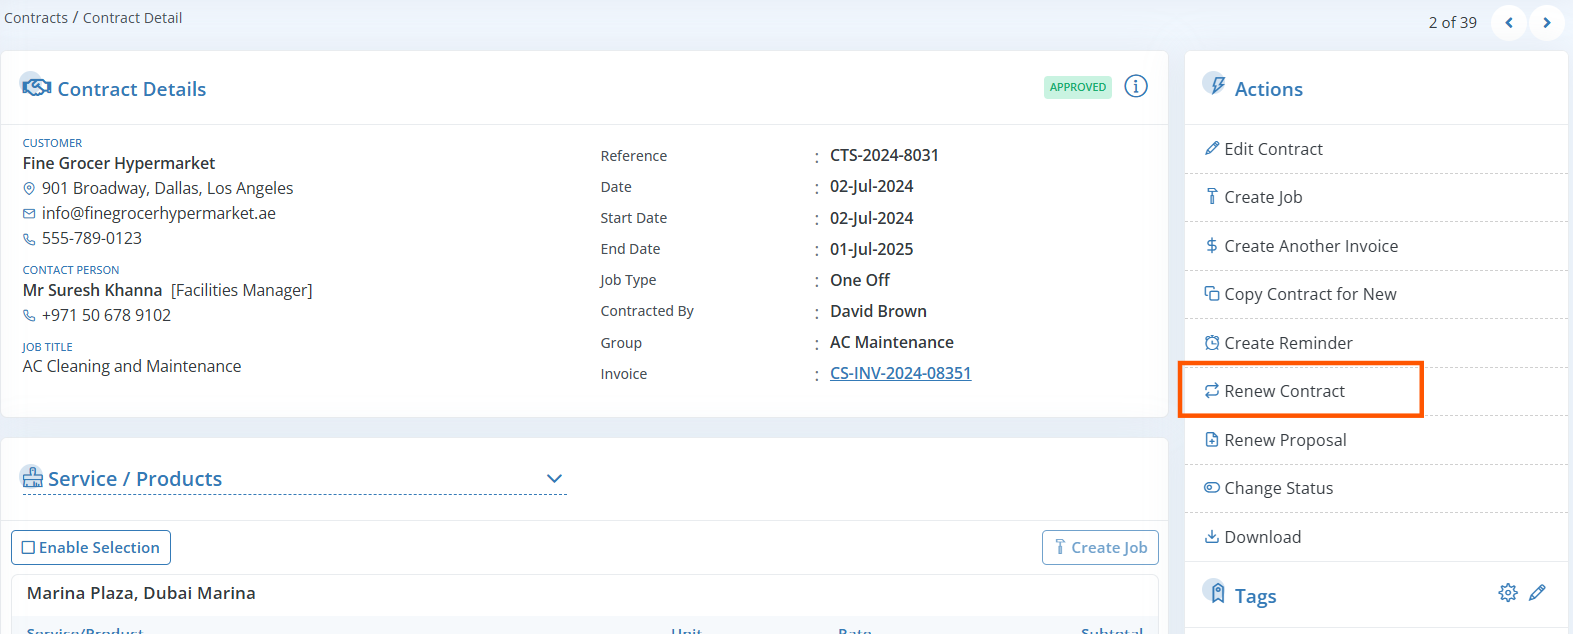
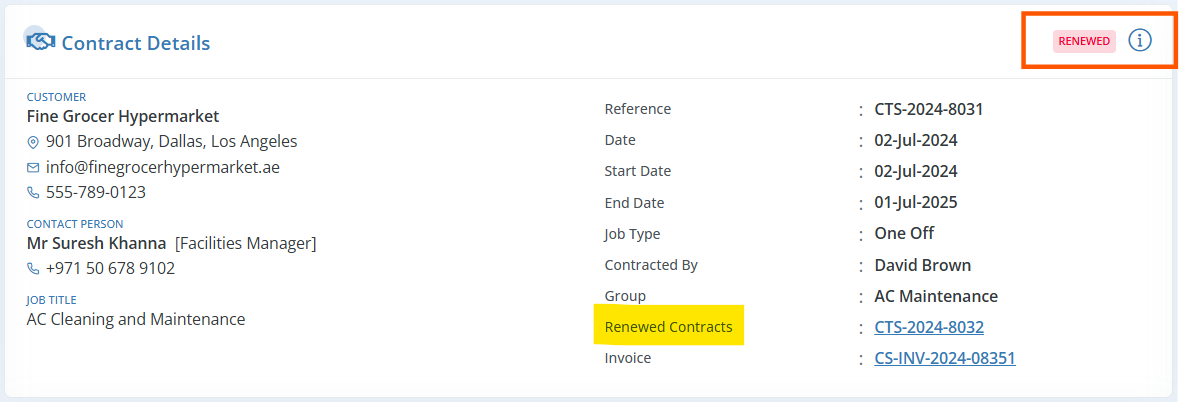
Once the Renewed Contract is created, the status of the current contract will automatically change to On Renewal.
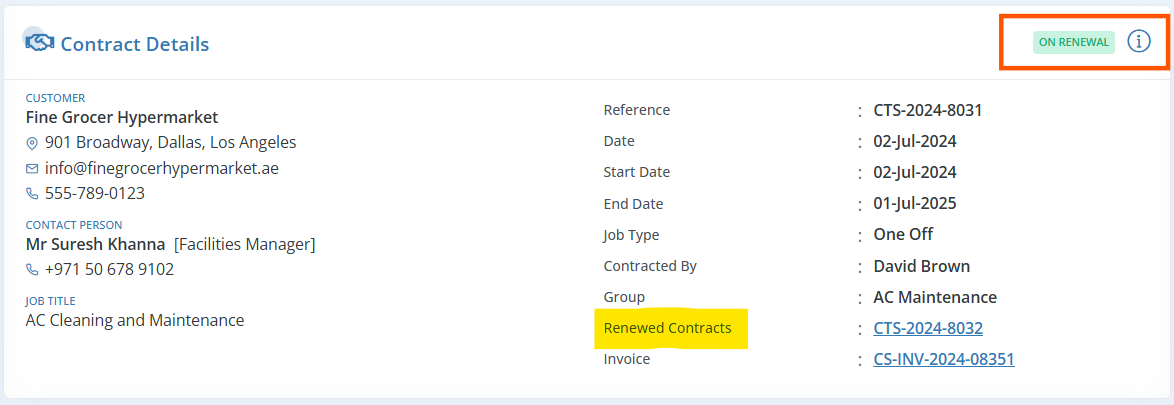
When the renewed contract’s status updates to Signed, the current contract’s status will automatically change to Renewed.
More Actions
You can perform a number of actions once a Contract is created. These actions are available in the action pane of the Contract summary page.
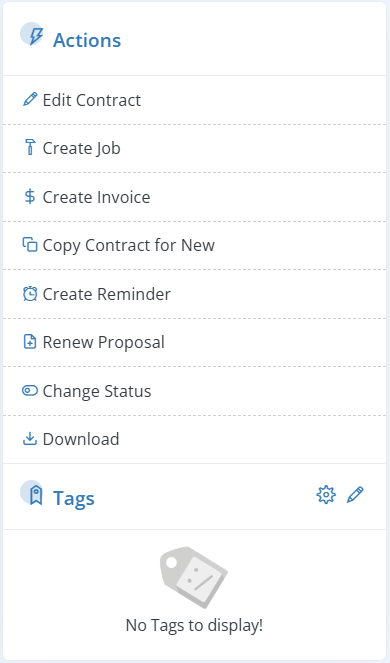
| Edit Contract: | You can edit and modify an existing Contract. |
| Create Job: | Create a Job from a Contract. Customer details and service items will be transferred to the Job upon conversion. However, once a Contract is converted to a Job, any changes made to the Contract will not reflect on the Job. |
| Create Invoice: | Generate an Invoice from a Contract. Customer details and service items will be transferred to the Invoice upon conversion. However, once a Contract is converted to an Invoice, any changes made to the Contract will not reflect on the Invoice. |
| Copy Contract for New: | Create a new Contract by copying an existing one. All details will be duplicated except for the Contract number and date. |
| Create Reminder: | You can create Invoice Reminders directly from the Contracts. |
| Renew Contract: | To renew a Contract, click Renew Contract. This option becomes available only after the status is updated to Approved. |
| Renew Proposal: | To renew a Proposal, click Renew Proposal, and then the Quotes Editing screen will open. This option becomes available only after the status is updated to Approved. |
| Change Status: | Change the status of the Contract. For example, once a Contract is submitted to the customer, you can change its status from Draft to Submitted. |
| Download: | This button is used to download the saved Contract, to share it with the client. |
Contract Statuses
| Draft: | This is a Contract which is simply created but not sent to the client. |
| Submitted: | This is a Contract already submitted and waiting for a response from the client. |
| Request to modify: | This is a Contract that a client requested you to change something. |
| Approved: | This is a Contract that has been approved by the client. |
| Signed: | This is a Contract that has been signed by the client. |
| On Renewal: | This is a Contract which is renewed. |
| Renewed: | This is a Contract which is renewed. |
| Archived: | A Contract which is not converted to a job can be kept as archived. |
| Rejected: | This is a Contract rejected by a client. |
| Finished: | This is a Discharged Contract. |
Using Variables
In Workstair, a variable represents a generic value in a textual portion of a document that will be replaced with an actual value when the output is generated. In document templates, you can add a variety of variables, such as the Contracted date, the jobsite, the job duration, etc. These variables will be replaced with actual values in the outputs when you generate PDF. To choose a variable, click the drop-down menu in the text box’s right corner.
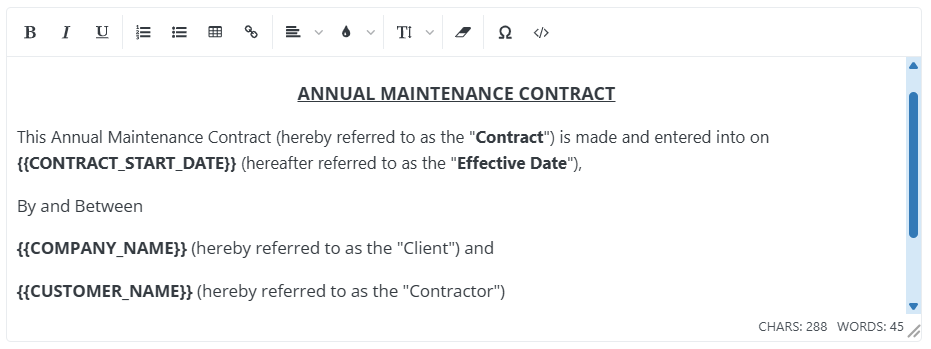
The output will be:

Some examples of available variables are:
- Current date
- Job site
- Customer group name
- Contract end date
- Delivery note reference
- Company name
- Contact Person name
- Contract date
- Contract grand total amount in words
- Contract grand total amount in words
- First schedule start date
- Company address
Contract Templates
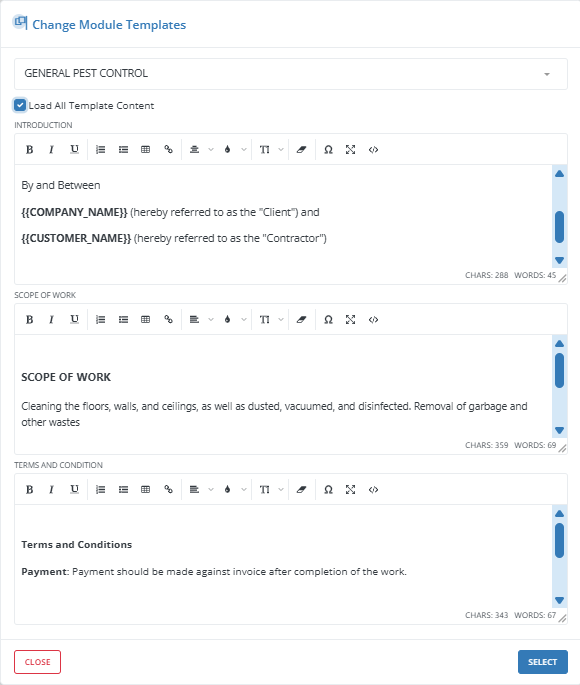
Certain sections of the Contract, such as the “Introduction,” “Scope of Work,” and “Terms and Conditions,” are frequently repeated for similar services. These repetitive sections can be saved as Contract Templates in Workstair, allowing you to create contracts quickly and efficiently.
Note: Want to learn more about creating Module Templates ? Click here!

Introduction text will be added to the Contract after selecting an option from the list and clicking the Select button.
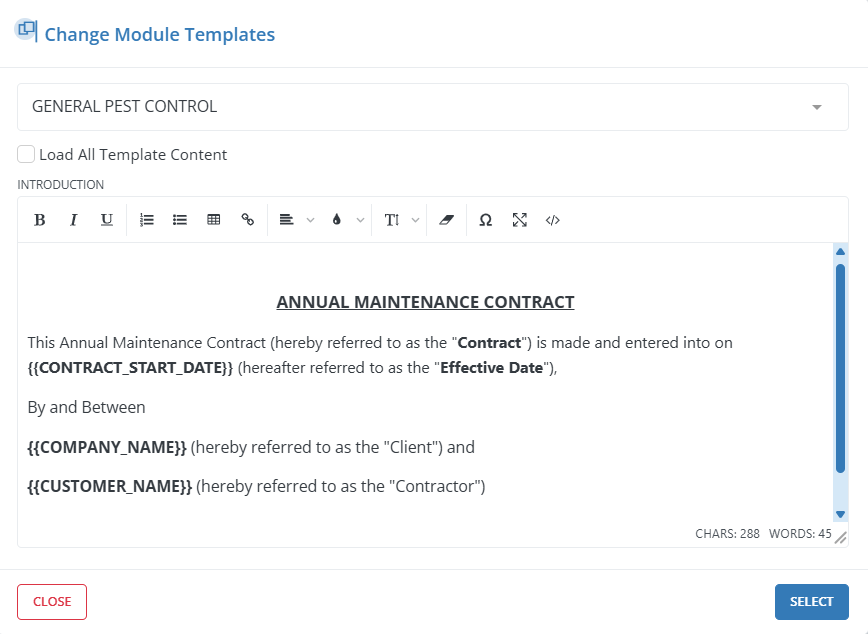
Load All Template Content
When the “Load All Template Content” checkbox is enabled, the sections for “Introduction,” “Scope of Work,” and “Terms and Conditions” will appear simultaneously.
Click the Select button to insert the content into the Contract.
Searching a Contract
The advanced search option in Workstair allows you to search documents in many ways.
To Search a Contract in workstair:
- Goto Left Menu bar > Contracts.
- Search Contract by Job Title, Reference Number, Customer, Created date or Status.
Note: To sort Contracts, select from available criteria such as Reference Number, Created At, Updated At, or Priority.

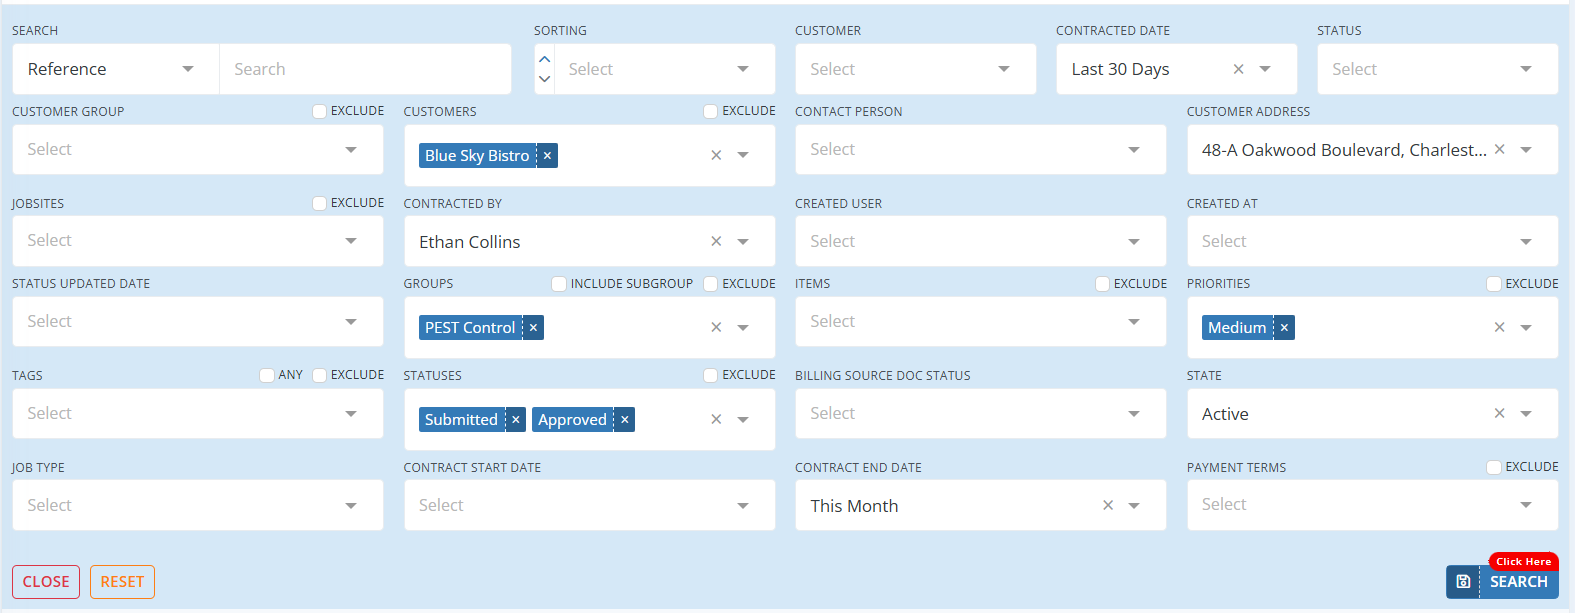
For more search options:
- Click Untitled Filter button.
- There you can search Contracts for multiple Customers, Job Sites, Tags, Statuses.
- Click Search
It is possible Later, when you click on the saved search, Contracts will be displayed based on the saved criteria. Click here to learn more about Saved Searches!

