Table of Contents
Module Configuration
In Workstair, Module Configuration refers to the settings and customization options that are available for a specific module such as Quotes, Contracts, Jobs etc… Module configuration allows users to tailor the software to their specific needs and preferences, and to optimize the use of the software for their particular organizational requirements. Here each module has different configuration option. You can customize each module by selecting type of module from the dropdown list.
Quotes Configuration
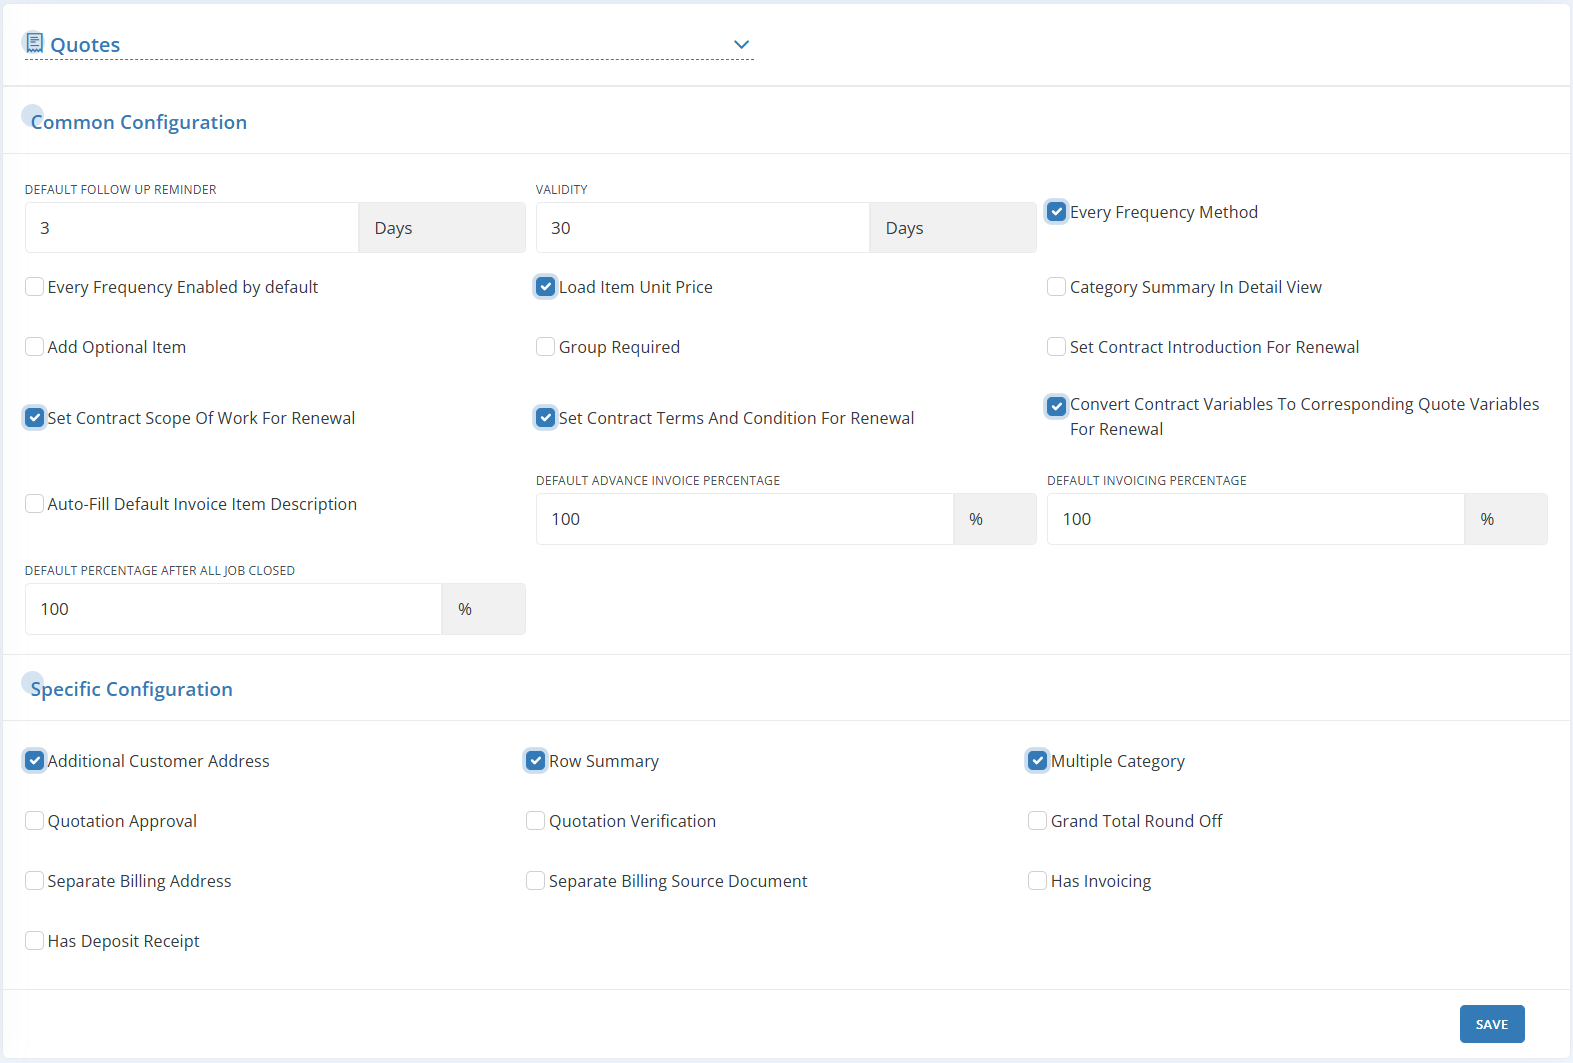
| Default Follow Up Reminder: | Set an automatic reminder for follow-ups to ensure timely actions |
| Validity: | Validity of quotation refers to the period during which the Quoted price and terms offered by a company to its customer or client remain valid. |
| Every Frequency Method: | Enable this option to show or hide Every checkbox in the product/services section of the Quote creation page. Once enabled, an additional option, Every Frequency Enabled by Default, will appear. This allows you to automatically set the Every checkbox to be selected by default for all items. |
| Load Item Unit Price: | When this option is enabled, the unit price that has been pre-set in Company Setup > Items will automatically populate in the Quote when an item is selected. |
| Category Summary in detail view: | Enable this checkbox to display the category summary in detailed view of the Quotes. |
| Add Optional Item: | Enabling this checkbox displays an Optional checkbox in the service/product pane. When selected, it marks the corresponding service or product as optional, allowing customers to decide whether to include it in their final selection. |
| Group Required: | Enable this option to make the Group field mandatory. |
| Set Contract Introduction for Renewal: | When renewing a Contract (Contracts > Actions > Renew Proposal), the Contract Introduction will automatically populate in the Quotation Introduction field. |
| Set Contract Scope of Work for Renewal: | When renewing a Contract, the Scope of Work from the original Contract will automatically populate in the renewal Quotation Scope of Work field. |
| Set Contract Terms & Conditions for Renewal: | When renewing a Contract, the Terms & Conditions from the original Contract will automatically populate in the renewal Quotation Terms & Conditions field. |
| Convert Contract Variables to Corresponding Quote Variables for Renewal: | When renewing a Contract, the Contract Variables will automatically convert to their corresponding Quotation Variables. |
| Auto-Fill Default Invoice Item Description: | Automatically populates a description for each Invoice item based on a predefined default setting. |
| Default Advance Invoice Percentage: | Set a predetermined percentage of the total Invoice amount that must be paid in advance by the customer in this field. |
| Default Invoicing Percentage: | Set a default percentage that will be applied to the work cost, which will automatically appear while creating an Invoice. |
| Default Percentage After All Jobs Closed: | Set a default percentage that will be applied to the work cost after all Jobs or tasks associated with the service/product have been completed. |
Specific Configuration:
To show or hide options in the Additional Configuration pane of the Quotation creation page, select or deselect the corresponding checkboxes:
- Additional Customer Address
- Row Summary
- Multiple Category
- Quotation Approval
- Quotation Verification
- Grand total round off
- Separate Billing Address
- Separate Billing Source Document
- Has Invoicing
- Has Deposit Receipt
Contracts Configuration
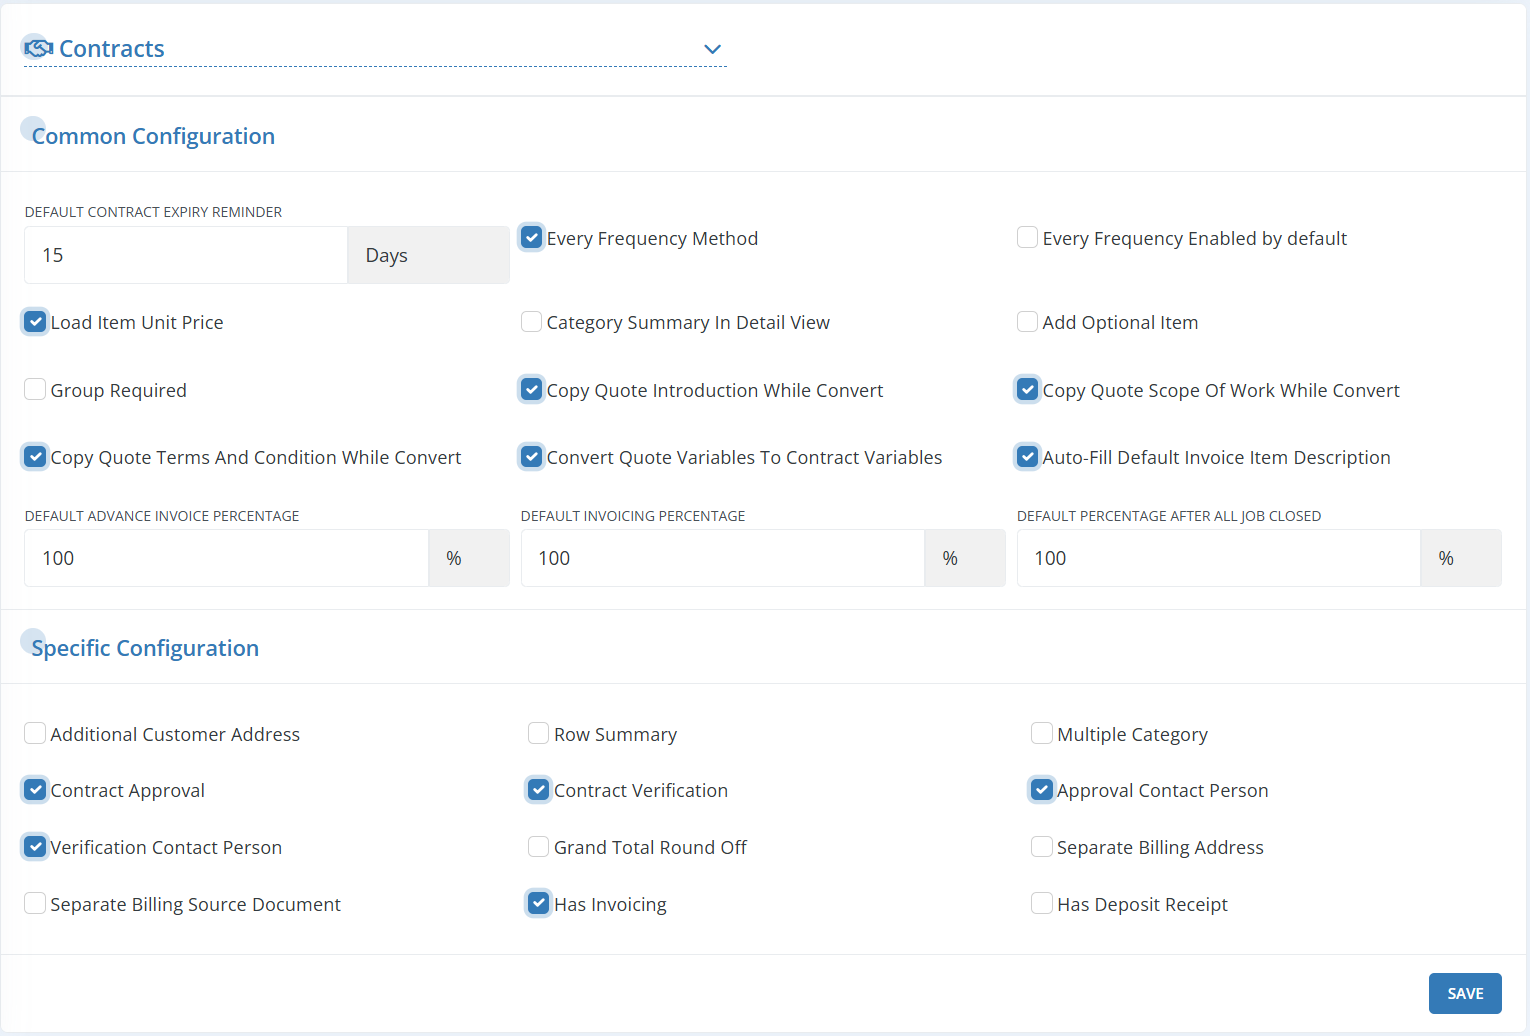
| Default Contract Expiry Reminder: | Specify the number of days in advance you’d like to receive a Contract expiry reminder. This notification is automatically generated by the system to alert you when a Contract is about to expire. |
| Every Frequency Method: | Enable this option to show or hide Every checkbox in the product/services pane on the Contract creation page. Once enabled, Every Frequency Enabled by Default checkbox will appear by default, allowing you to set it as checked automatically. |
| Load Item Unit Price: | When this option is enabled, the unit price pre-set in Company Setup > Items will automatically populate when an item is selected. |
| Category summary in detail view: | Enable this option to display a category summary in the detail view. |
| Add Optional Item: | Enabling this option adds an Optional checkbox to the service/product pane. Selecting it will mark the service or product as optional, allowing customers to choose whether to include it in their final selection. |
| Group Required: | To make the Group field mandatory, enable the Group Required option. |
| Set Quote Introduction While Convert: | When converting a Quotation to a Contract, the quote’s Introduction will automatically populate in the contract’s Introduction field. |
| Set Quote Scope of Work While Converting: | When converting a Quotation to a Contract, the Scope of Work from the quote will automatically populate in the contract’s Scope of Work field. |
| Set Quote Terms and Conditions While Converting: | When converting a Quotation to a Contract, the quote’s Terms & Conditions may or may not automatically transfer to the contract’s Terms & Conditions field. |
| Convert Quote Variables to Contract Variables: | When converting a Quote to a Contract, the variables in the quote will automatically convert to their corresponding contract variables. |
| Auto-Fill Default Invoice Item Description: | Enabling this feature will automatically populate a description for each Invoice item based on predefined settings. |
| Default Advance Invoice Percentage: | Set a predefined percentage of the total Invoice amount to be paid in advance by the Customer. |
| Default Invoicing Percentage: | Set a default percentage of the Work cost that will automatically appear when creating an Invoice. |
| Default Percentage After All Jobs Closed: | Set a default percentage of the total cost that will apply once all jobs or tasks associated with the service/product are completed. |
Specific Configuration:
To show/hide the below options in additional configuration pane of Contract creation page, select/deselect corresponding checkboxes.
- Additional Customer Address
- Row Summary
- Multiple Category
- Contract Approval
- Contract Verification
- Approval Contact Person
- Verification Contact Person
- Grand Total Round Off
- Separate Billing Address
- Separate Billing Source Document
- Has Invoicing
- Has Deposit Receipt
Jobs Configuration
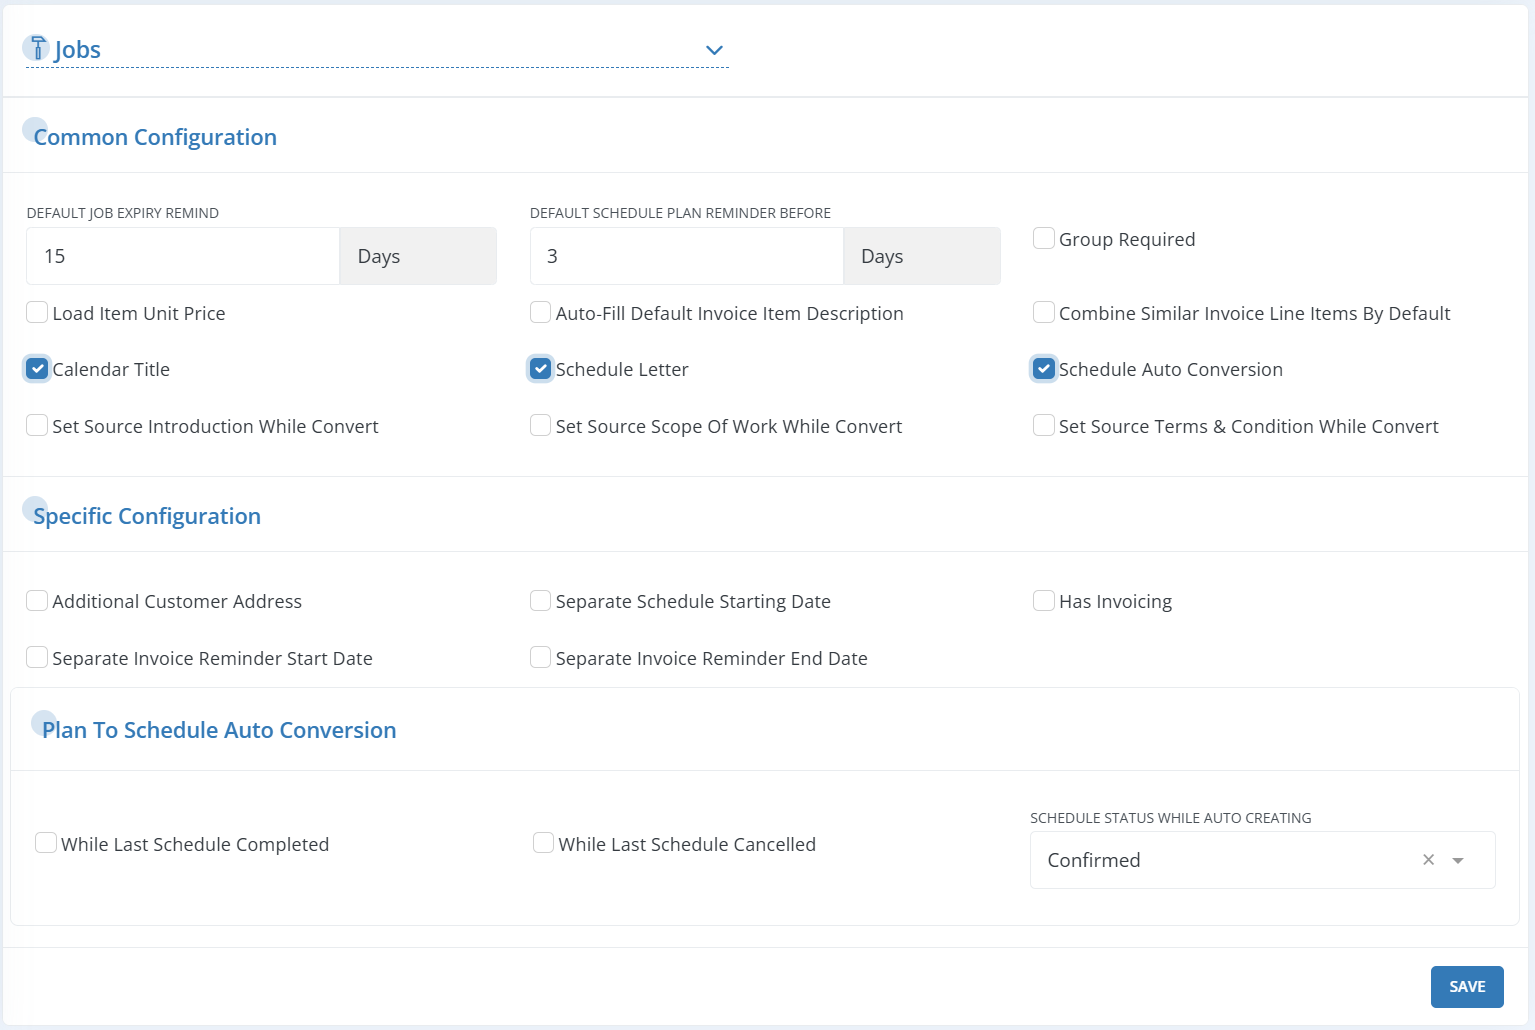
| Default Job Expiry Reminder: | Set the number of days in advance to receive reminders for upcoming Job expirations. |
| Default Schedule Plan Reminder: | Specify how many days in advance you’d like to receive reminders for upcoming Schedule Plans. |
| Group Required: | Enable this option to make the Group field mandatory. |
| Load Item Unit Price: | When enabled, the unit price pre-set in Company Setup > Items will automatically populate when an item is selected. You can manually edit the unit price if needed after it has been auto filled. |
| Auto-Fill Default Invoice Item Description: | Enable this checkbox to automatically populate a description for each Invoice item based on a predefined setting. |
| Combine Similar Invoice Line Items by Default: | Select this option to automatically group Invoice line items that share the same name, description, and price. |
| Calendar Title: | Enable to set the title that will appear in the Calendar for the Jobs. |
| Schedule Letter: | |
| Schedule Auto Conversion: | Enable this feature to automatically convert Schedule Plans into Schedules. |
| Set Source Introduction While Convert: | When converting a source document (e.g., quote, contract) to Jobs, the source’s Introduction will automatically populate in the new document. |
| Set Source Scope Of Work While Convert: | When converting a source document (e.g., quote, contract) to Jobs, the source’s Scope of Work will automatically populate in the new document. |
| Set Source Terms & Condition While Convert: | When converting a source document (e.g., quote, contract) to Jobs, the source’s Terms & Conditions will automatically populate in the new document. |
Specific Configuration:
To show/hide the below options in additional configuration pane of Jobs creation page, select/deselect corresponding checkboxes.
- Additional Customer Address
- Separate Schedule Starting Date
- Has Invoicing
- Separate Invoice Reminder Start Date
- Separate Invoice Reminder End Date
Schedule Configuration
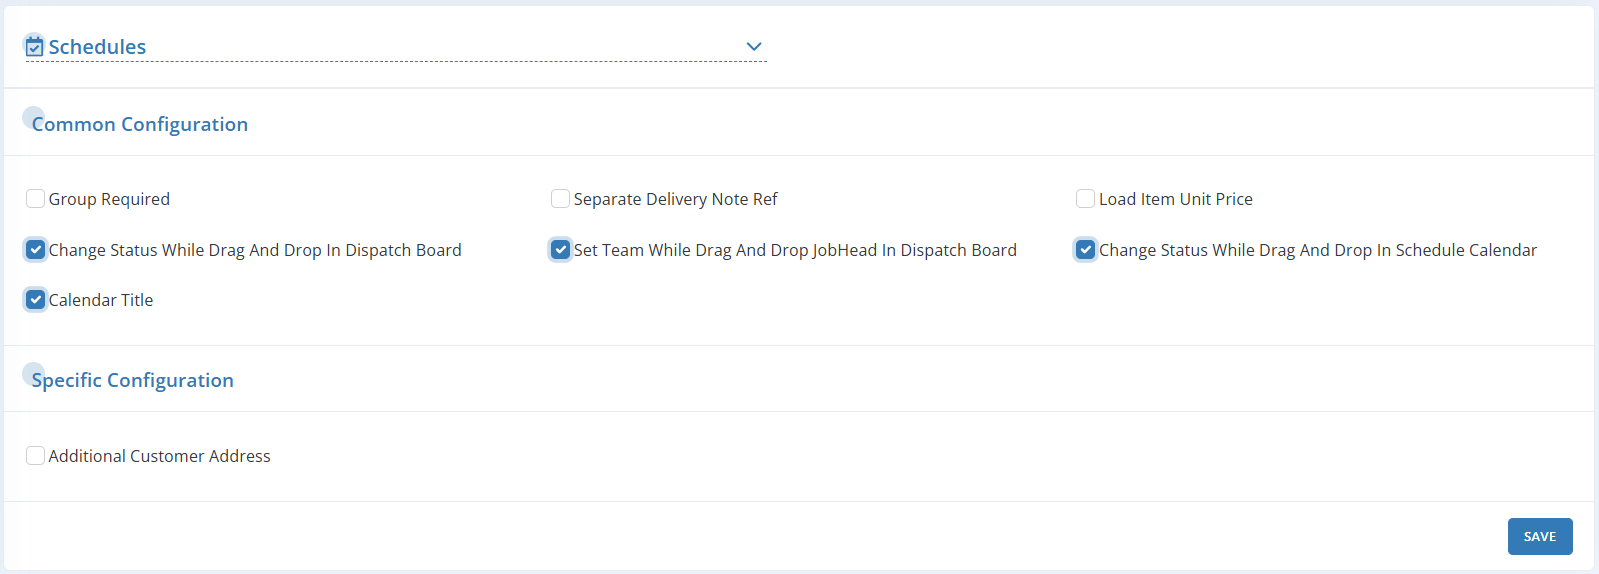
| Group Required: | To make the Group field mandatory, enable the Group Required option. |
| Separate Delivery Note Ref: | Enable this option to display a Separate Delivery Note Ref field on the Schedule creation page, allowing you to enter additional details about the products or services being delivered. |
| Load Item Unit Price: | When enabled, the unit price pre-set in Company Setup > Items will automatically populate when an item is selected. You can manually edit this field, if necessary, after the value is populated. |
| Change Status While Drag and Drop in Dispatch Board: | Enable this option to automatically change the status of Schedules when they are moved via drag and drop on the Dispatch Board. |
| Set Team While Drag And Drop JobHead In Dispatch Board: | Enable this feature to assign a team when dragging and dropping the JobHead in the Dispatch Board. |
| Change Status While Drag and Drop in Schedule Calendar: | Enable this option to automatically update the Schedule status when Jobs are moved in the Schedule Calendar via drag and drop. |
| Calendar Title: | Set the title that will be displayed for Schedules in the calendar. |
Specific configuration:
To show/hide the below option in additional configuration pane of schedules creation page, select/deselect corresponding checkboxes.
- Add additional Customer address
Invoices Configuration
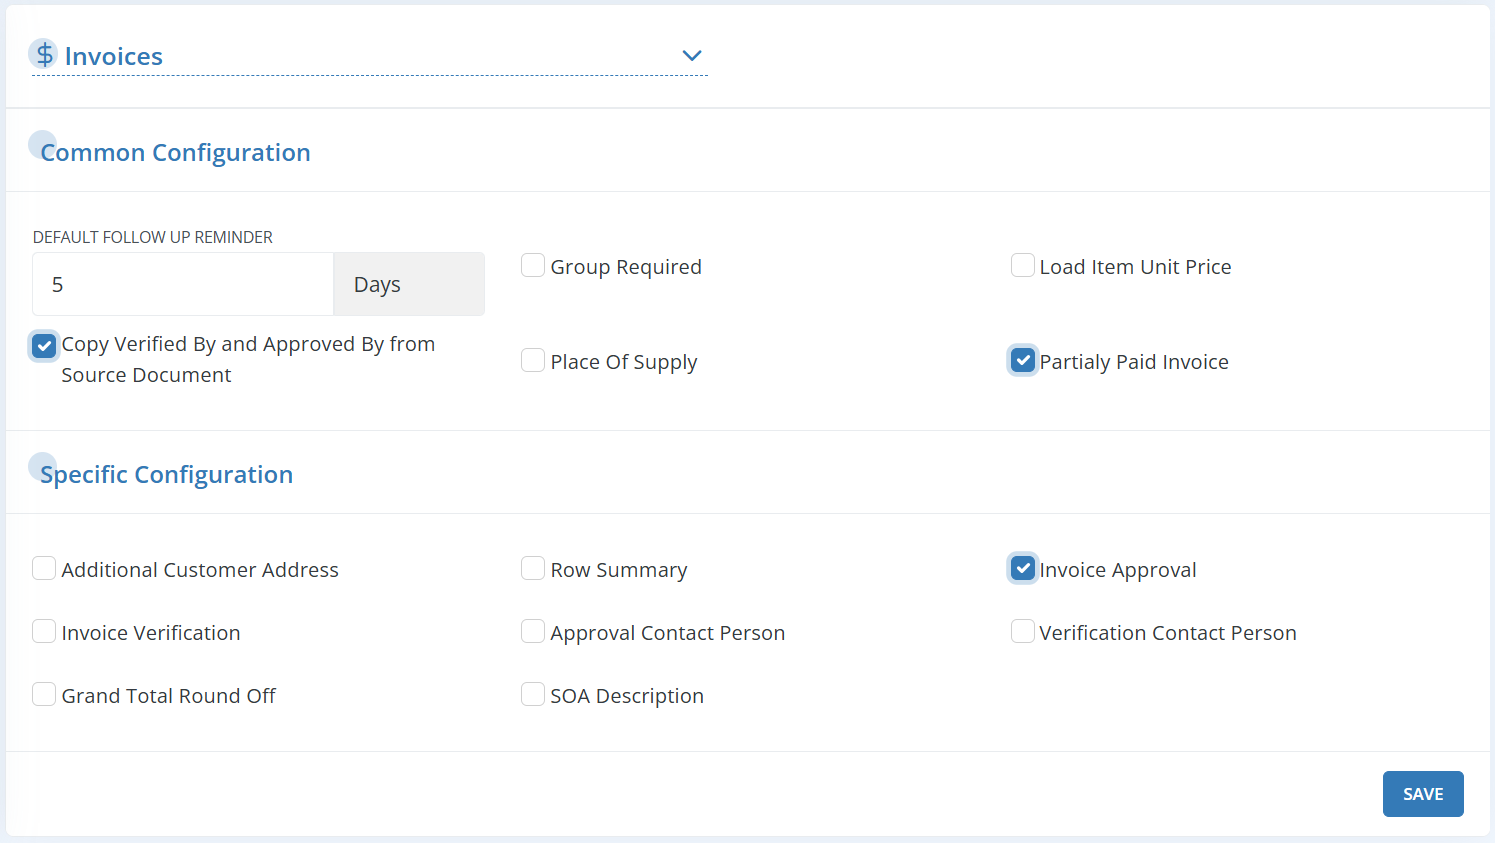
| Default Follow Up Reminder: | Enable this option to automatically send reminders to Customers if their Invoices remain unpaid after a certain period. |
| Group required: | Enable this option to make the Group field mandatory. |
| Load item unit price: | When enabled, the unit price pre-set in Company Setup > Items will automatically populate when an item is selected. You can manually edit this field if needed after it has been populated. |
| Copy Verified By and Approved By from Source Document: | Enable this option to automatically copy the Verified By and Approved By fields from a source document, such as a Quote or Contract, when creating an Invoice. |
| Place of supply: | Select or deselect this checkbox to show or hide the Place of Supply field in the Invoices module, which helps determine applicable tax rules and rates. |
| Partially Paid Invoice: | Enabling this module will display a Partially Paid checkbox in Invoices. This checkbox allows you to enter partial payments received against the Invoice, and a Receipt will automatically be generated for the received partial payment. |
Specific configuration:
To show/hide the below options in additional configuration pane of Invoice creation page, select/deselect corresponding checkboxes.
- Additional Customer Address
- Row Summary
- Invoice Approval
- Invoice Verification
- Approval Contact Person
- Verification Contact Person
- Grand Total Round Off
- SOA Description
Receipts Configuration
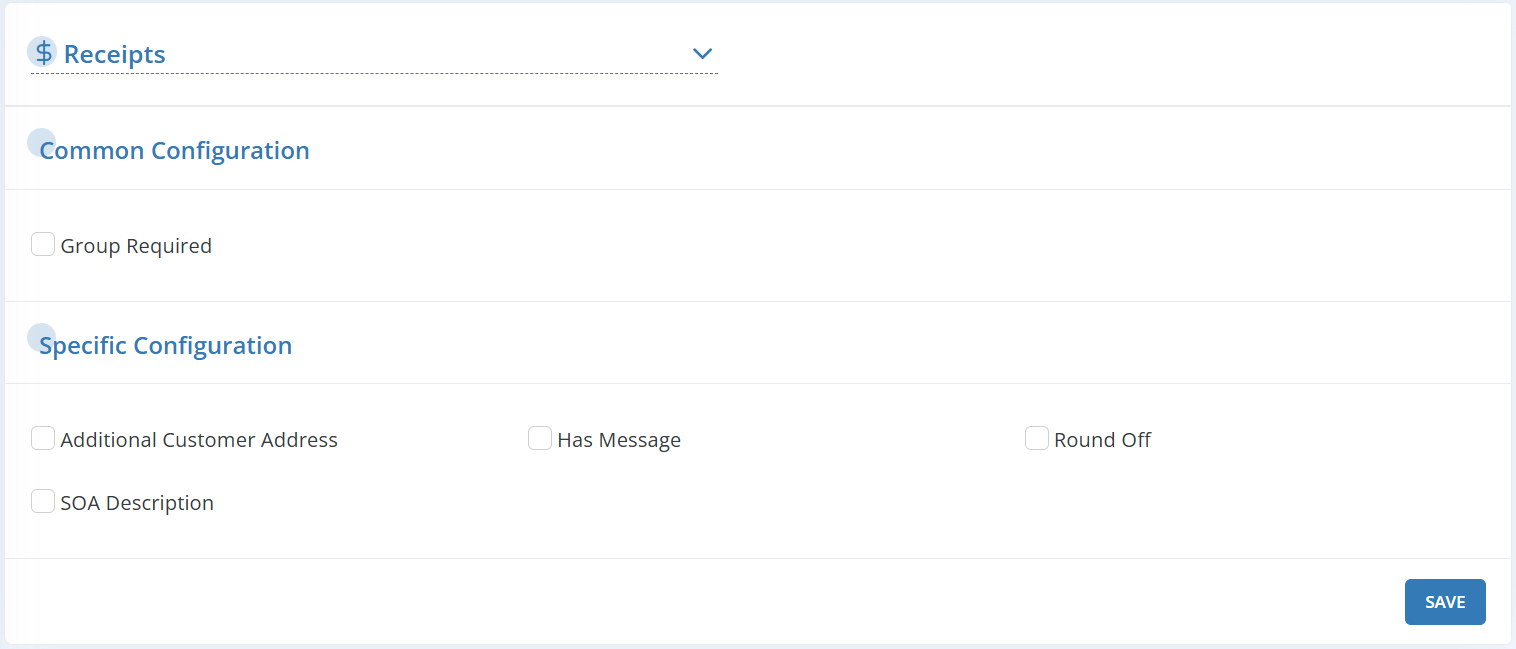
| Group Required: | In order to make the Group field mandatory, select the Group Required field. |
Specific configuration:
To show/hide the below options in additional configuration pane of Receipts creation page, select/deselect corresponding checkboxes.
- Additional Customer Address
- Has Message
- Round Off
- SOA Description
Pdf Configuration
Workstair offers a wide range of configuration options, allowing you to customize the appearance of PDFs to suit your needs. You can effortlessly modify elements like fonts, background, orientation, and size.
To perform these customizations:
- Navigate to Settings > PDF Configurations.
- Select the module from the dropdown menu for which you’d like to edit the PDF template.
- Create and save multiple configurations, each with a unique name, for future use.
- To create a new configuration, click +New, assign a name, set your desired configurations, and then click Save. Your saved configurations can be applied to documents as needed.

There are two types of configurations:
| Common configuration: | A configuration which is applied for all documents, which means any changes made will be applied to all documents |
| Specific configuration: | A configuration which can be applied to a particular document. You can keep different specific configurations for different documents. |
Since the configurations for various modules resemble one another considerably, the functionalities are described below using Quotes as an example.
Pdf Common Configurations:
| Page Size: | Based on the type of content in the document, you can choose between A4 and Letter sizes from the dropdown. |
| File Name: | Specify the file’s naming scheme here, which will be used when you save the PDF. |

Title Pane:
You can customize:
- Table Content Margin: Adjust the top and bottom margin space to control the distance between the title of a section and its corresponding entry in the table.
- Border Thickness & Color: Customize the appearance of the title by entering the border thickness in the first field. Set the border color by either entering a hex color code or clicking the colored square to open the color picker in the second field.
- Set the line border, border style, division, font size, and title style for your documents.
- You can also customize the label and font color for the Reference, Contract Date, and Grand Total fields.
- To set a background color for these fields, check the Background Color for Title Table checkbox.

Subject pane:
You can add a label for the subject in the Label Field. Additionally, you can style the subject label and its content as Bold or Italic as needed.

Details Table Configuration:
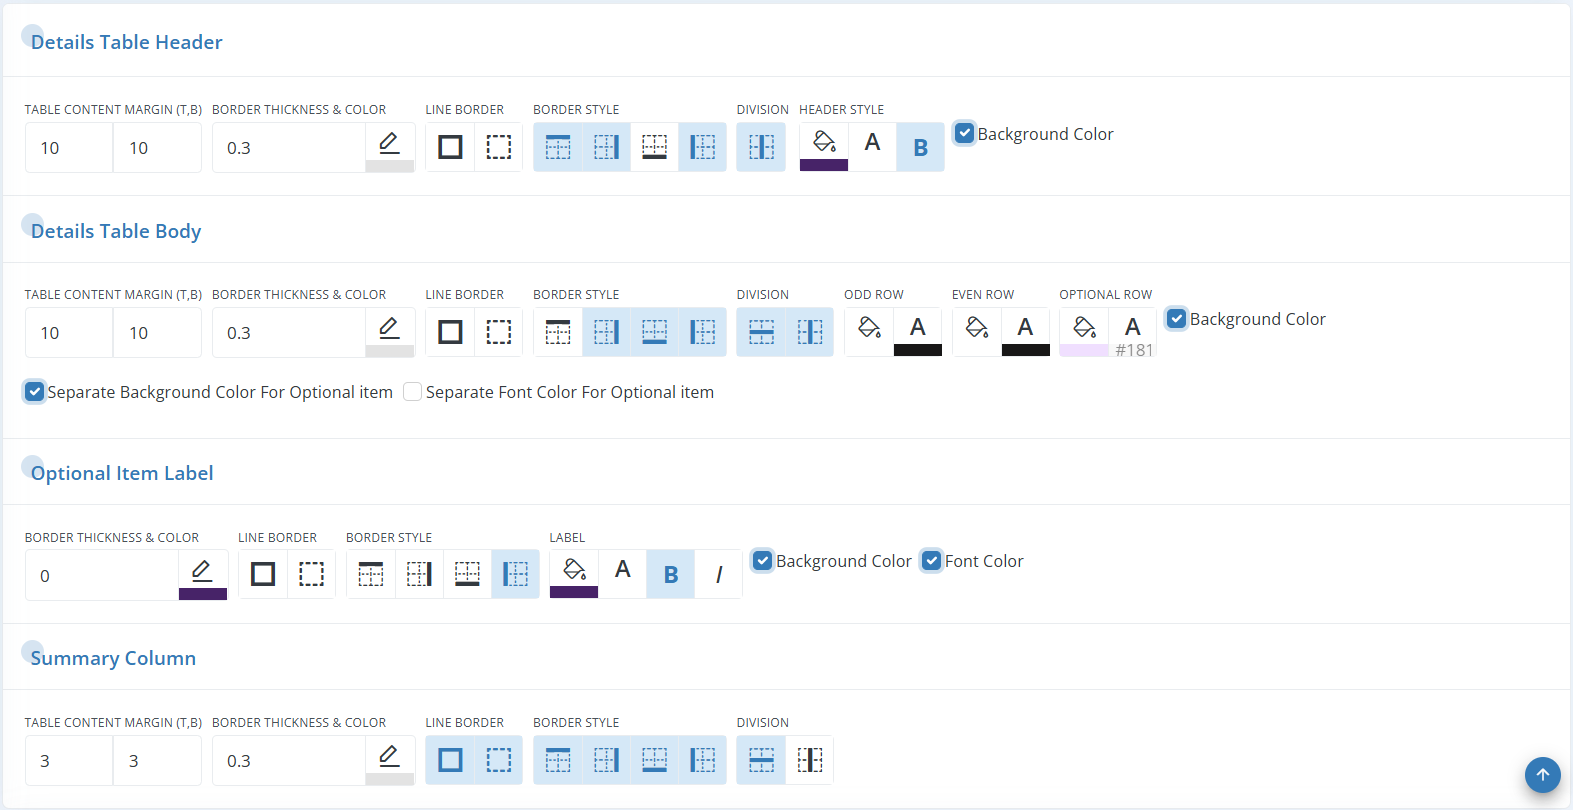
| Details Table Header: | Adjust the top and bottom margins, border thickness, color, line border, styles (border, division, header). Enable or disable the background color using the Background Color checkbox. |
| Details Table Body: | Set the top and bottom margins, border thickness, color, and styles (line, border, division) for the table body. To add stripes, set different background and text colors for Odd Row and Even Row, and for optional row items. Use the Background Color checkbox to enable or disable background color. |
| Optional Item Label: | Customize the border thickness, color, line style, background color, font color, and style for optional labels. Enable or disable background and font color by selecting the Background Color and Font Color checkboxes. |
| Summary Column: | Set the top and bottom margins, border line thickness, color, line border, border style, and division style for the summary column. |
Category Summary pane:
- Set the top and bottom margins, border thickness, color, line border, border style, and division style for the Category Summary Table. To enable or disable background color options in the category summary pane, select or deselect the Background Color checkbox.
- Customize the background color, font color, and font style (Bold) for Subtotal in the Period, Subtotal for All Duration, Category Discount, Category Tax, and Grand Total within the Category Summary Table.

Total Summary Table Header & Body Pane:
| Total Summary Table Header: | Set the top and bottom margins, border thickness, color, line border, and styles (border, division, header). Use the Background Color checkbox to enable or disable background color. |
| Total Summary Table Body: | Define the top and bottom margins, border thickness, color, and styles (line, border, division) for the table body. To add stripes, set different background and text colors for Odd Row and Even Row, and for optional row items. Use the Background Color checkbox to enable or disable the background color. |

Quote Summary pane:
- Set the top and bottom margins in the Table Content Margin field. Customize border thickness, color, line border, border style, and division for the Quote summary table. Use the Background Color checkbox to enable or disable background color options.
- Adjust the background color, text color, and bold styling for Subtotal in Period, Subtotal All Duration, Quote Discount, Quote Tax, Round Off, and Grand Total rows in the Quote summary table.

Grand Total in Words pane:
Format the grand total in words using variables. You can also adjust the top margin and set the font style for the grand total in words.

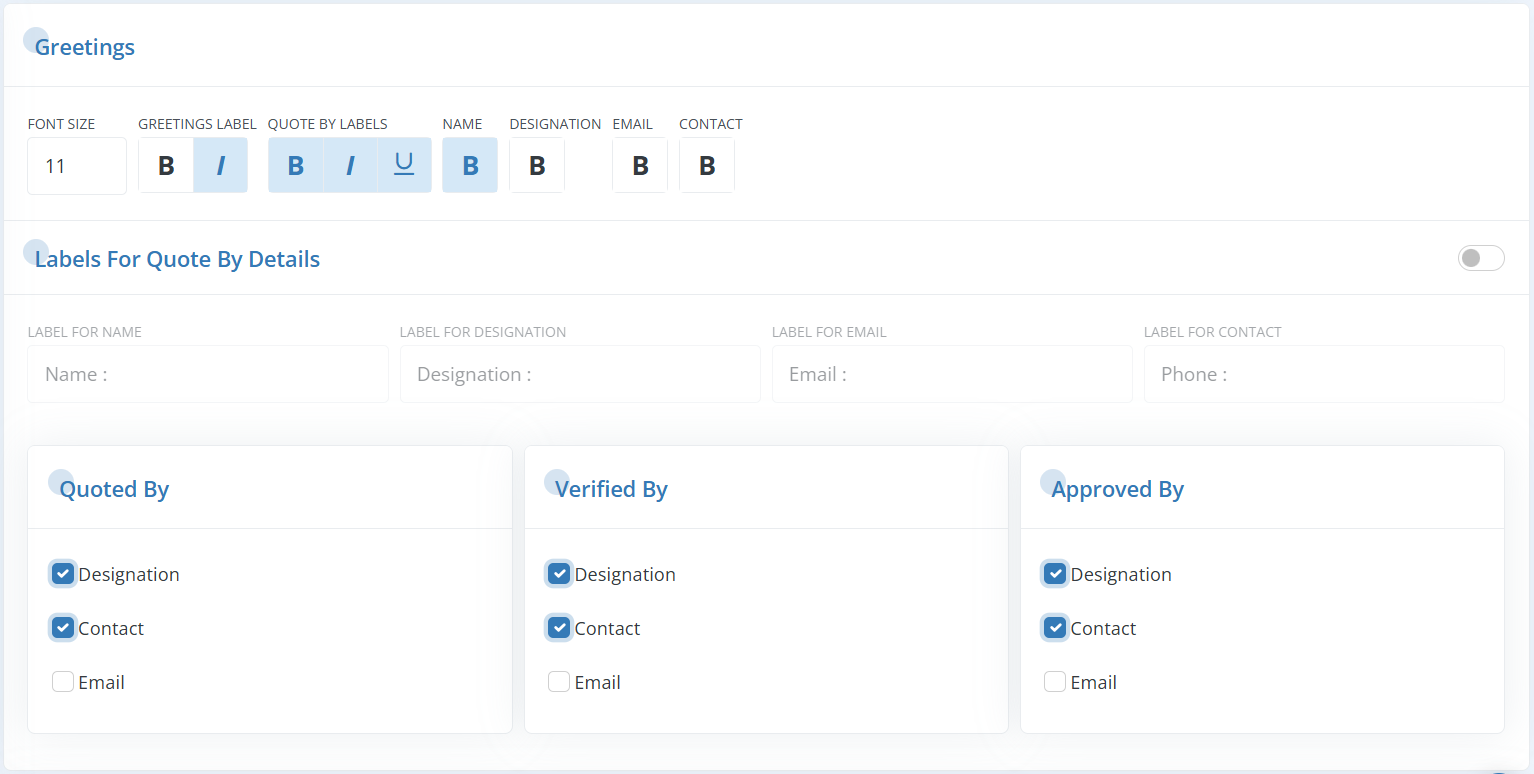
Greetings & Labels for Quote By Details pane:
| Greetings: | Adjust the font size for Greetings and customize the font style for the Greeting Label and Quote By details. |
| Labels for Quote By Details: | Enable or disable labels for Quote By details to add custom labels for Name, Designation, Email, and Contact fields. |
Signatures Pane:
- Enable signature row to add custom Label for Signature.
- You can set the Signature Label, adjust the font size, customize the Greeting Label style, and use the checkbox to position the signature below.

Footer Pane:

Specific Configuration
Once you save a document, a default-specific configuration is applied to it. You can modify these specific configurations on the same document editing page. Any changes made will only affect that particular document.
Format Pane:
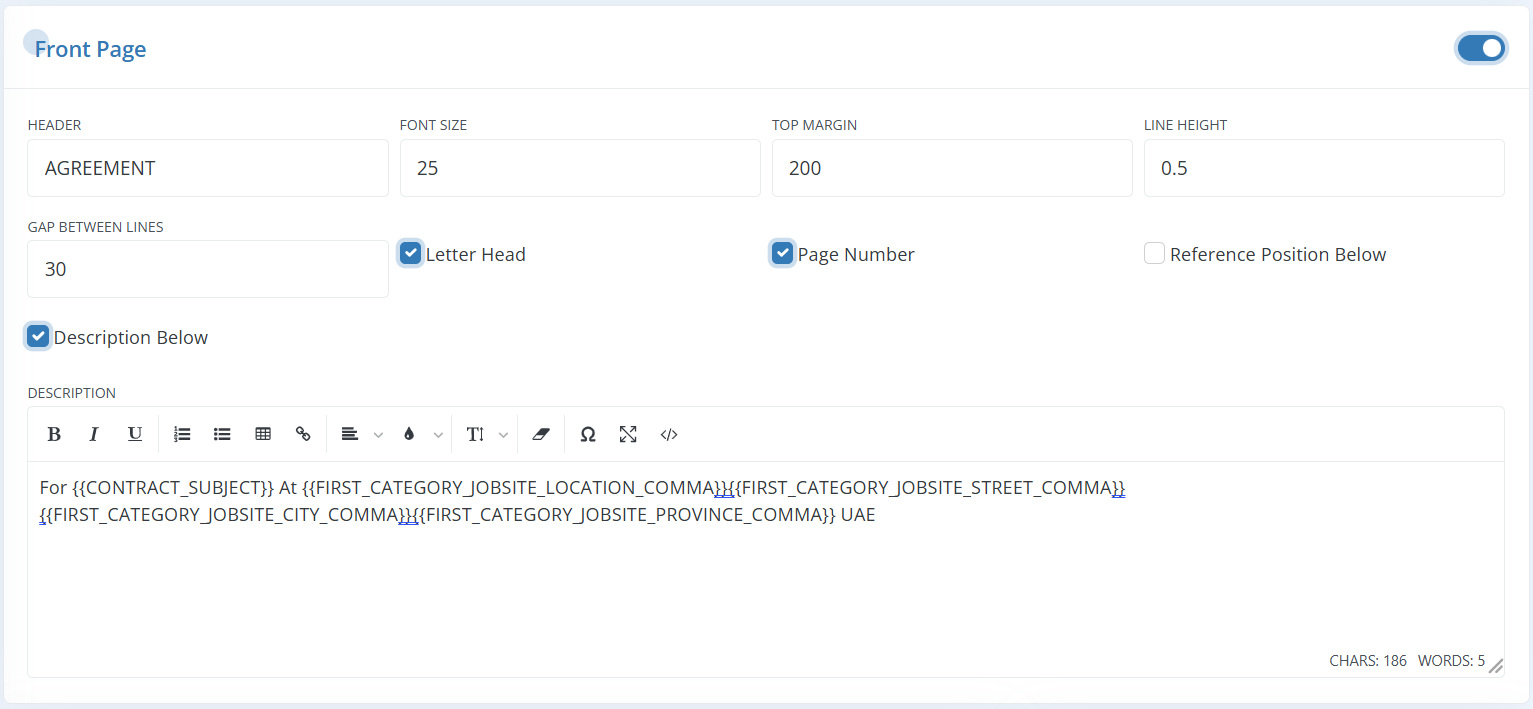
By selecting the checkboxes, you can add a price table, specify decimal places for prices, enable comma separators in prices, and include a letterhead in the background.

Front Page Pane:
Company Details, Customer Details, Customer Group & Contact Person Pane:
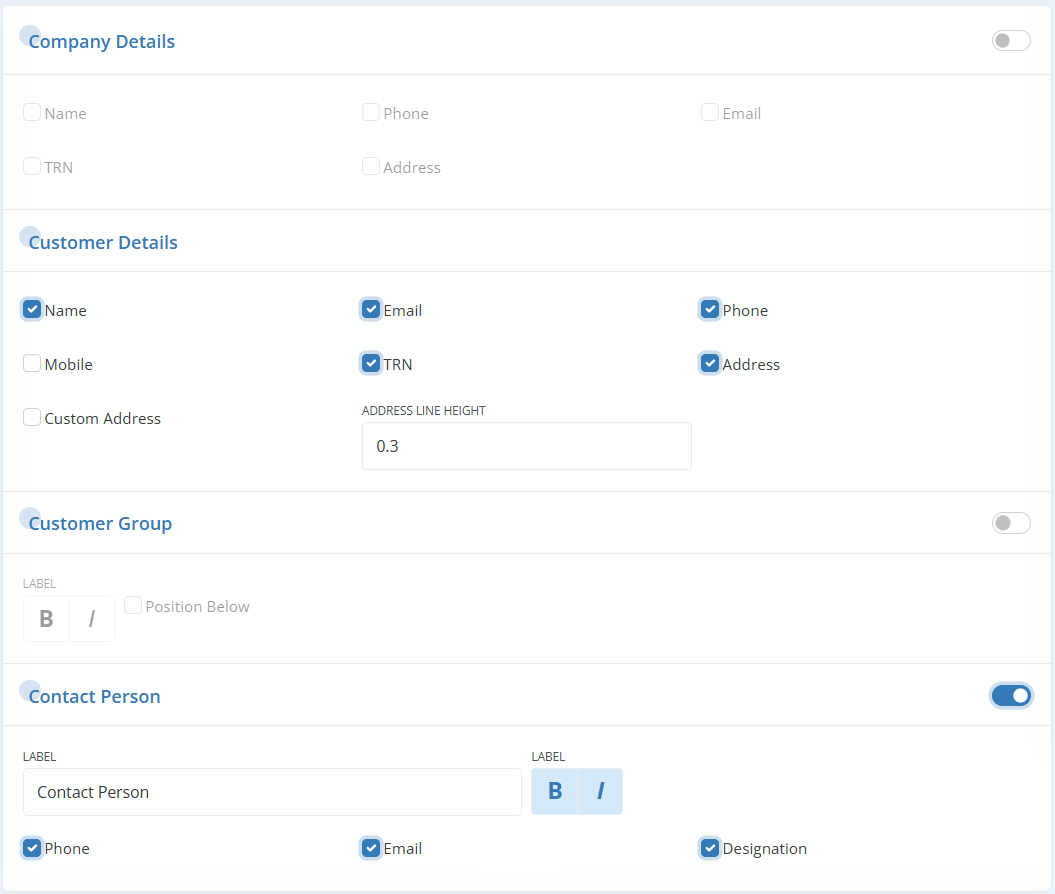
| Company Details: | Select or deselect checkboxes to show or hide the Company Name, Phone, Email, TRN, and Address. |
| Customer Details: | Select or deselect checkboxes to show or hide the Customer Name, Email, Phone, TRN, Address, and Custom Address. You can also adjust the line height for both Company and Customer details. |
| Customer Group: | Use the Enable/Disable button to show or hide the customer group. Style it as Bold or Italic. If “Position Below” is checked, the customer group will appear below the customer name; otherwise, it will be above. |
| Contact Person: | Use the Enable/Disable button to show or hide the contact person. Customize the label text and set it to Bold or Italic. Select checkboxes to show or hide the phone, email, and designation. |
Title Header & Title Table Pane:
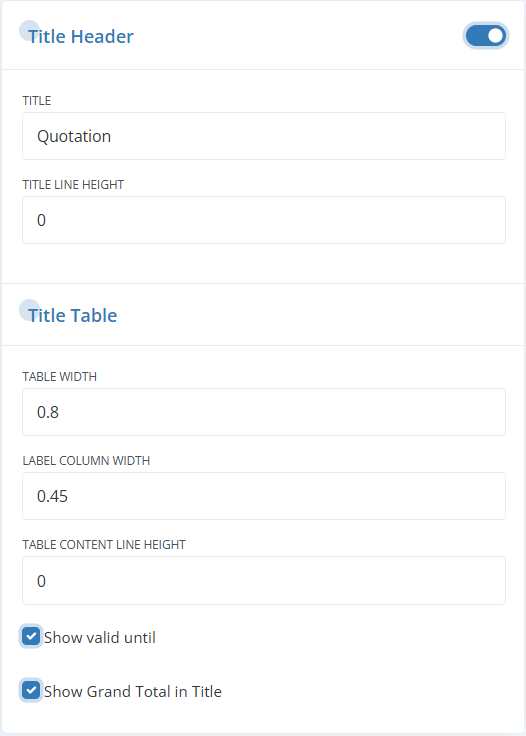
| Title Header: | Use the Enable/Disable button to show or hide the title header. Enter the text to be displayed in the Title field and adjust the line height as needed. |
| Title Table: | Set the title table width, label column width, and line height of the table content. Use the checkboxes to show or hide the “Valid Until” and “Grand Total” fields in the title. |
Subject & Content Line Height Pane:
| Subject: | Use the Enable/Disable button to show or hide the subject from the document. Adjust the top margin and line height as needed. |
| Content Line Height: | Set the line height and top margin for sections like Introduction, Scope of Work, and Terms & Conditions to improve readability and legibility. |

Table Details Pane:
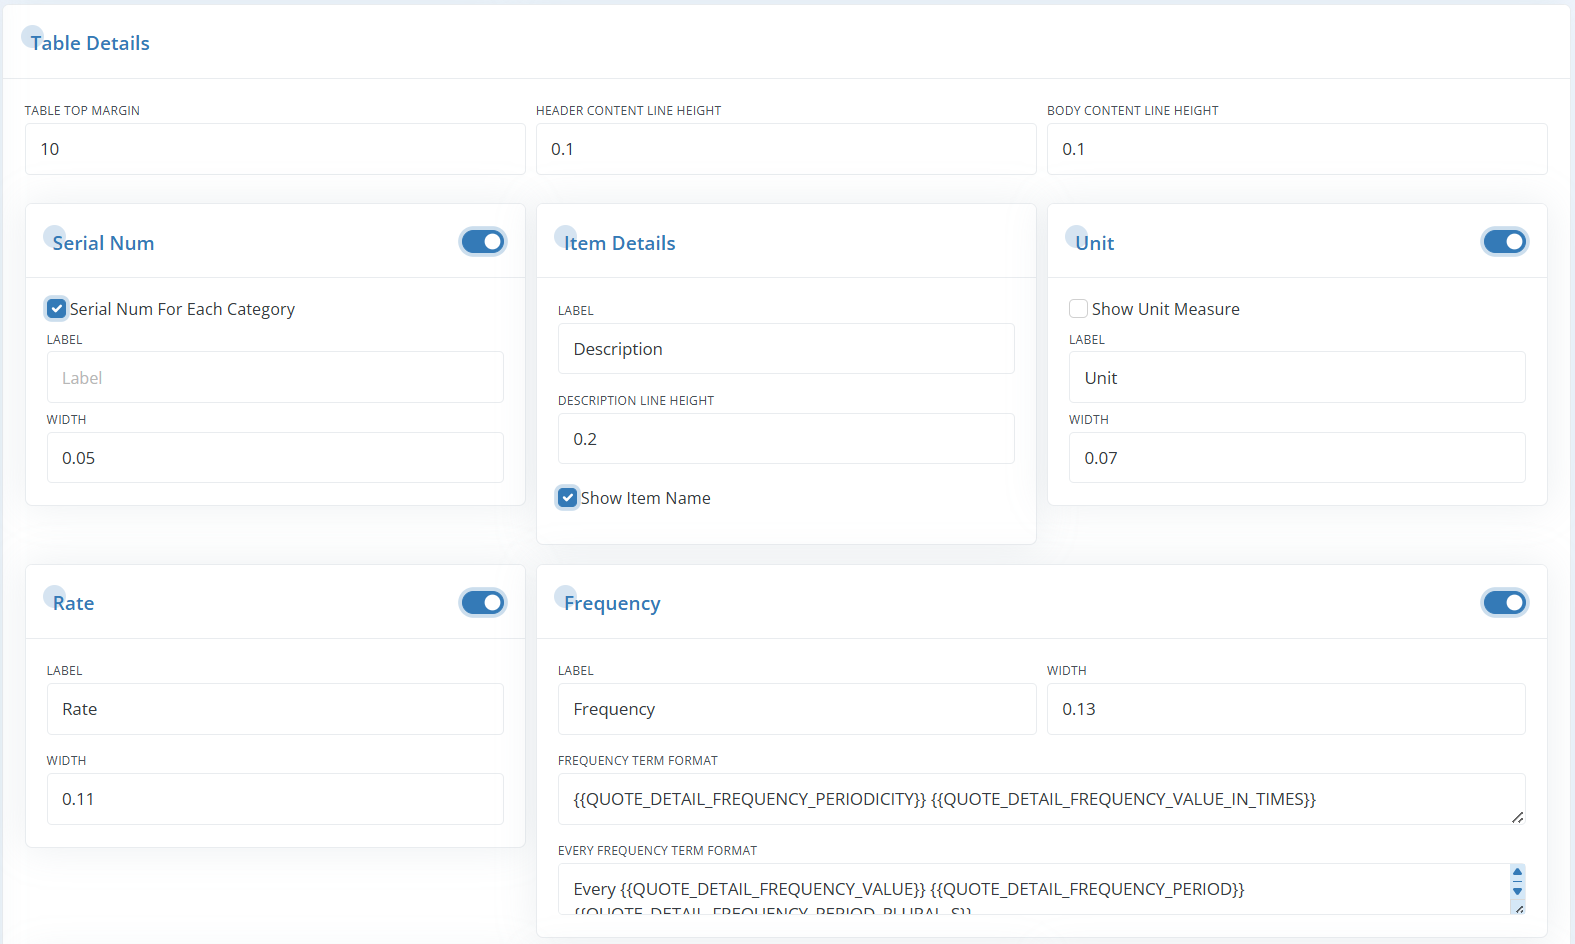
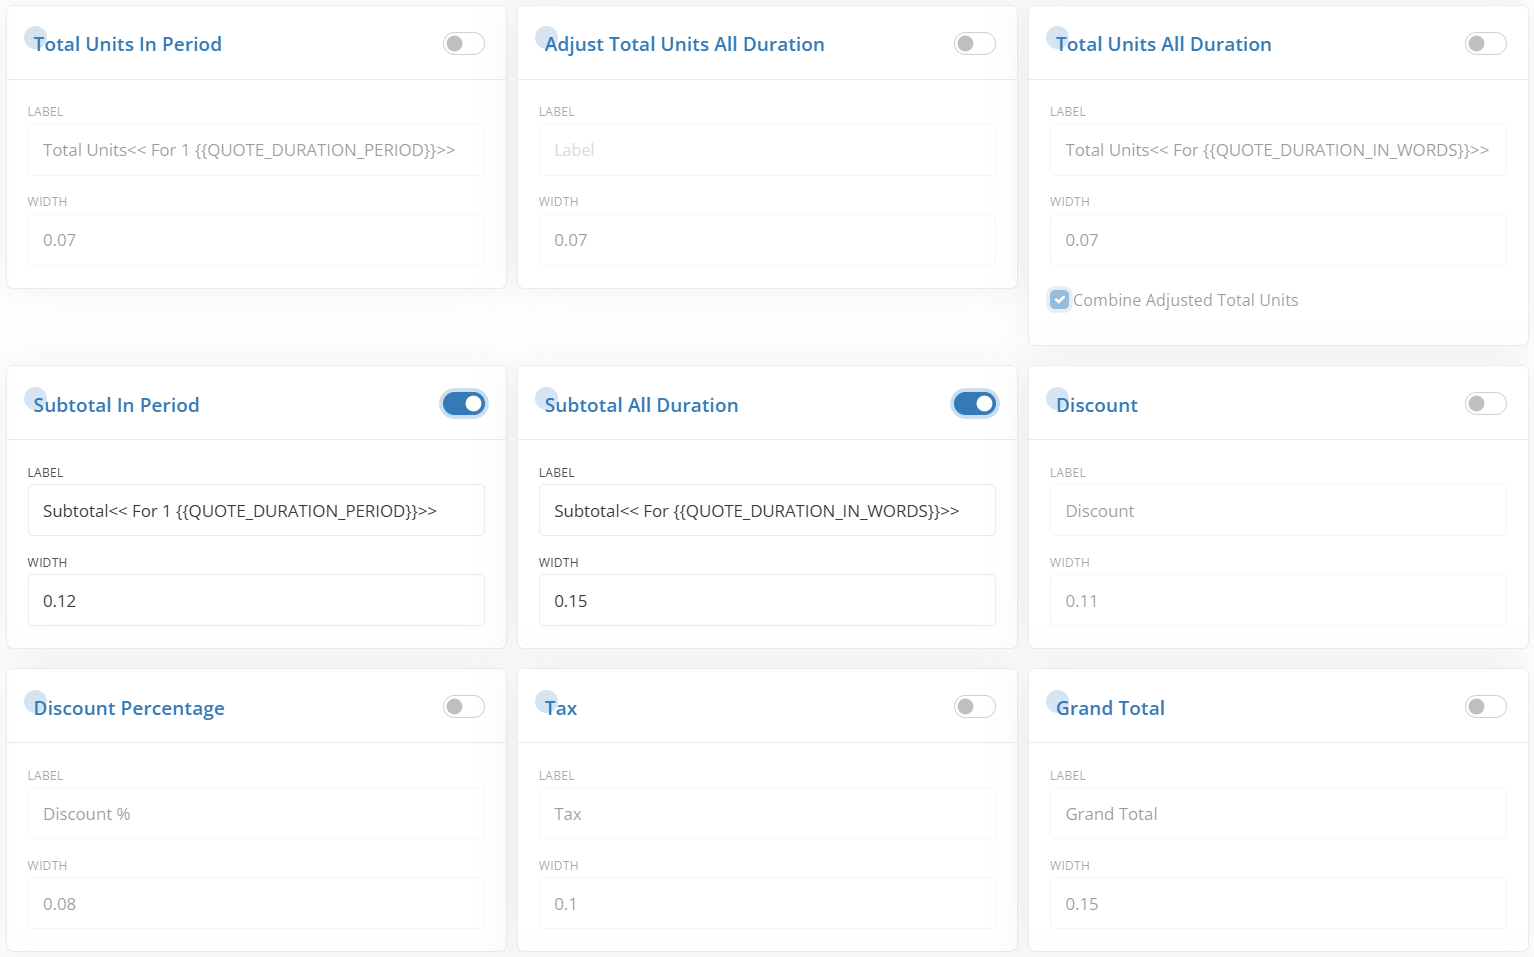
- You can Enable/Disable to show or hide Serial Num, Unit, Rate, Frequency, Total Units in period, Adjust Total Unit of all Duration, Total units of all duration, Subtotal in Period, Subtotal all duration, Discount Tax and Grand Total column in table.
- You can set the Label text and Width for Serial Num, Item Details, Unit, Rate, Frequency, Total Units in period, Adjust Total Unit of all Duration, Total units of all duration, Subtotal in Period, Subtotal all duration, Discount Tax and Grand Total.
- In Frequency Pane, you can customize text for frequency term as well as text for frequency term if every is checked.
Optional Item Label Pane:
Customize the Label text, Font Size, Width, Height, and Line Height for optional item labels.

Summary Column Pane:
- Show or hide the Summary Column in the line item details table using the Enable/Disable button.
- Customize the Content Line Height, Label, Table Width, and Label Width for the summary column.
- Select/deselect options to show or hide Total Units, Subtotal, Discount, Tax, and Grand Total in the Summary Column.

Category Summary Pane:
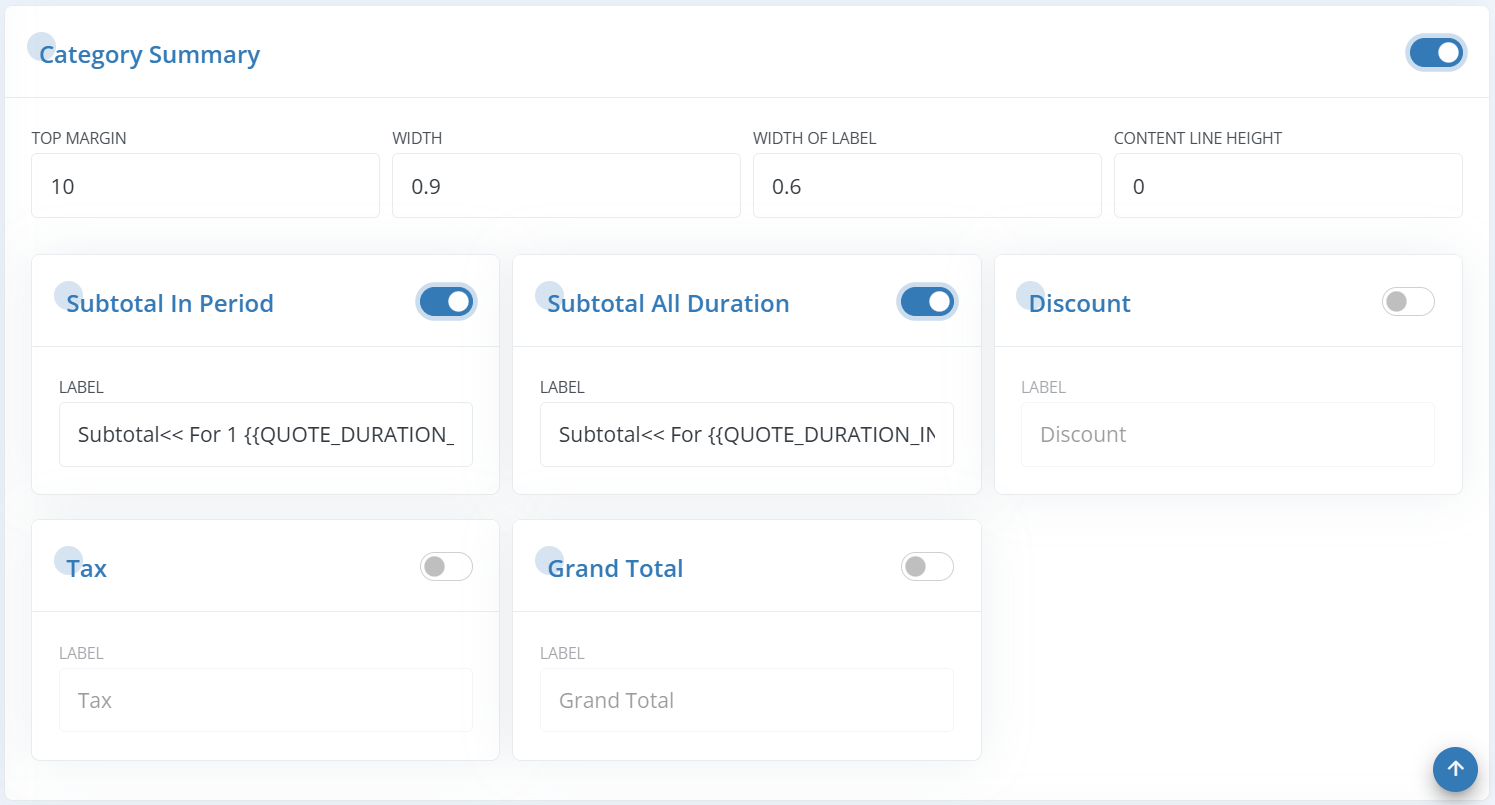
- Customize the top margin, width, table width, and line height for each row in the category summary table.
- Use the Enable/Disable option to show or hide Subtotal in Period, Subtotal in All Duration, Discount, Tax, and Grand Total.
- You can also format the label text for these fields.
Category Total Summary Pane:
- Use the Enable/Disable option to show or hide the Category Total Summary table.
- Customize the Top Margin, Header text Line Height, and Content text line height for the table title text.
- Choose to show or hide the Serial Number, Description, Subtotal in Period, Subtotal in All Duration, Discount, Tax, and Grand Total columns.
- You can also format the Label text and adjust the column Widths for each field.

Quote Summary Pane:
- Enable or disable the Contract Summary table as needed.
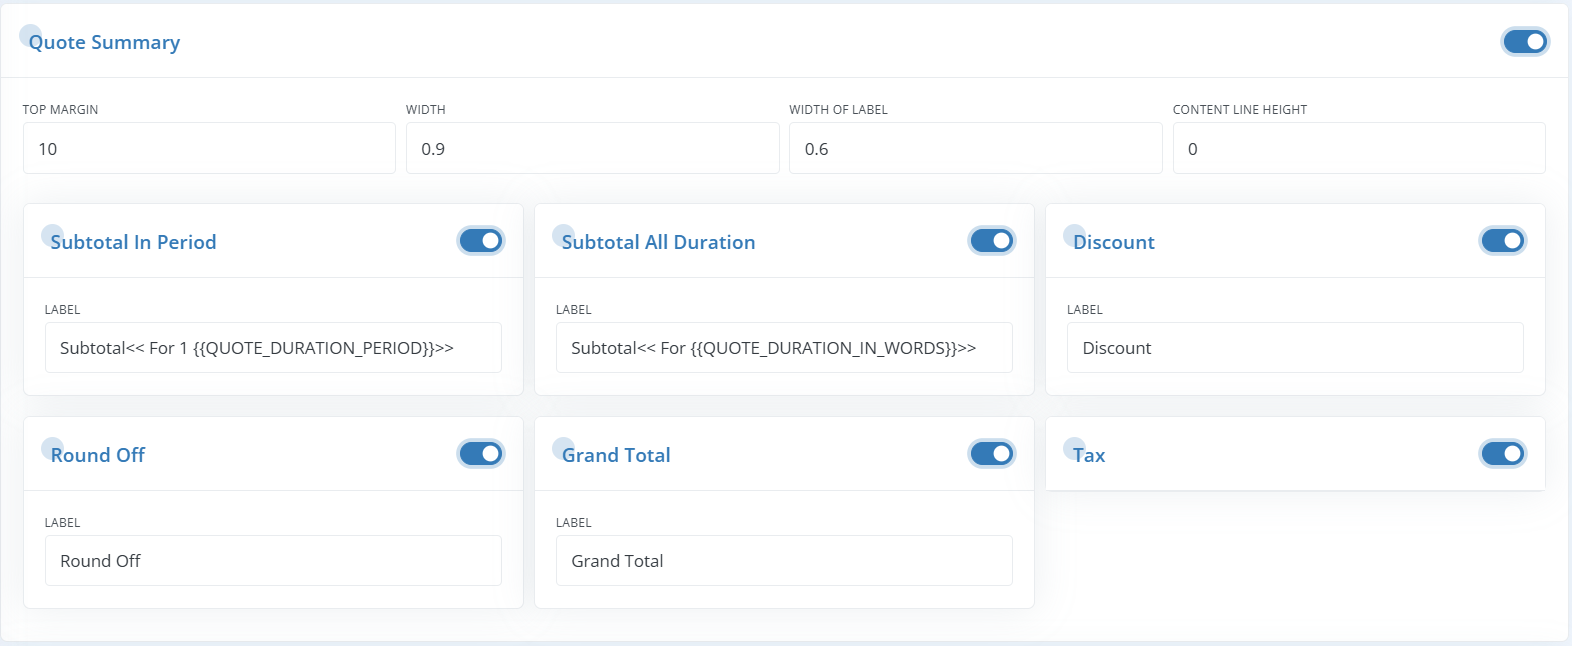
- Customize the Top Margin, Width, Label Width, and Content line height for the table.
- Choose to show or hide columns for Subtotal in Period, Subtotal in All Duration, Discount, Round Off, Tax, and Grand Total.
- You can also format the Label text for each of these rows.
Total in Words & Greetings pane:
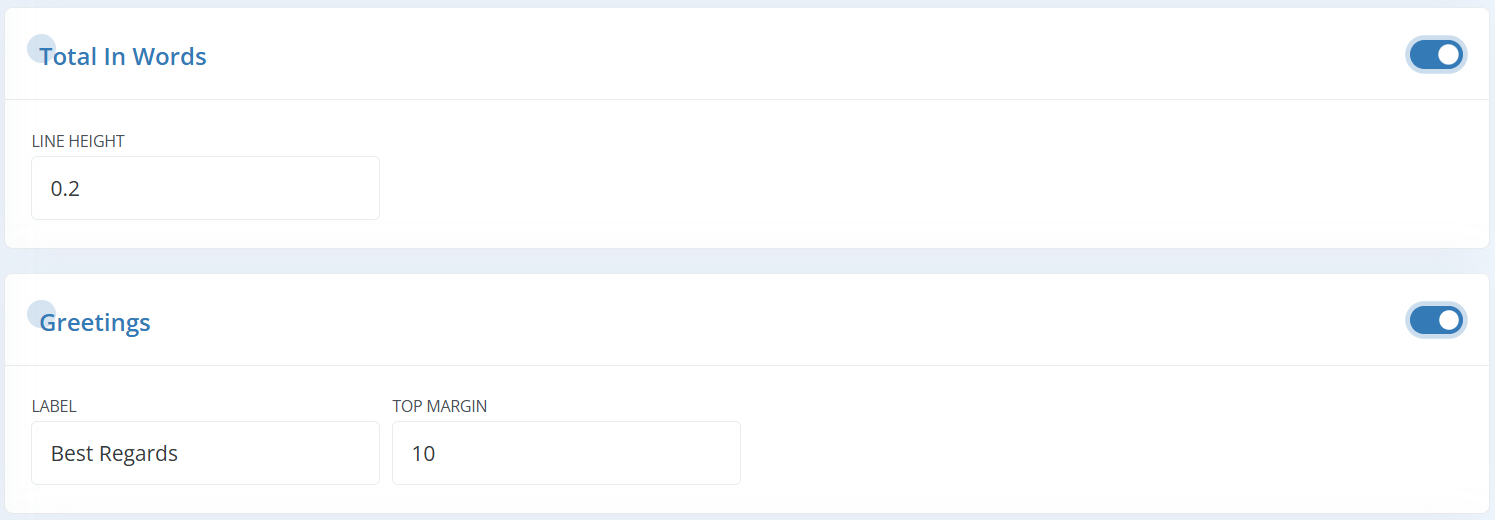
| Total in Words: | Enable or disable the display of Total in Words in the Quote. You can also adjust the line height of the text. |
| Greetings: | Enable or disable the greetings text in the Quote. You can also customize the Label text and Top Margin for the greetings in the Quote. |
Quoted By table pane:
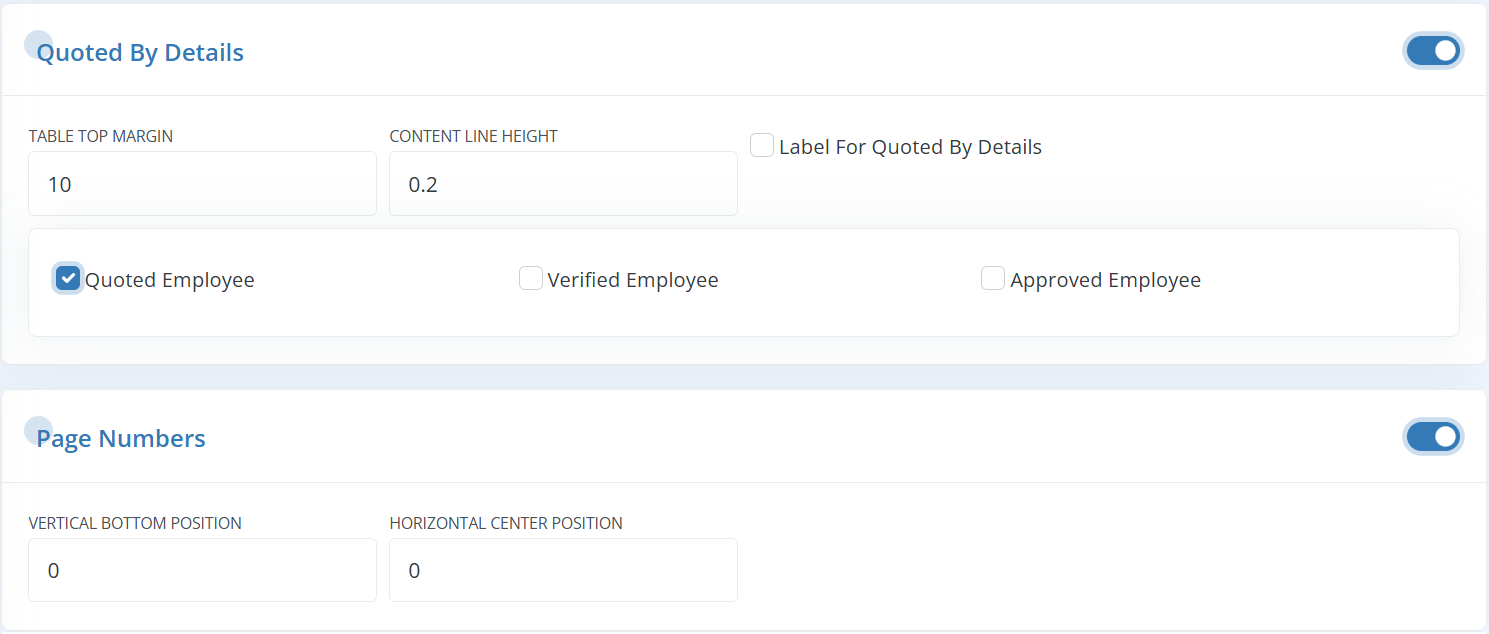
| Quoted By Details: | Enable or disable to show or hide Quoted employee, Verified employee, or Approved employee details by selecting/deselecting respective fields. You can label these fields by enabling “Label for Quoted By Details.” Adjust the Top Margin and Content line height of the text here. |
| Page Numbers: | Enable or disable to show or hide page numbers in the Quote. Customize the bottom margin and horizontal position of the page number. |
Users
A user is anyone with access to the Workstair software. Multiple users can be set up within the system.

There’re mainly 3 types of users in Workstair:
| Web User: | The users who are using the Workstair web application. |
| Jobhead User: | Jobhead users are team leaders who use the Jobhead Mobile App to manage Jobs and Schedules. Click to learn more! |
| Technician User: | These are technicians who use the Technician Mobile App to complete Schedules and get updates in the field. Click to learn more! |
Adding a New Administrator User:
- Go to Settings > Users.
- Select the Administrators tab at the top of the page.
- Click + New in the top right corner.
- Enter the required details and click Save.
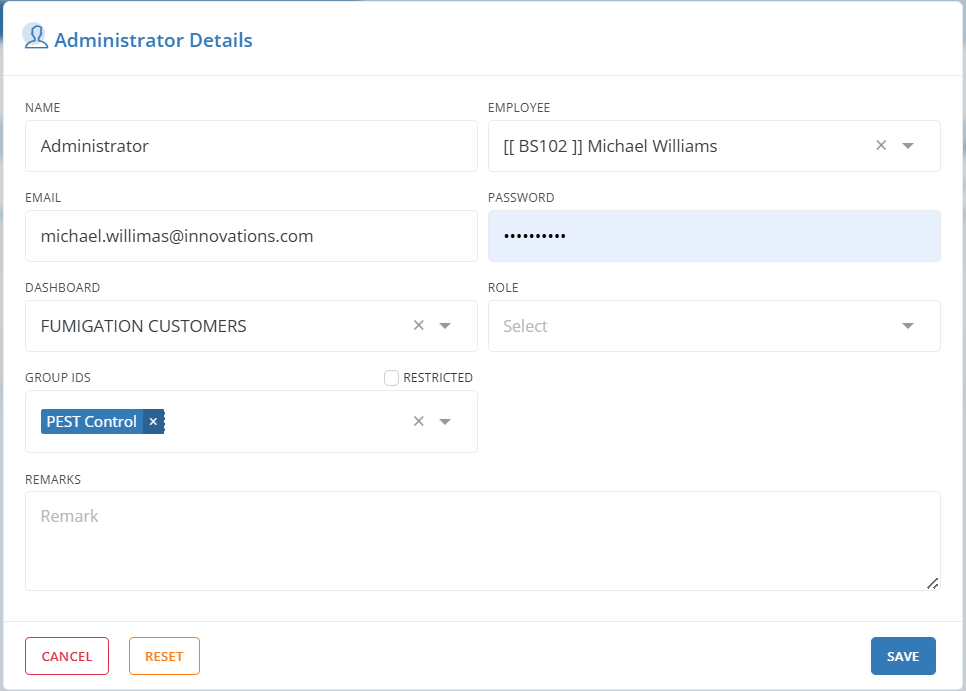
| Name: | Enter the Name of the new user. |
| Employee: | Select the Employee’s name from the dropdown. |
| Email: | Enter a valid Email address. |
| Password: | Enter the Password. |
| Role: | Select the Role from the dropdown. |
| Restricted Group IDS: | select Restricted Group ids from multiple selection dropdown list. |
| Remarks: | Enter any remarks here. |
To add a new Job Head user:
- Go to Settings > Users.
- Select the Job Heads tab at the top of the page.
- Click the +New button in the top right corner.
- Enter the required details and click Save.
Roles
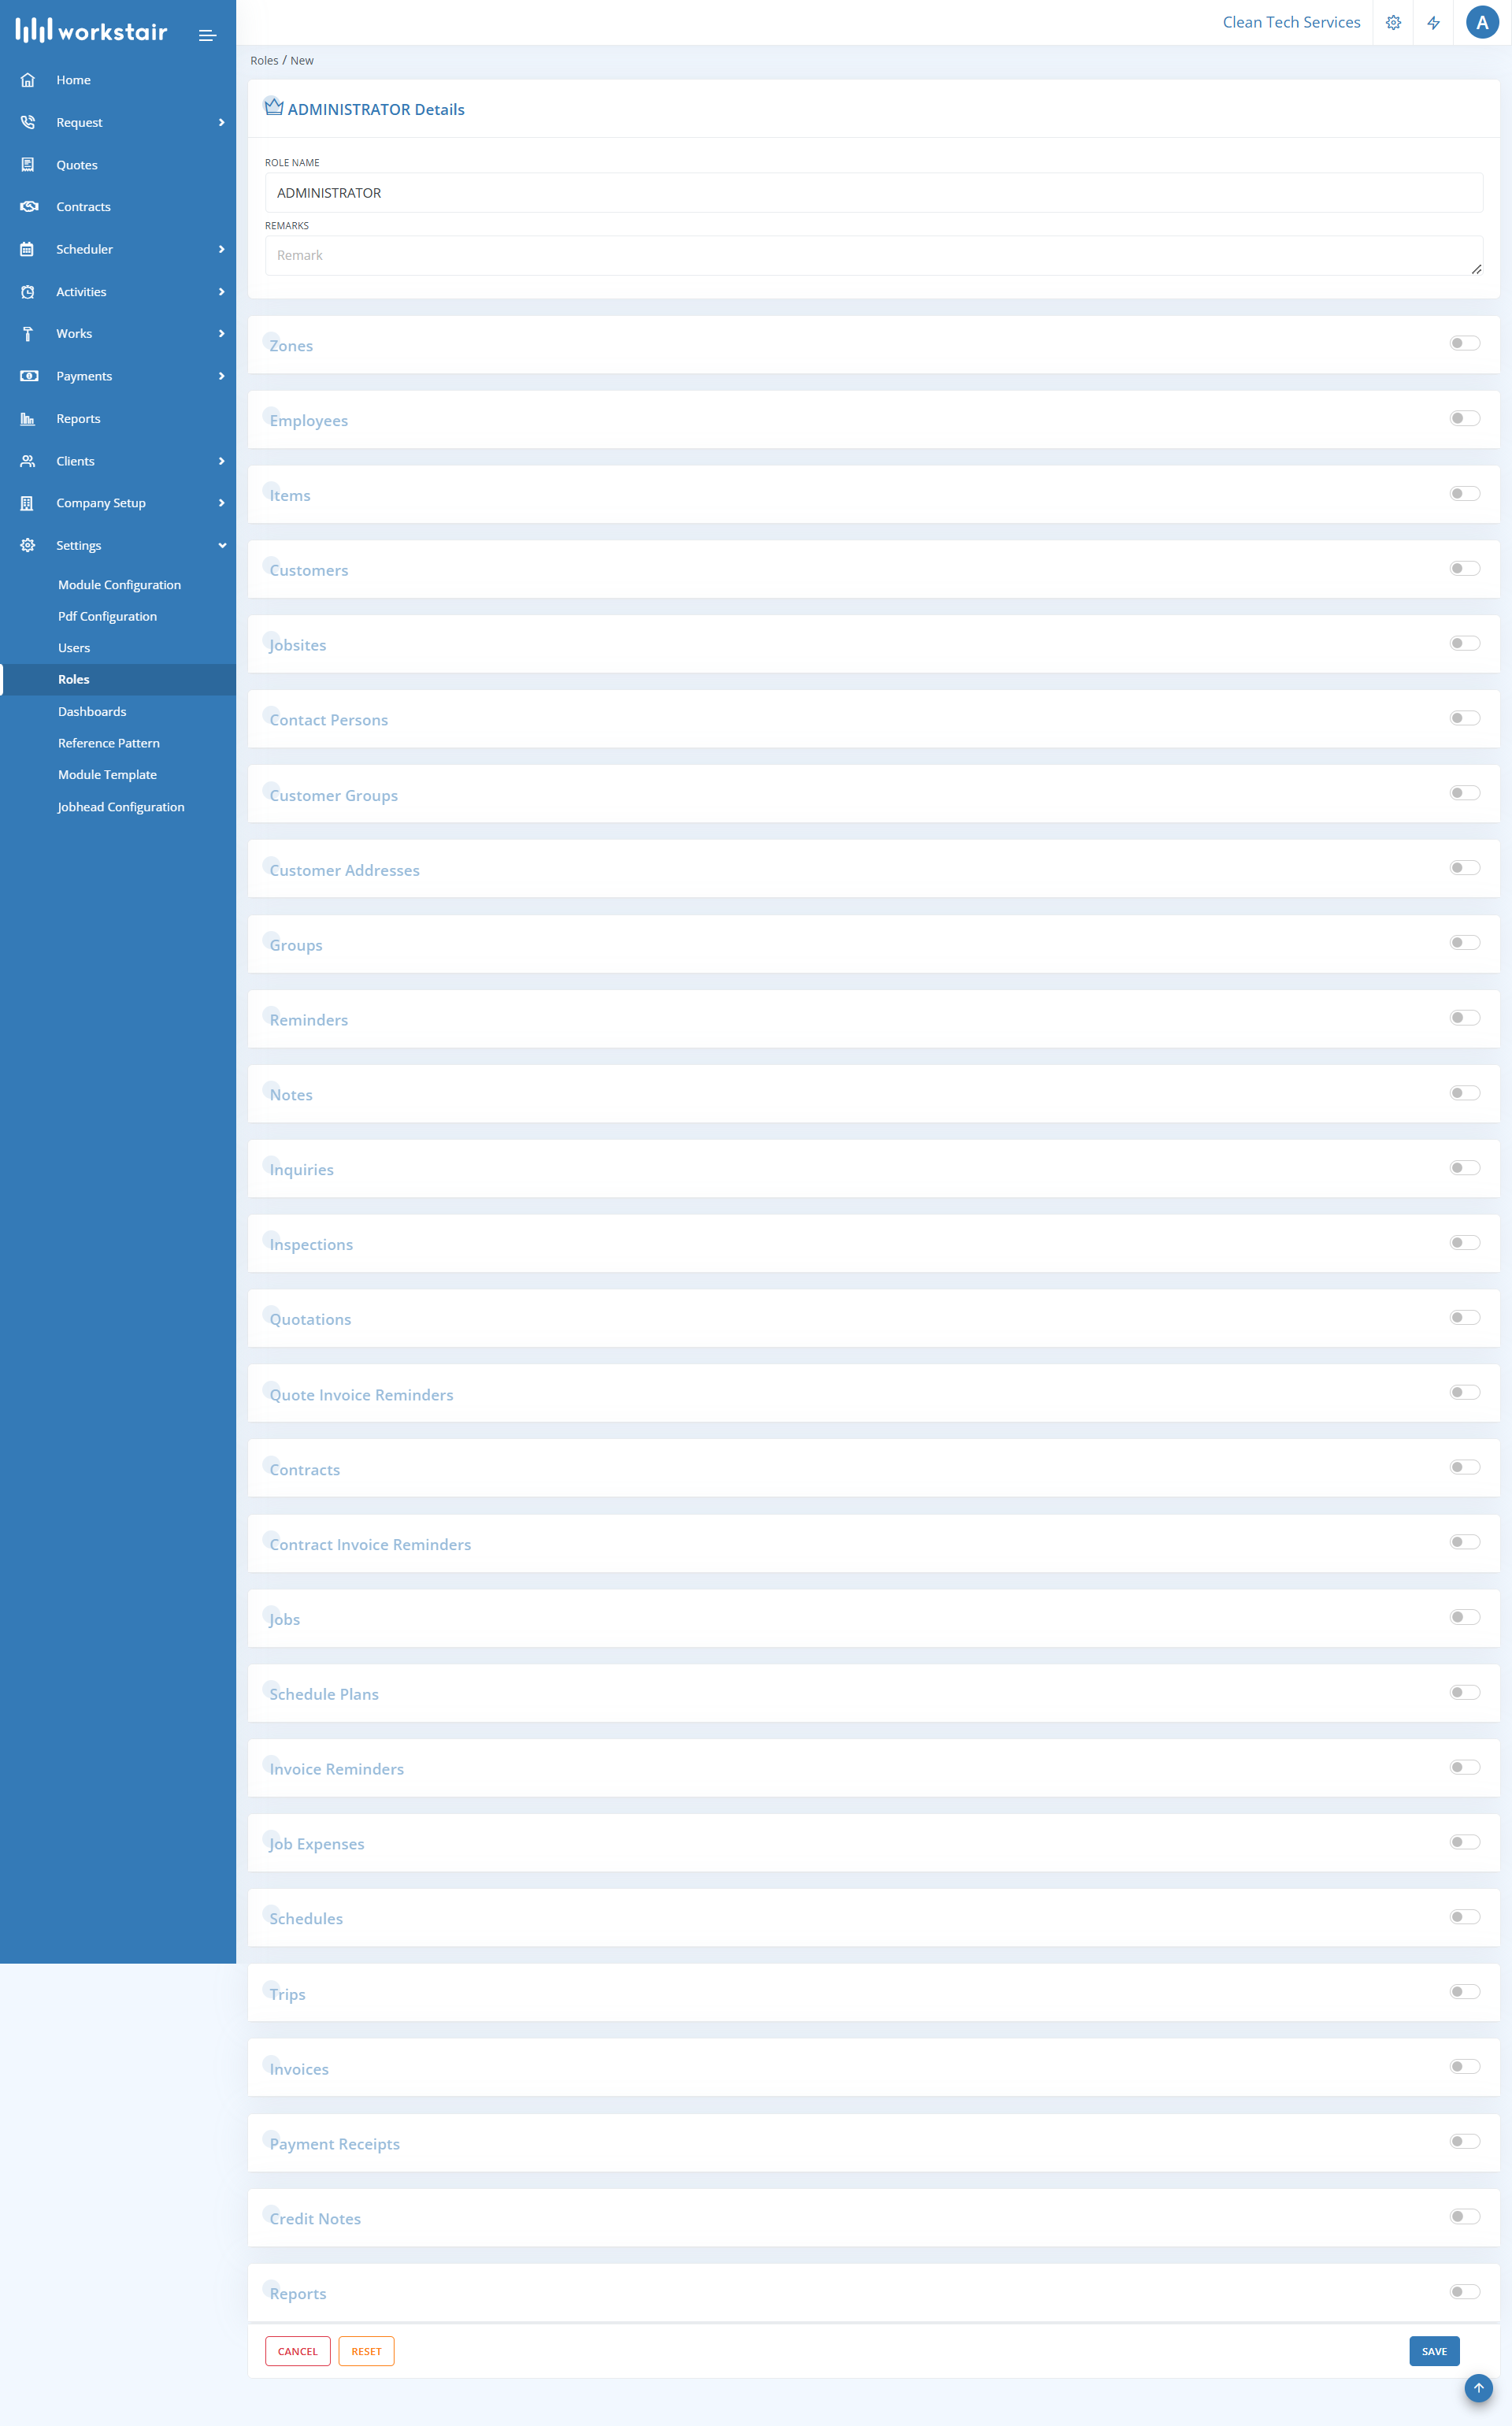
Roles refer to the positions or functions that people occupy within a particular organization. In Workstair, we have standard roles under Administrator role and Job head Role.

To add a new Administrator role:
- Go to Settings > Roles.
- Select the Administrators tab on top of the page.
- Click the +New button in the top right corner.
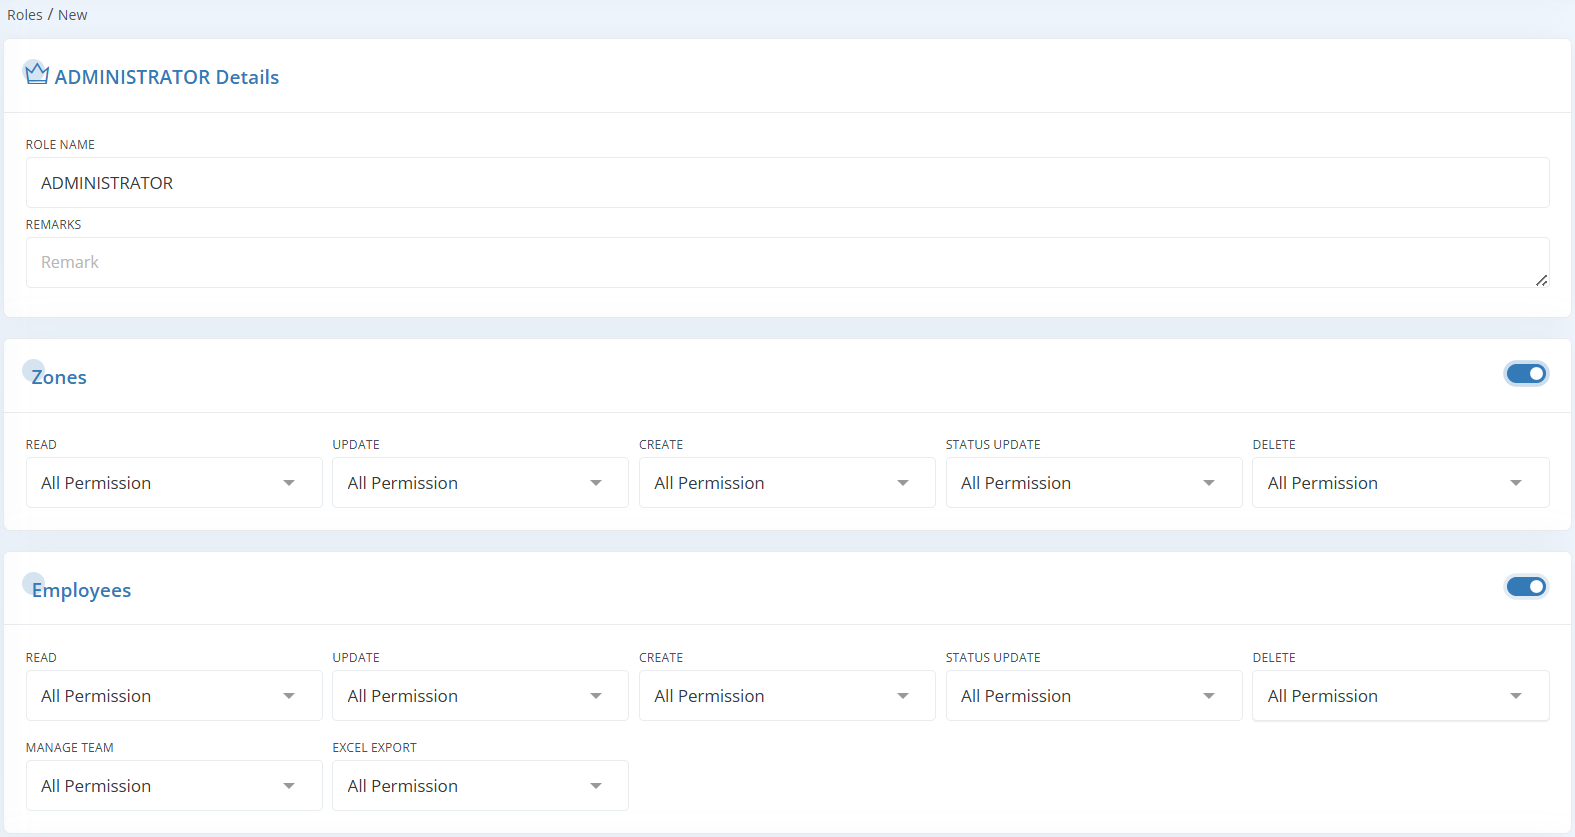
- Enter the Role Name and Remarks in the details pane.
- Select the modules and the level of access you want to provide for the role.
- Click Save.
To add a new Job Head Role:
- Go to Settings > Roles.
- Select the Job Heads tab on top of the page.
- Click the +New button in the top right corner.
- Enter the Role Name and Remarks in the details pane.
- Click Save after filling in all the fields.
In Workstair it’s possible to create Roles for particular user groups. When setting up a Role, you can enable or disable access to different categories like Zones, Employees, Items, Customers, Jobsites, etc. Each category has detailed user permissions or restrictions.
For example, in the Invoices category, you can set permissions such as: Read, Update, Create, Status Update etc. It’s possible to set like All Permission, No Permission, Created Owner, Invoiced by Employee etc.

Role Assigning and User Restrictions
Users can be assigned with particular roles and can also be restricted with certain permissions or groups in Workstair with ease.
- Go to Settings > Users
- Select an existing user or click New to create a new user.
- In the user details window, locate the Roles dropdown.
- Choose the role you want to assign to the user.
- In the Restricted Groups dropdown, select the groups where the user’s permissions should be limited.
- Click Save to update the details
Reference Pattern
The reference number of a document is a unique identifier that distinguishes it from other documents. In Workstair, you can customize a reference number pattern according to your organization’s specific needs.
Steps to Customize a Reference Number Pattern:
- Navigate to Settings > Reference Pattern.
- Select the type of document for which you want to customize the reference number pattern from the dropdown menu.
- To set a default reference pattern, choose an existing pattern from the dropdown and click Set as Default.
- To create a new reference pattern, click +New.

Enter the pattern details and Save.
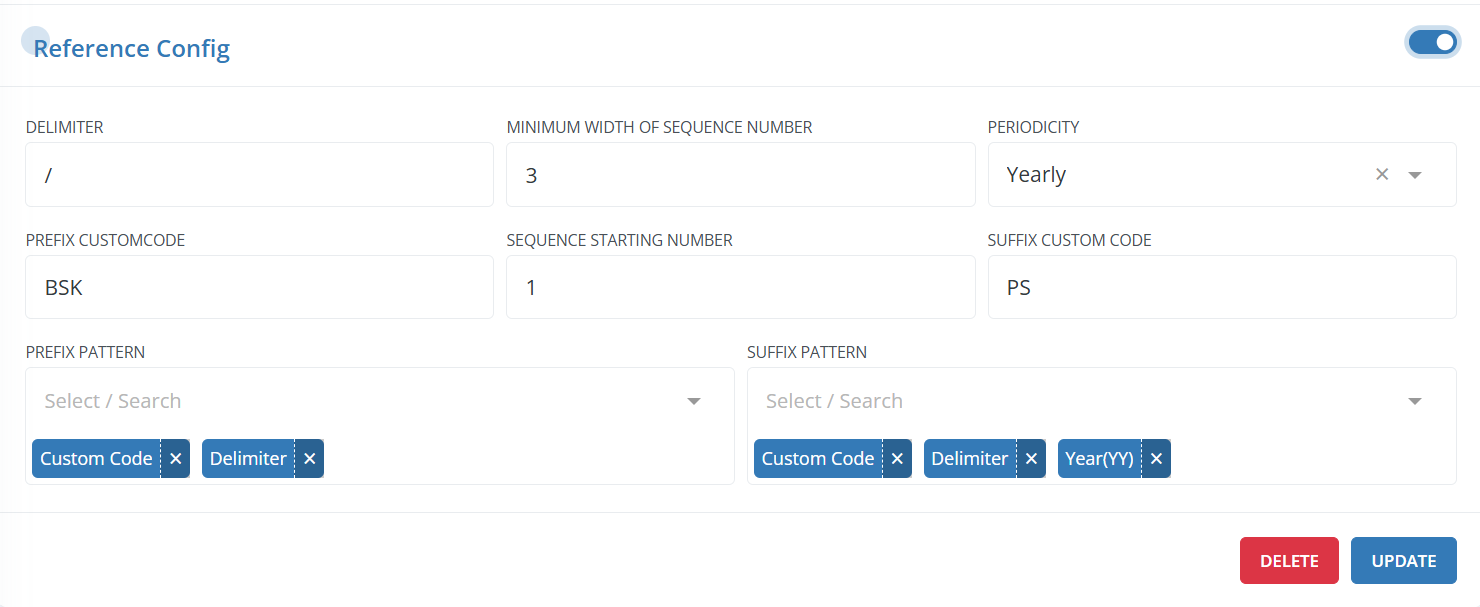
| Delimiter: | Enter a delimiter to make the reference number more readable, especially if it contains multiple components. |
| Minimum Width of Sequence Number: | Specify the minimum width for the sequence number. |
| Periodicity: | Define how often the number resets or restarts. You can set the periodicity as Yearly or None based on your organization’s requirements. |
| Prefix Custom code: | Input a set of characters or symbols that will be added to the beginning of the reference number to help identify the document type. |
| Sequence Starting Number: | Enter the number that serves as the starting point for generating the reference number sequence. |
| Suffix Custom Code: | Provide a set of characters or symbols that will be added to the end of the reference number to help identify the document type. |
| Prefix Pattern: | Set the prefix pattern by selecting options such as Custom Code, Day, Month, Year, etc., from the dropdown. |
| Suffix Pattern: | Set the suffix pattern by selecting options such as Custom code, Day, month, Year etc… from the dropdown. |
Module Template
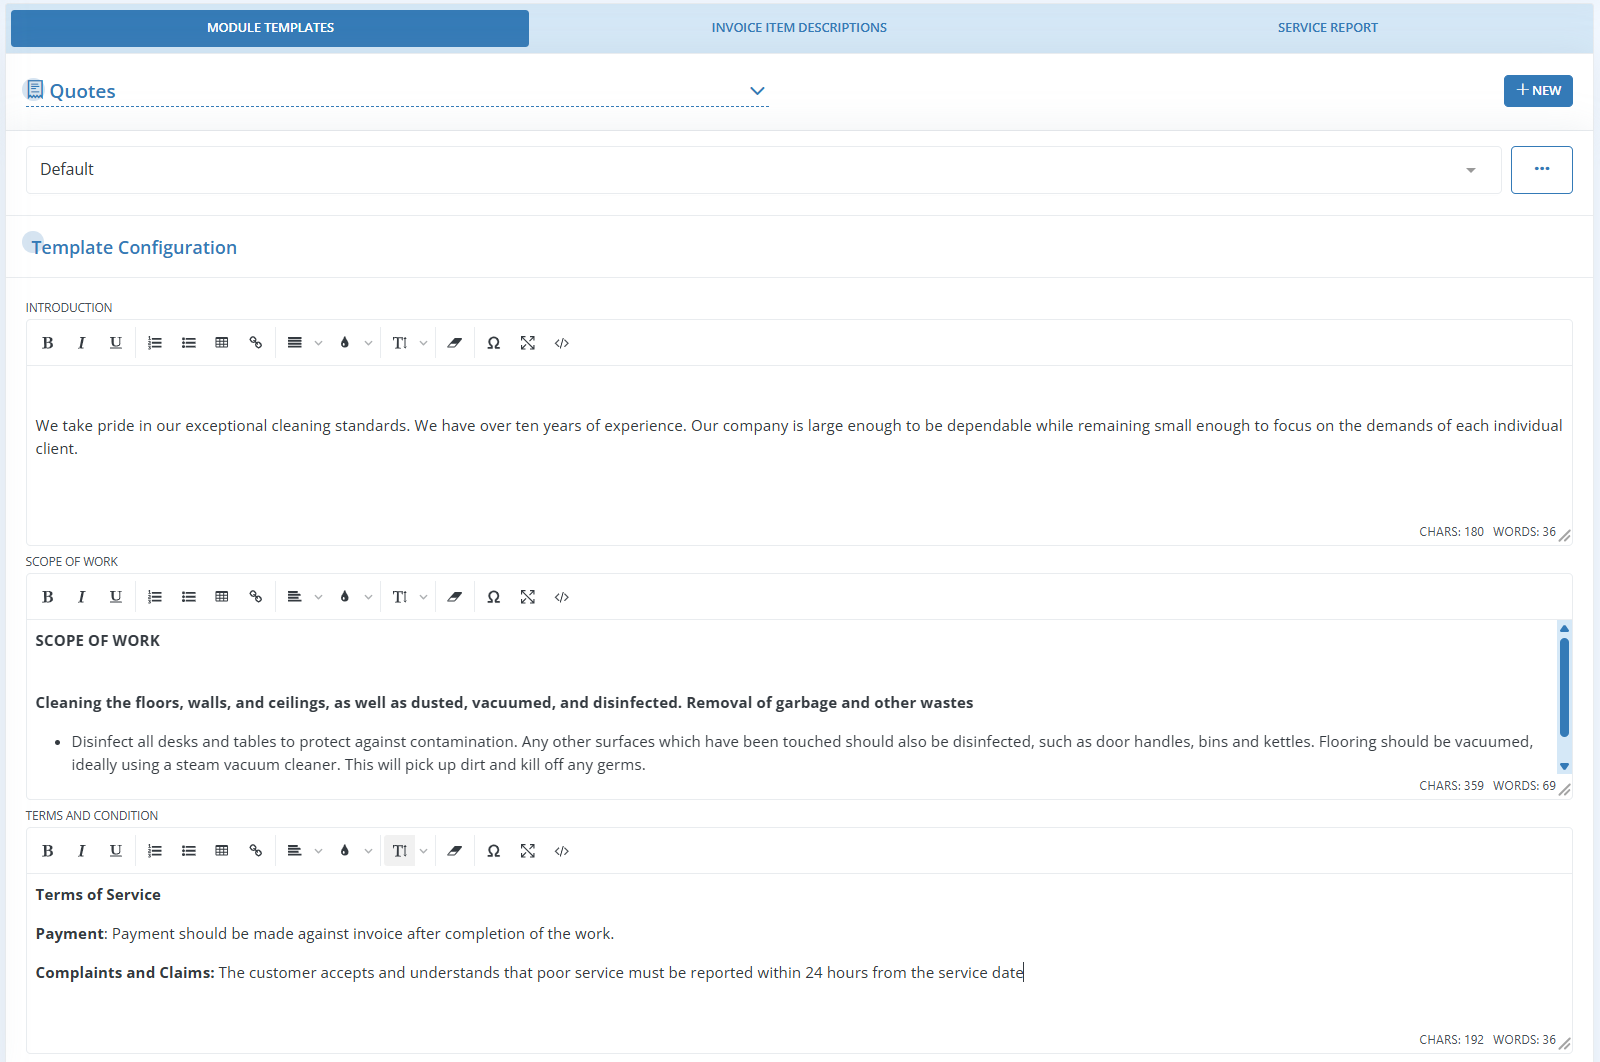
In Workstair, you can create and save templates for the Introduction, Scope of Work, or Terms and Conditions for later use. Multiple templates can be created for each document type with meaningful names for easy identification, ensuring consistent content in new documents. You can also set a default template to load automatically when creating a new document, customizable at the user level.
To create a new template:
- Go to Settings > Module Template.
- Open the Module Templates window.
- Select the type of document for the template from the dropdown list.
- Click the Create New button.
- Add a name for the template and enter text for the Introduction, Scope of Work, and Terms and Conditions. Variables can be used, and you can apply different font styles.
- Finally, save the template.
Invoice Item Description:
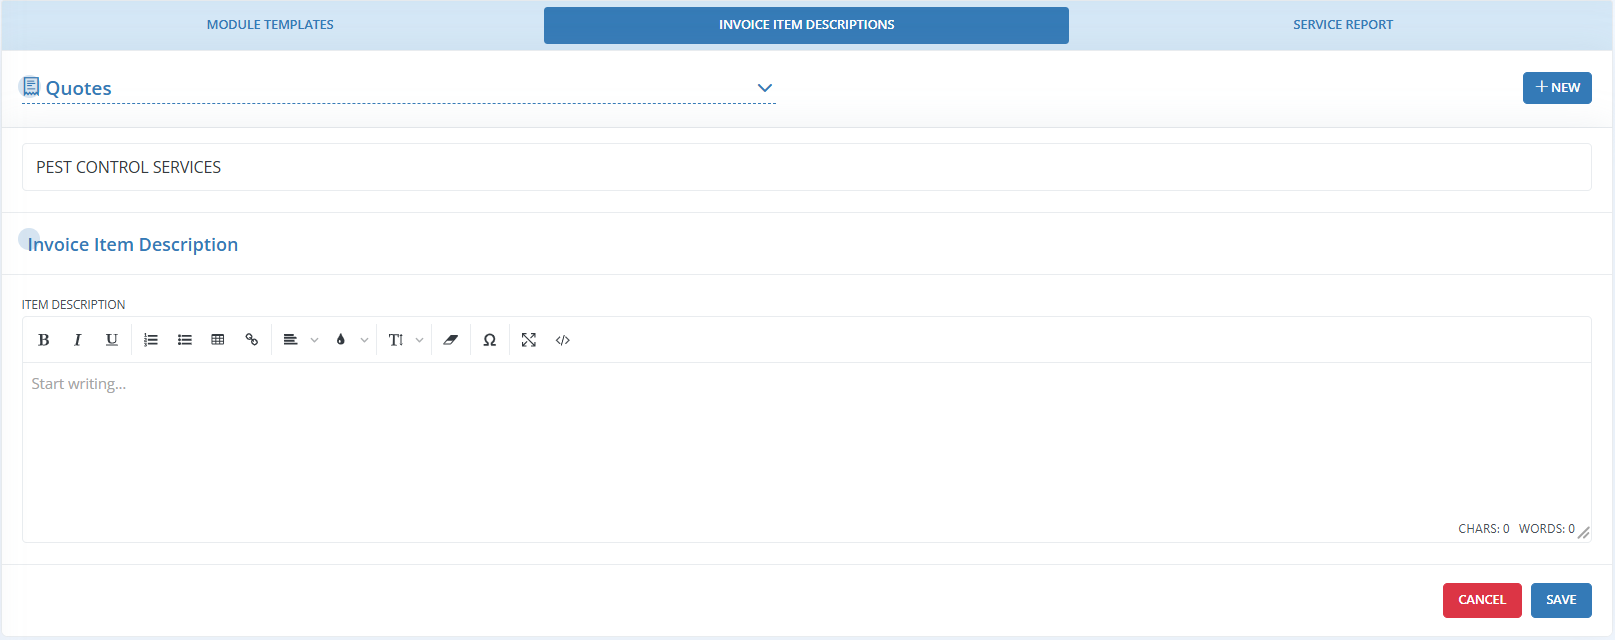
Invoice Item Description refers to a brief explanation of a product or service charged to the customer on an invoice. It includes details such as the product or service name, quantity, unit price, and any applicable taxes or discounts. This description helps the customer understand the charges, ensuring accurate billing for the services or products received.

To create a new Invoice Item Description:
- Go to Settings > Module Template.
- Select the Invoice Item Descriptions tab.
- Choose the document type from the dropdown.
- Click the +New button.
- Enter a name for the description and provide the text content for the item description, utilizing variables and adjusting font styles as needed.
- Finally, save the Invoice Item Description.
Job Head Access
Job Head access can be limited to certain areas of the software based on the user’s role and responsibilities within the organization. In Workstair, you can easily configure these access levels.

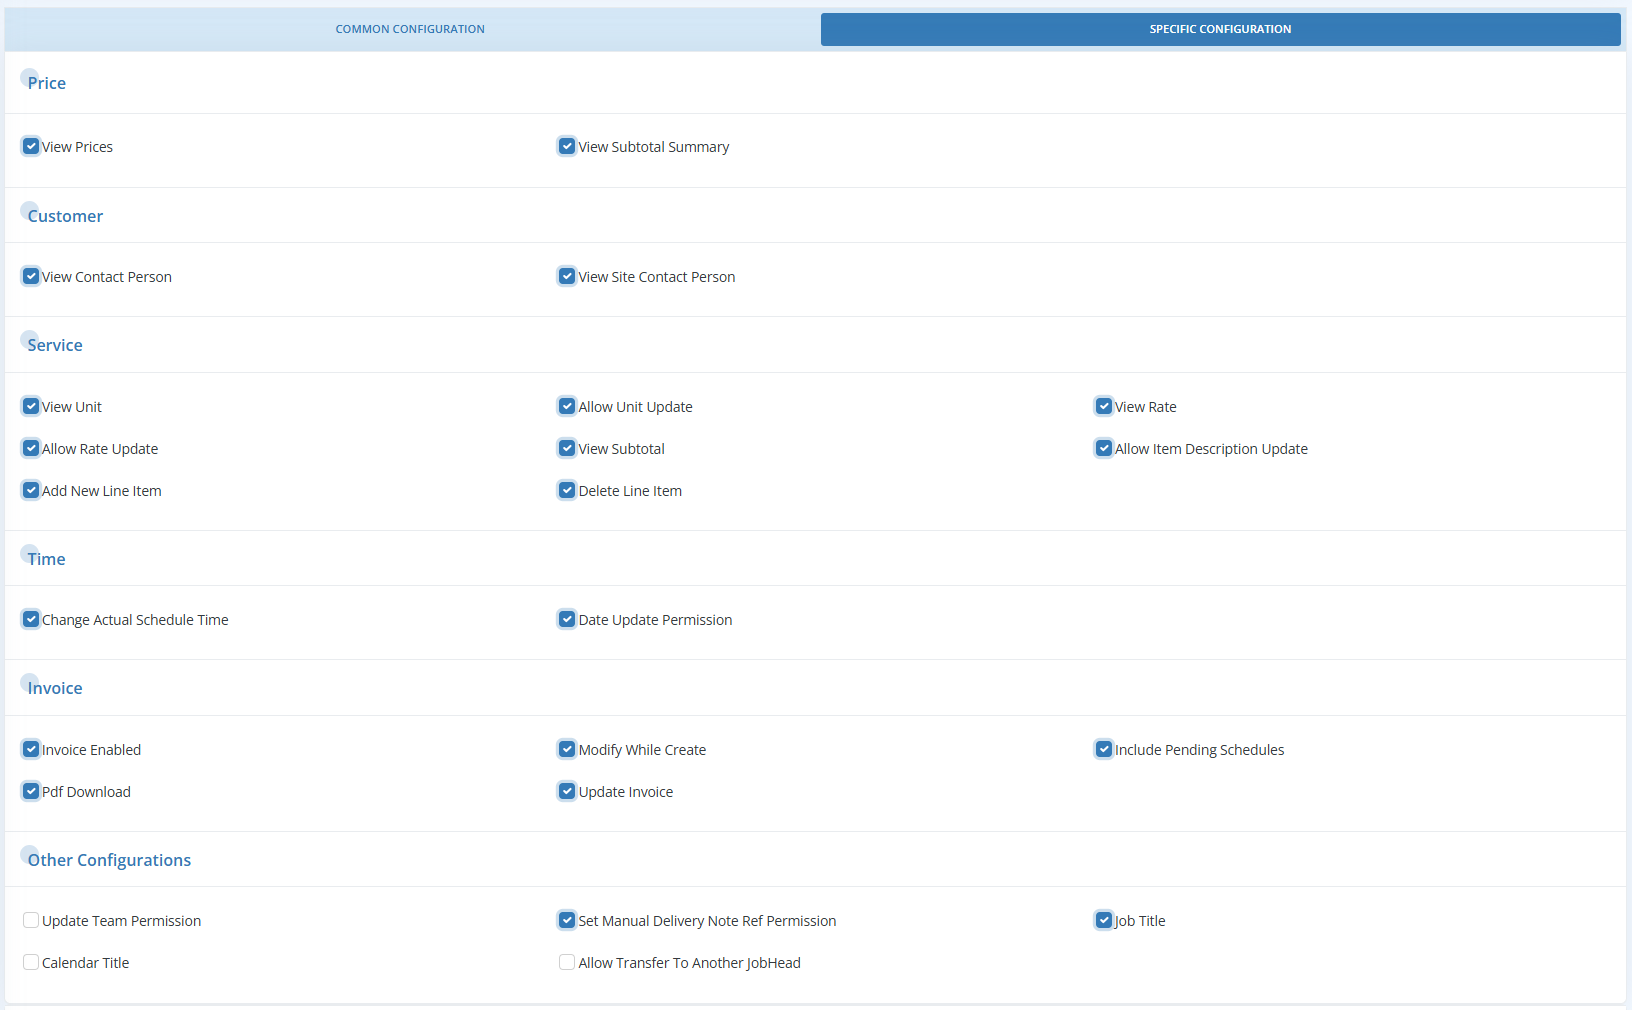
In the Common Configuration tab, access related to Schedule and Customer is available. Simply check the boxes for the specific accesses you want to grant.
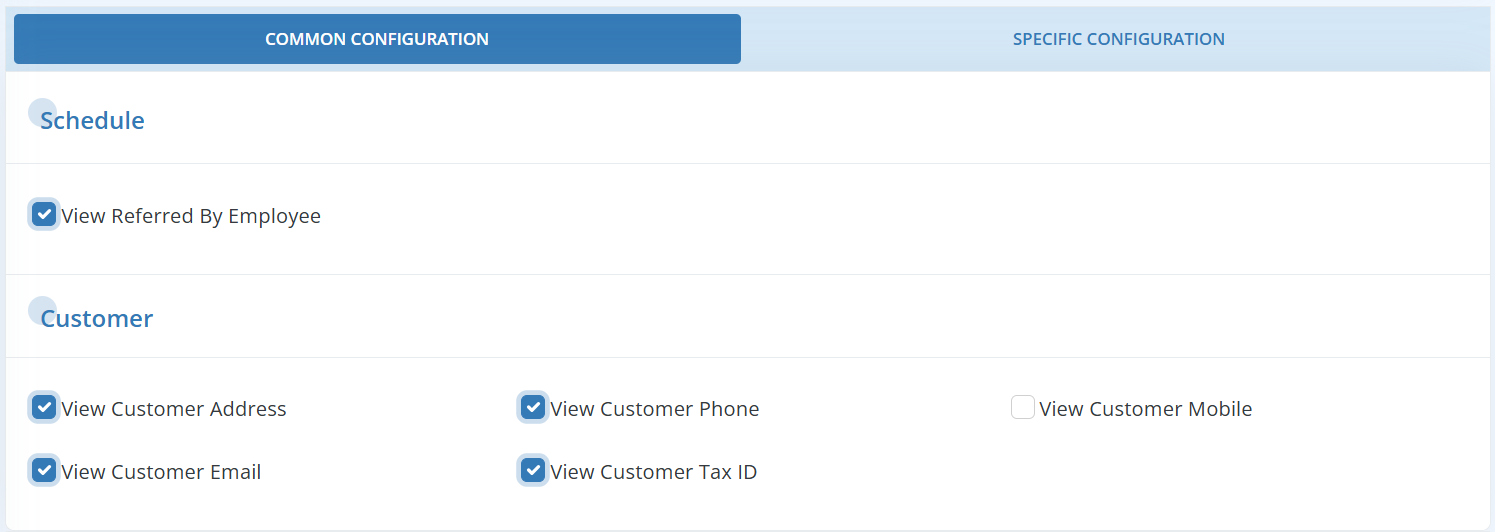
In the Specific Configurations tab, access related to Price, Customer, Service, and Time is provided. You can grant access by ticking the appropriate checkboxes.
