Table Of Contents
Overview
The Workstair Jobhead Mobile App is an essential tool for field technicians, providing a convenient way to manage schedules and access job information while on the move. With this app, technicians can easily:
- View scheduled shifts and job site details
- Access customer contact information
- Review service item details
- Receive important notes or instructions from managers
Additionally, the app enables users to create invoices and service reports, which can be shared instantly with customers. Available on both the App Store and Google Play Store, the Workstair Jobhead app ensures that field technicians have all the necessary tools and information at their fingertips to complete job assignments efficiently.
Jobhead Users
To use the Jobhead mobile app, a Jobhead user must first be created in the Workstair web application.
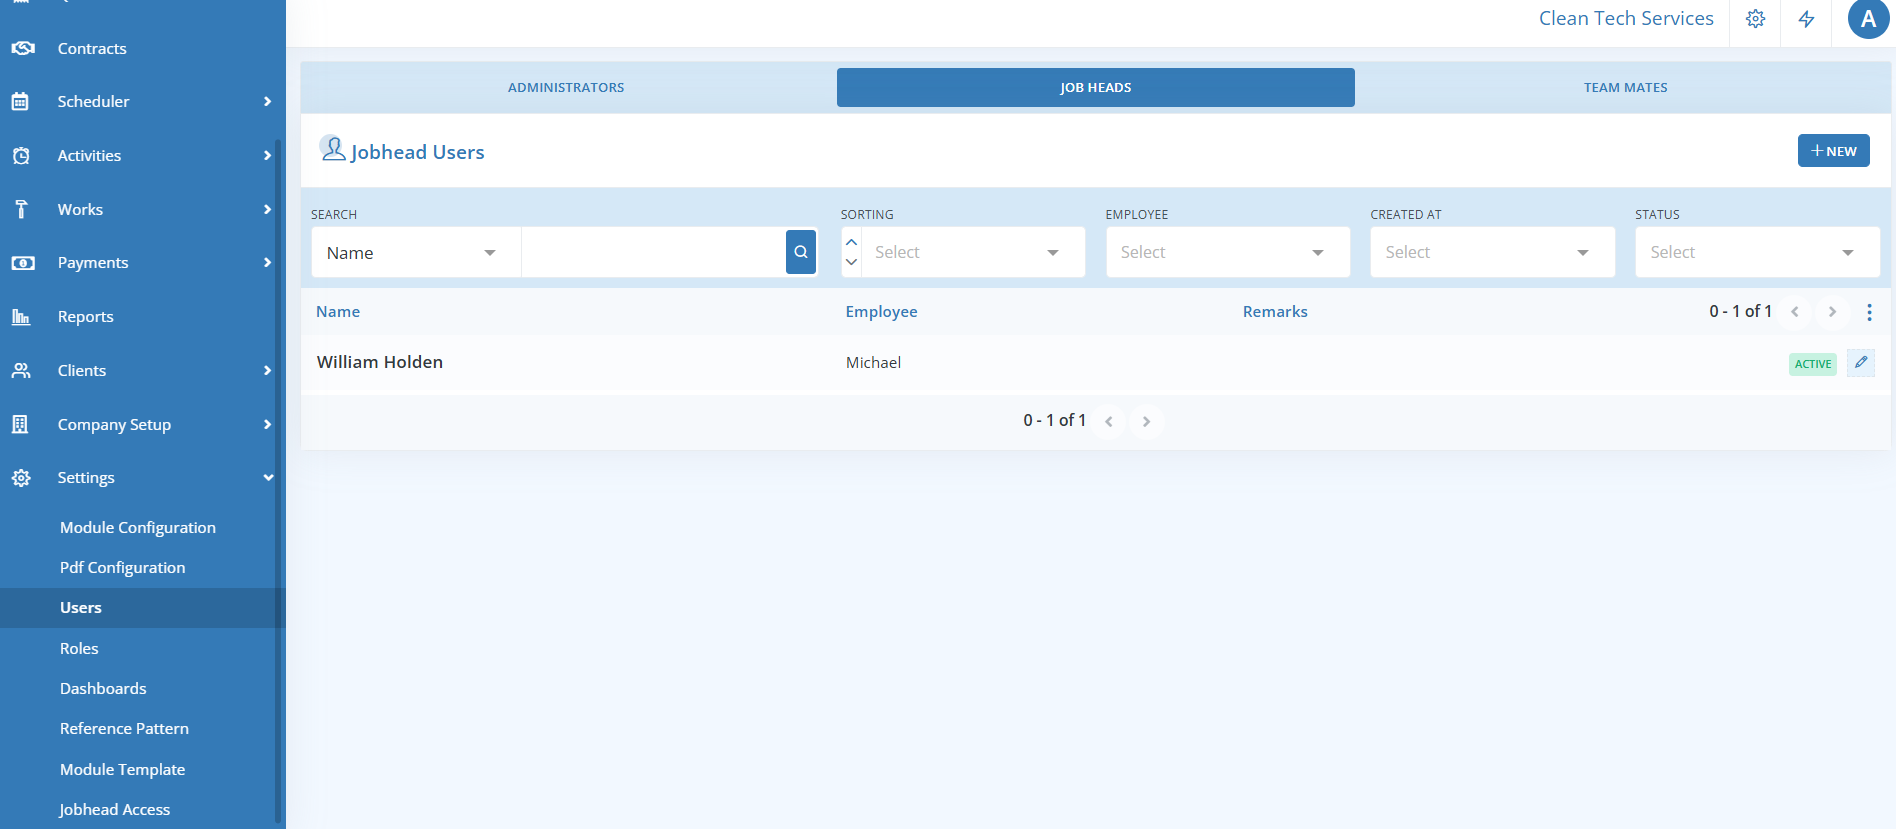
Follow these steps to create a new Jobhead user:
- Navigate to Settings and click on Users.
- Select the JOBHEADS tab.
- Click the New button.
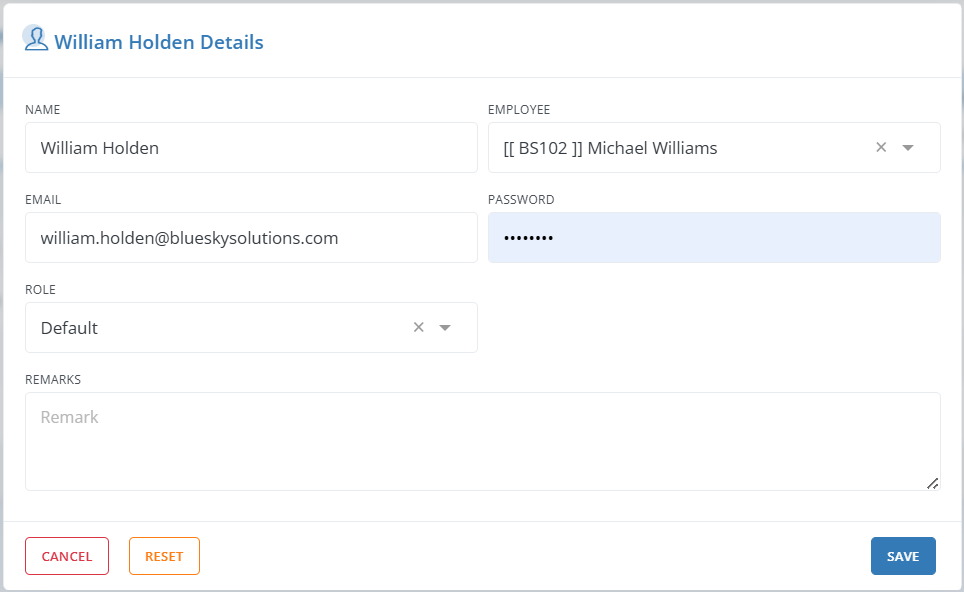
- Enter the required user details.
- Click Save to finalize the user creation.
This allows the Jobhead user to access their schedules via the mobile app.
Mobile App Installation
Follow these steps to install the Workstair Jobhead app on your mobile device:
For Android Devices:
- Open the Google Play Store
- Search for Workstair Jobhead – Workstair Jobhead on Google Play
- Select the app and tap Install
- Once installed, open the app and sign in
For iOS Devices:
- Open the App Store
- Search for Workstair Jobhead – Workstair Jobhead on the App Store
- Tap Get to download the app
- Open the app and sign in once the download is complete
Navigating Schedules in the App
Once logging into the app, users will only see schedules assigned to them. This ensures that each Jobhead has access exclusively to their own schedules, maintaining clear focus and security within the app.
Schedules
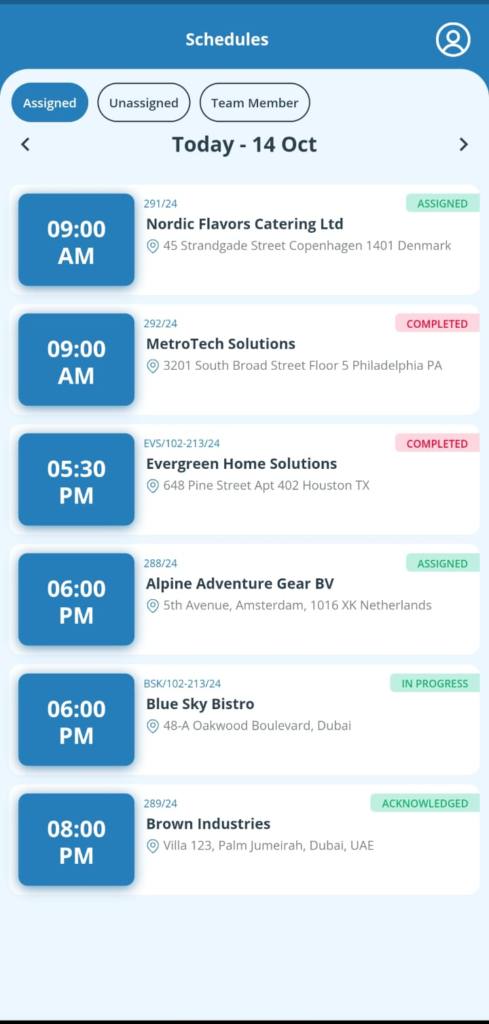
- The Schedules screen displays a list of all Schedules assigned to the logged-in Jobhead.
- Each Schedule in the list includes Customer Name, Jobsite, Schedule Time, and status.
- The date of the Schedules is visible on the title bar.
- Use the right navigation button to move to the next day’s Schedules, with each tap moving forward by a day.
- The left navigation button moves to previous days’ Schedules, with each tap moving backward by a day.
- Tapping on a Schedule item brings you to the Schedule Detail screen, where you can view detailed information such as job start/end times, instructions, service items, and more.
Schedule Details
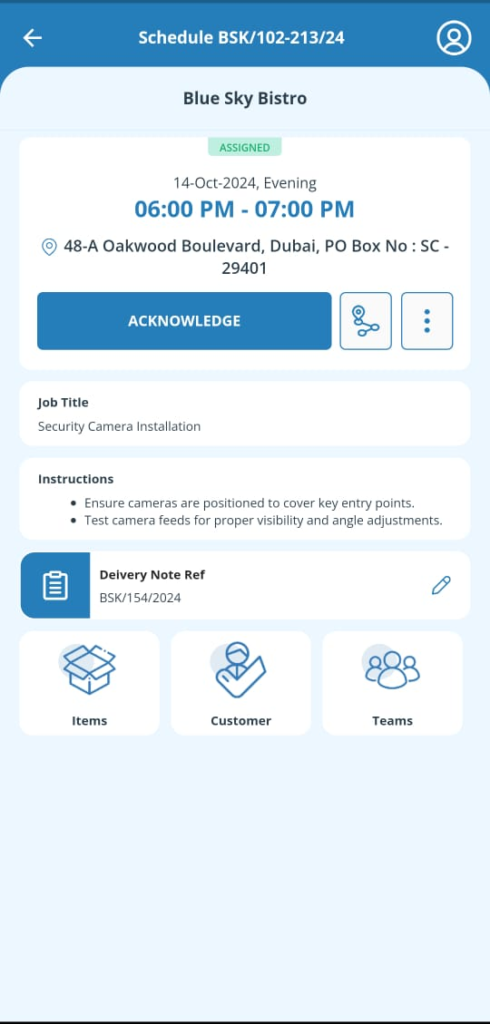
- The Schedule Detail page shows information like Jobsite location, date, start and end times, and status.
- Users can view Service Items and Job instructions here.
- The date of the Schedules is visible on the title bar.
- Field technicians can update the Schedule status to In Progress when work starts or Completed when work is finished.
- Status updates reflect instantly in the Workstair web application, giving administrators real-time insight into the progress.
Customer Details
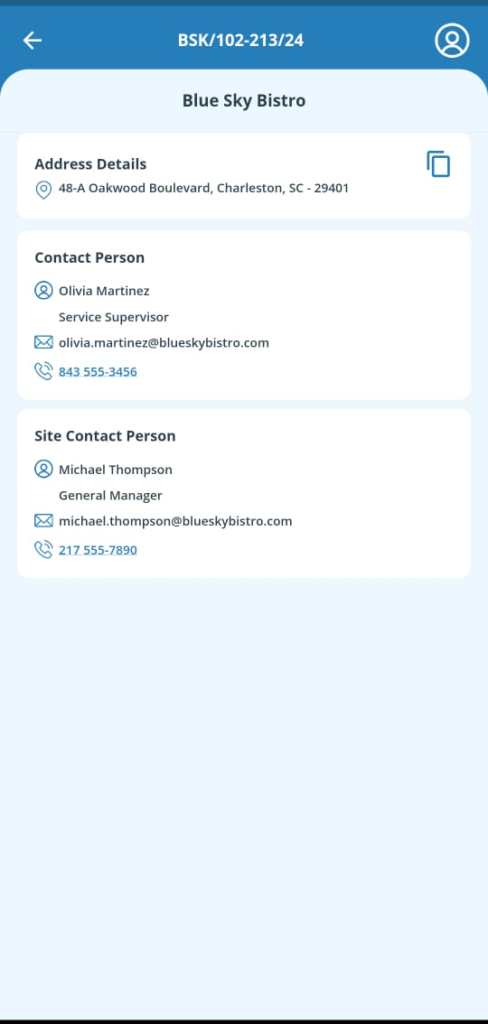
- From the Schedule Detail screen, tap the Customer details button to view customer information.
- Customer details include address, contact person information (name, email, phone), and site contact person details.
Service Details
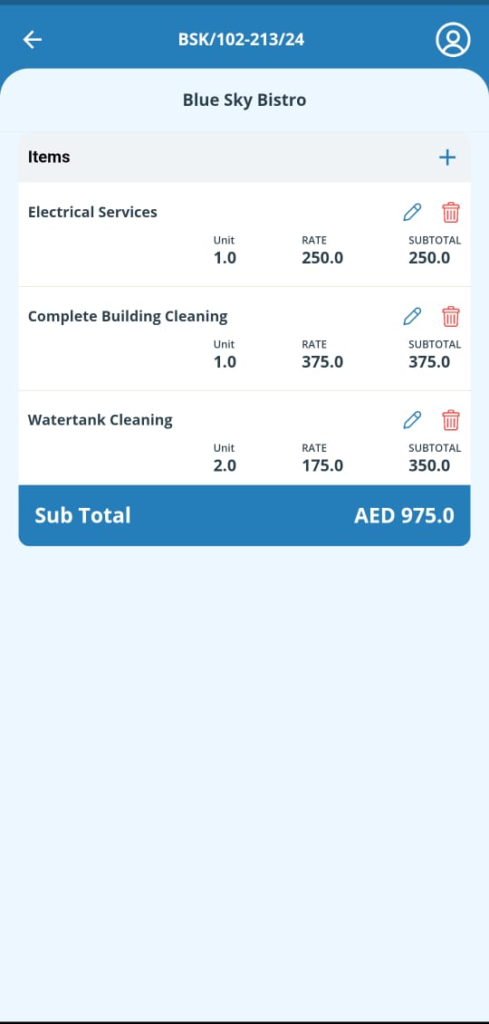
- The Service Items screen lists all Service Items associated with a Schedule.
- Each item shows the Service Name, Unit of Measurement, Rate per Unit, and Subtotal.
- A Grand total, summing all Subtotals, is displayed at the bottom of the screen.
- This feature helps track Service Items and Prices, providing detailed Invoices and Service Reports to Customers.
Schedule Statuses
The Schedule Details screen allows users to efficiently manage and track each stage of the schedule.
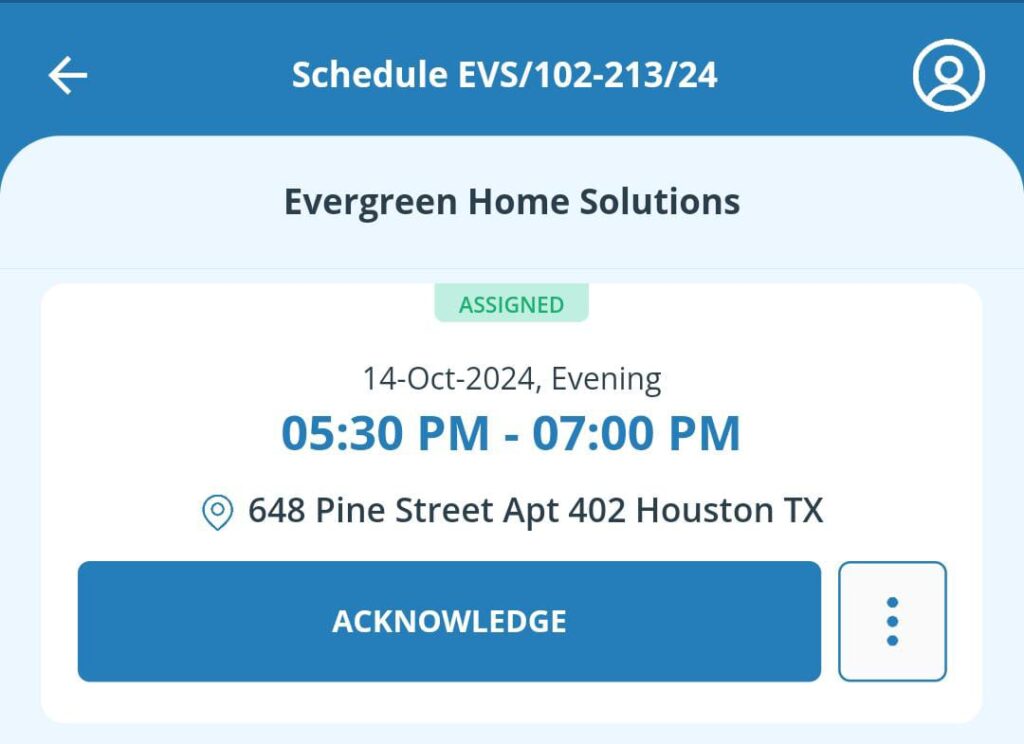
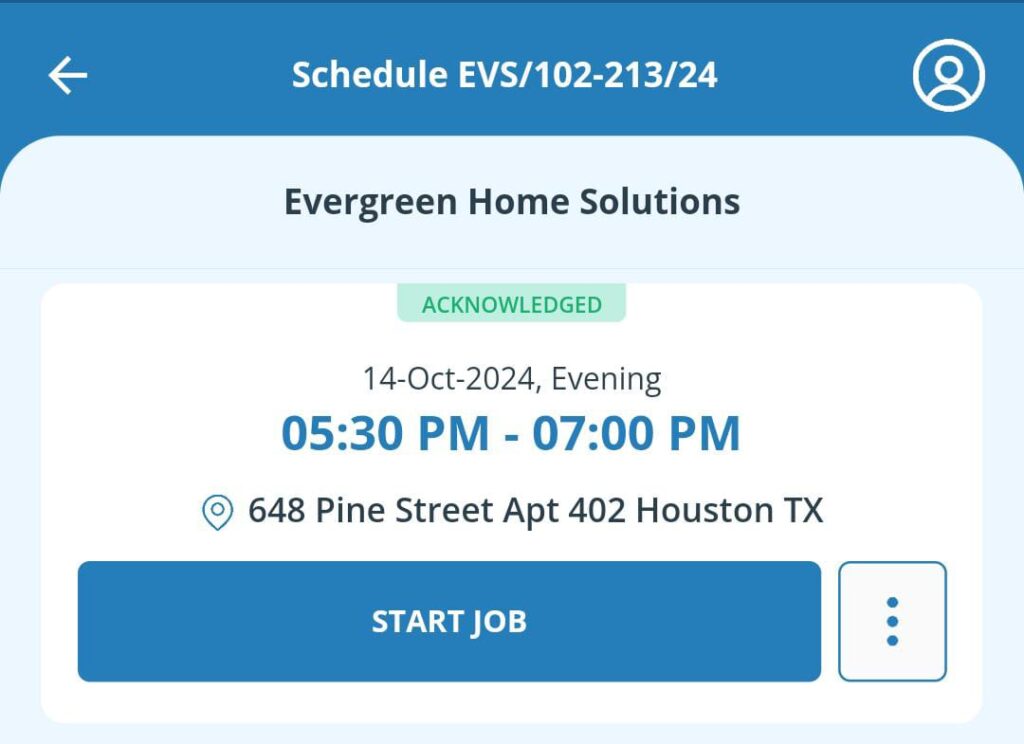
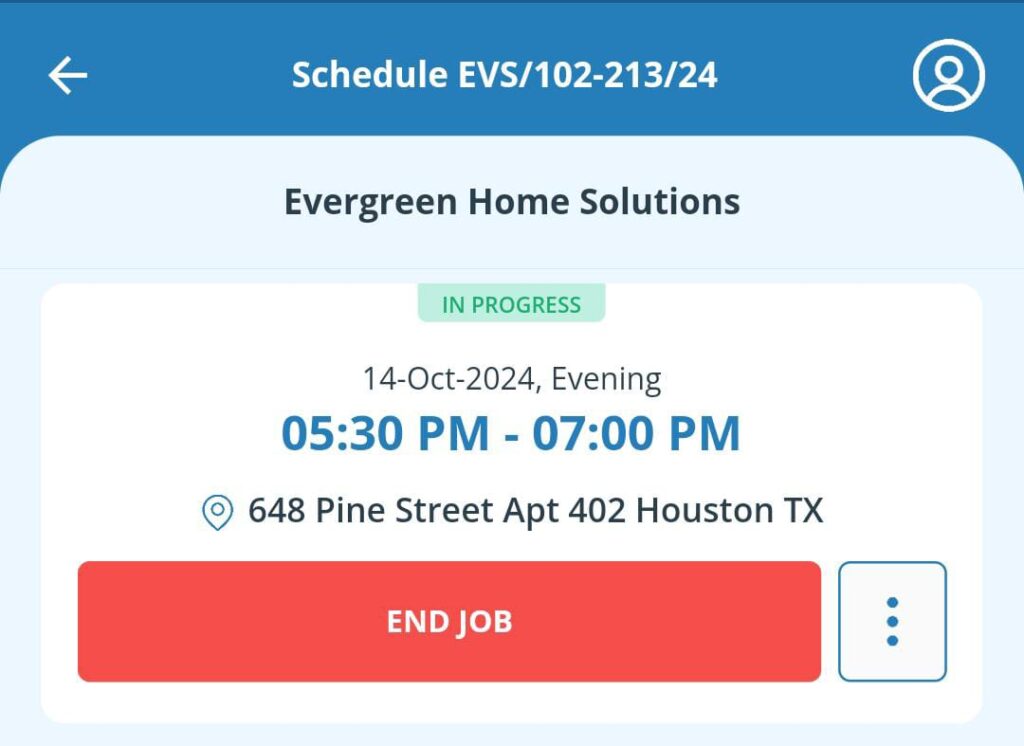
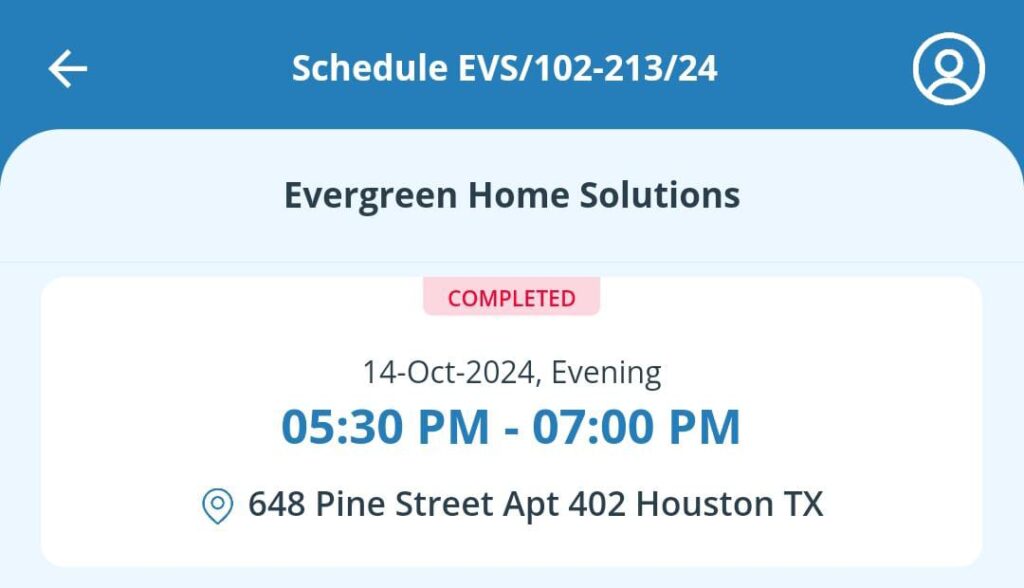
| Assigned: | When a schedule is assigned to a Jobhead, its status is set to Assigned. |
| Acknowledged: | The Jobhead can tap the ACKNOWLEDGE button in the mobile app to update the status to Acknowledged, confirming they have seen and accepted the schedule. |
| In Progress: | Tapping the START JOB button marks the beginning of the work, automatically updating the status to In Progress. |
| Completed: | Once the job is done, tapping the END JOB button updates the status to Completed. |
Schedule Categories
The Schedule screen in the Jobhead app includes various tabs that allow users to easily navigate between different types of Schedules:
- Assigned Tab: Displays Schedules assigned to the logged-in Jobhead.
- Unassigned Tab: Shows Schedules that haven’t been assigned to anyone.
- Team Member Tab: Displays schedules where the logged-in user is a team member.
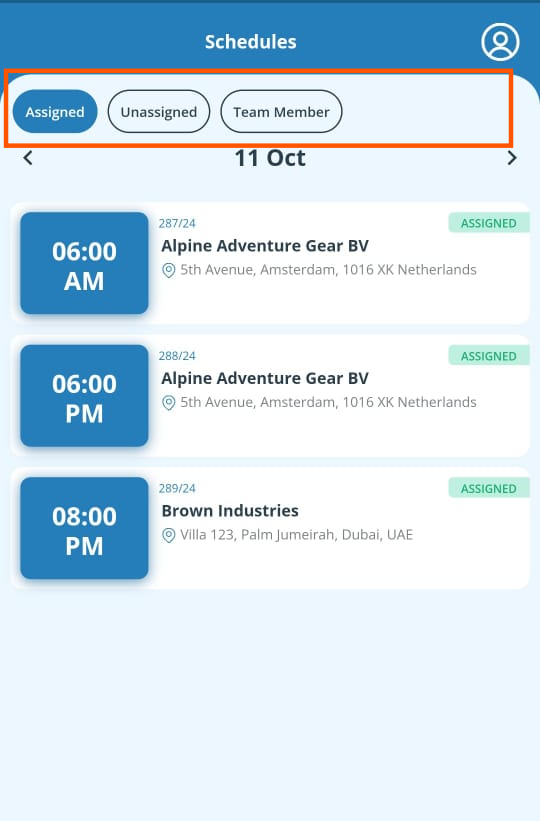
If a Schedule is unassigned, you can tap the Take Job button on the Schedule detail screen to assign it to yourself.
Delivery Note Ref
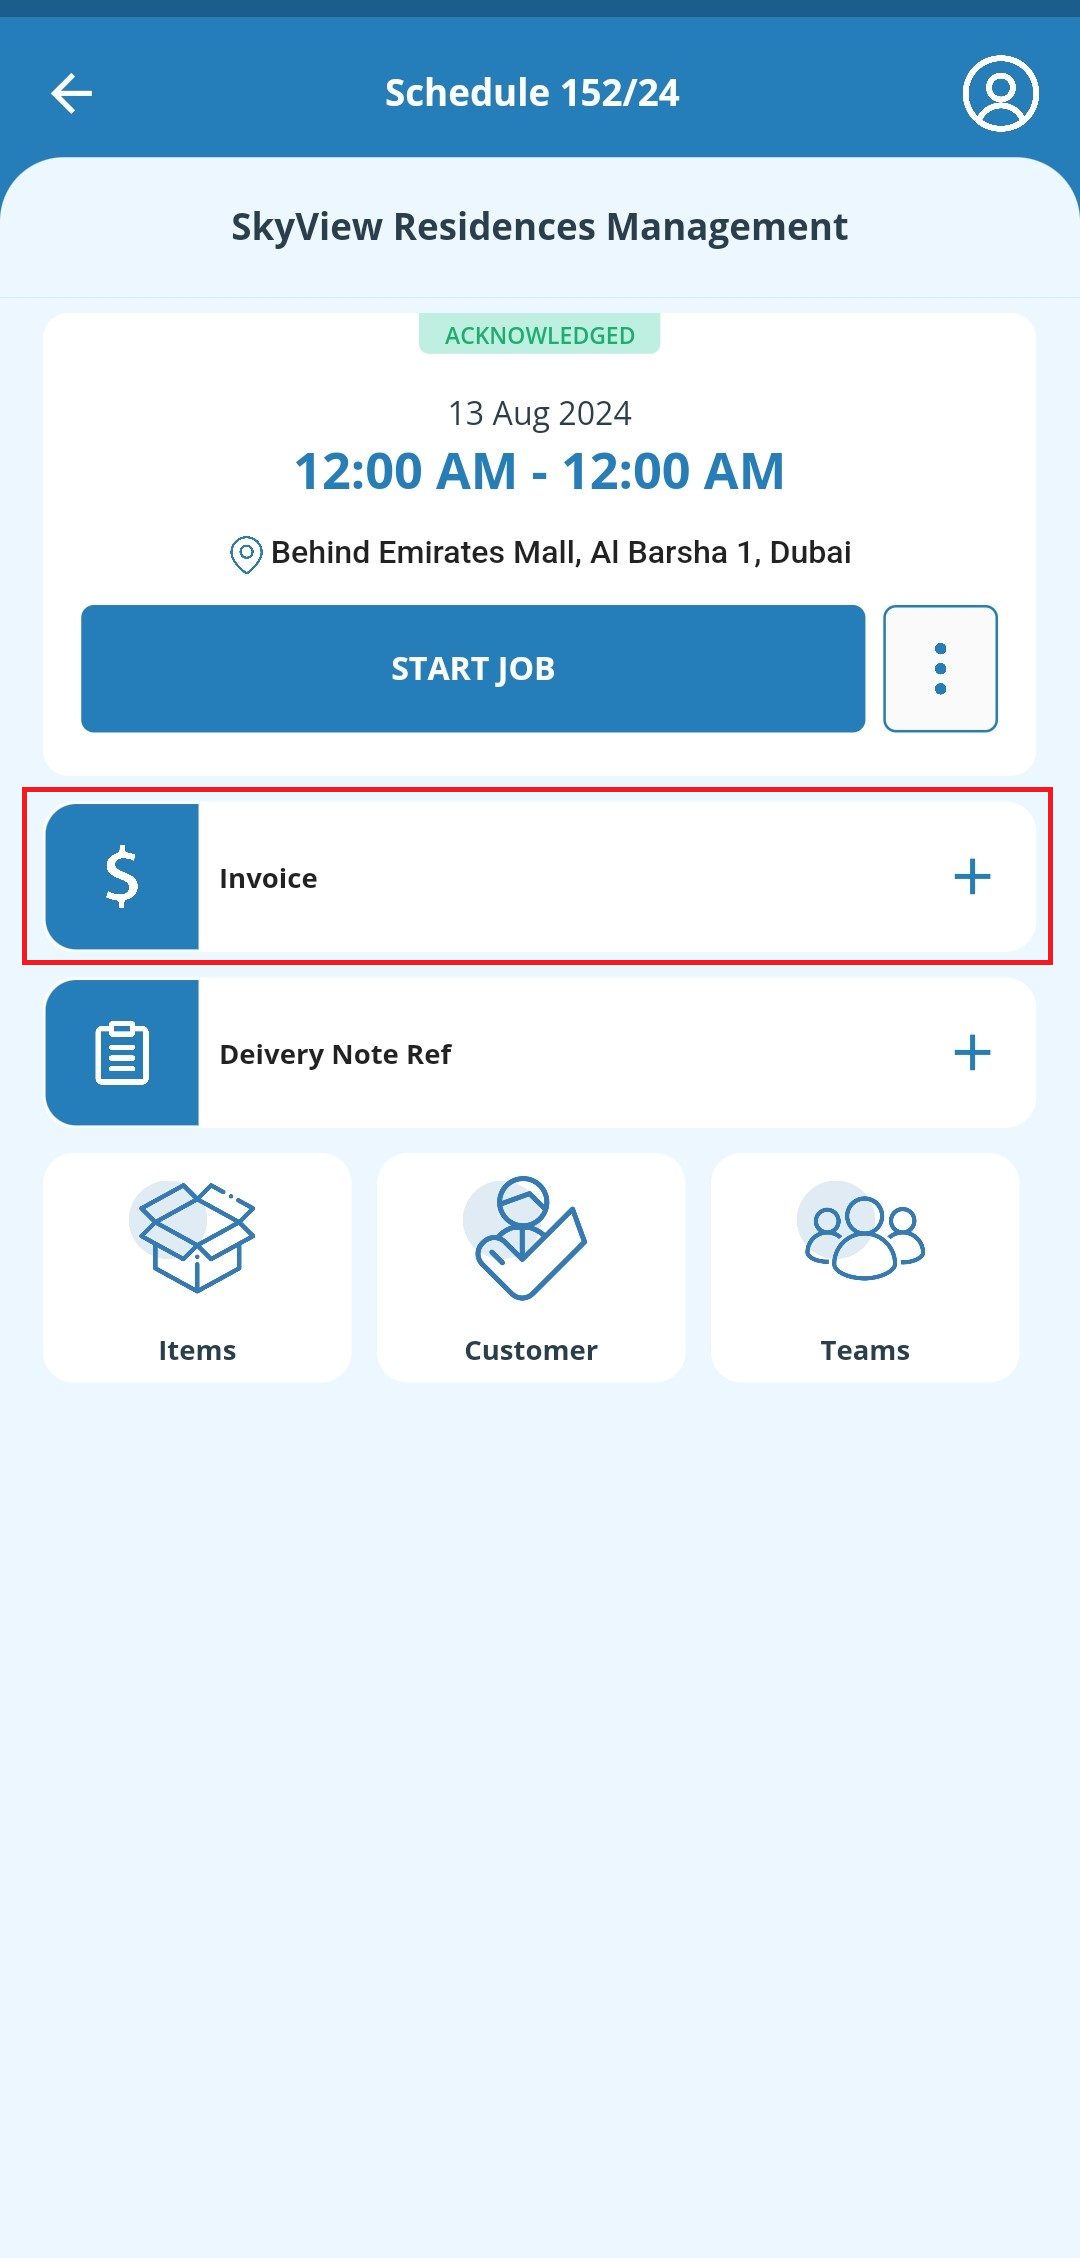
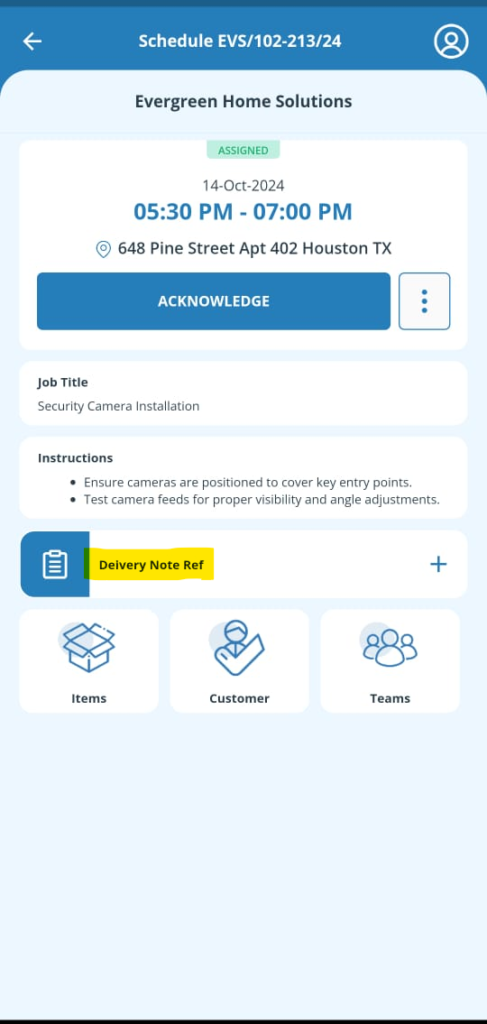
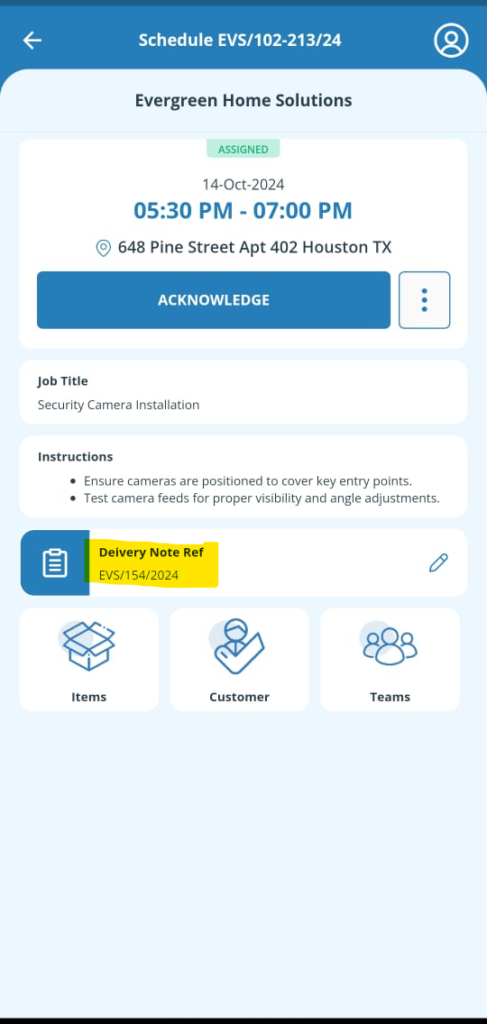
You can manually add a delivery note reference number to a Schedule from the Schedule detail screen.
Modifying Service Item
You have the flexibility to modify any Service Item in a Schedule according to your requirements.
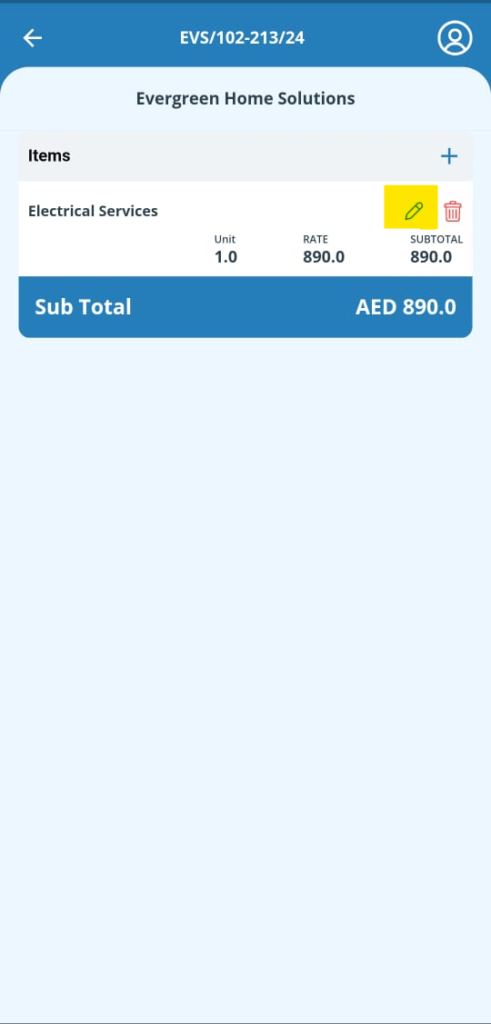
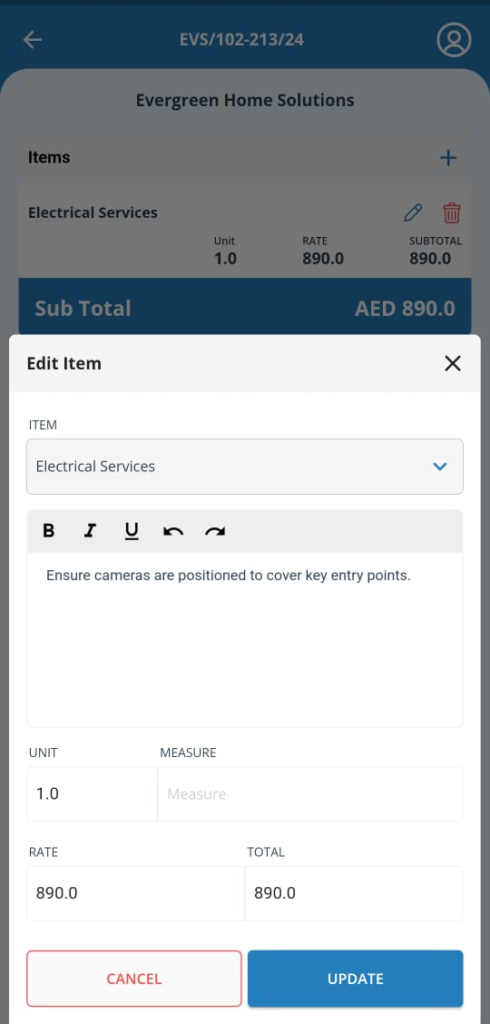
To edit a Service Item,
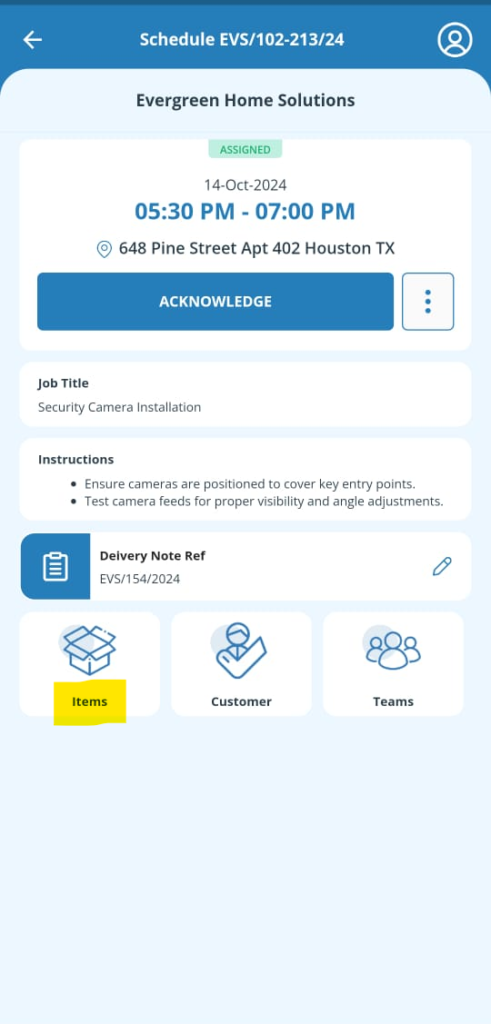
- Go to the Schedule Details screen and tap the Items icon.
- On the Service Details screen, tap the Edit button to modify the service item.
- You can update details like the description and price.
- If a service item is no longer needed, tap the Delete button to remove it.
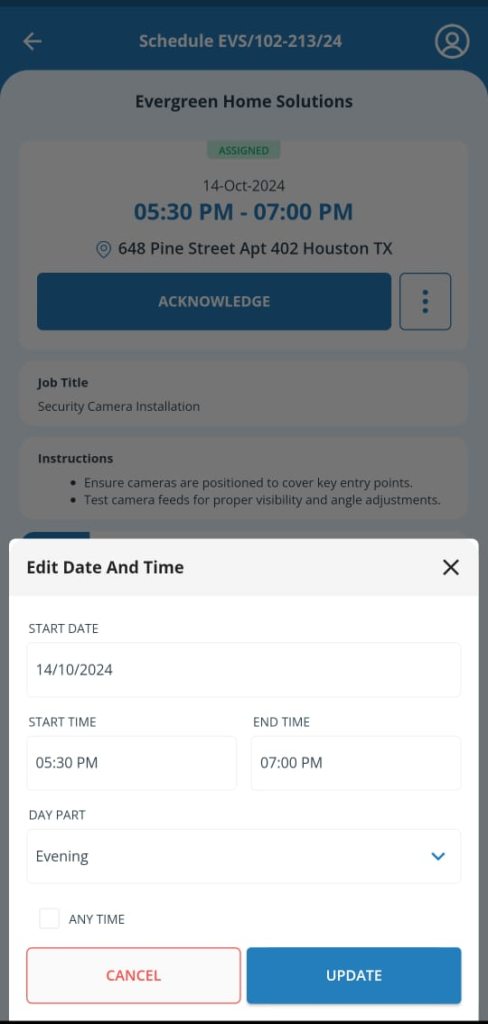
Edit Schedule Date and Time
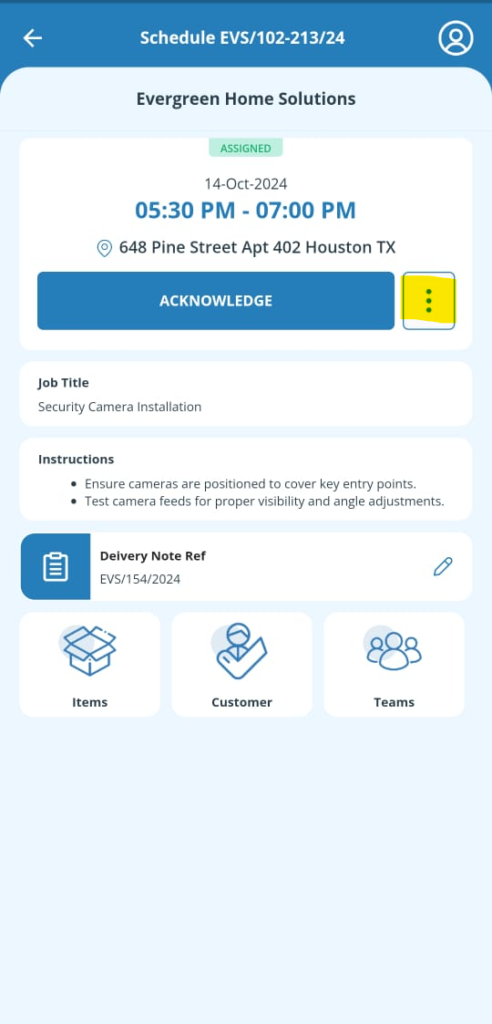
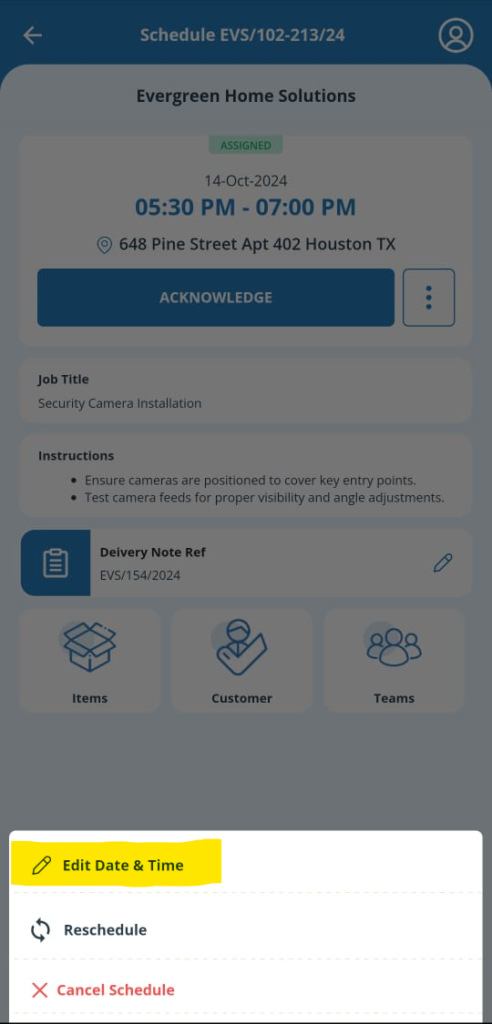
To change the date and time of a schedule, simply tap the More button on the Schedule Details screen.
Jobhead Roles
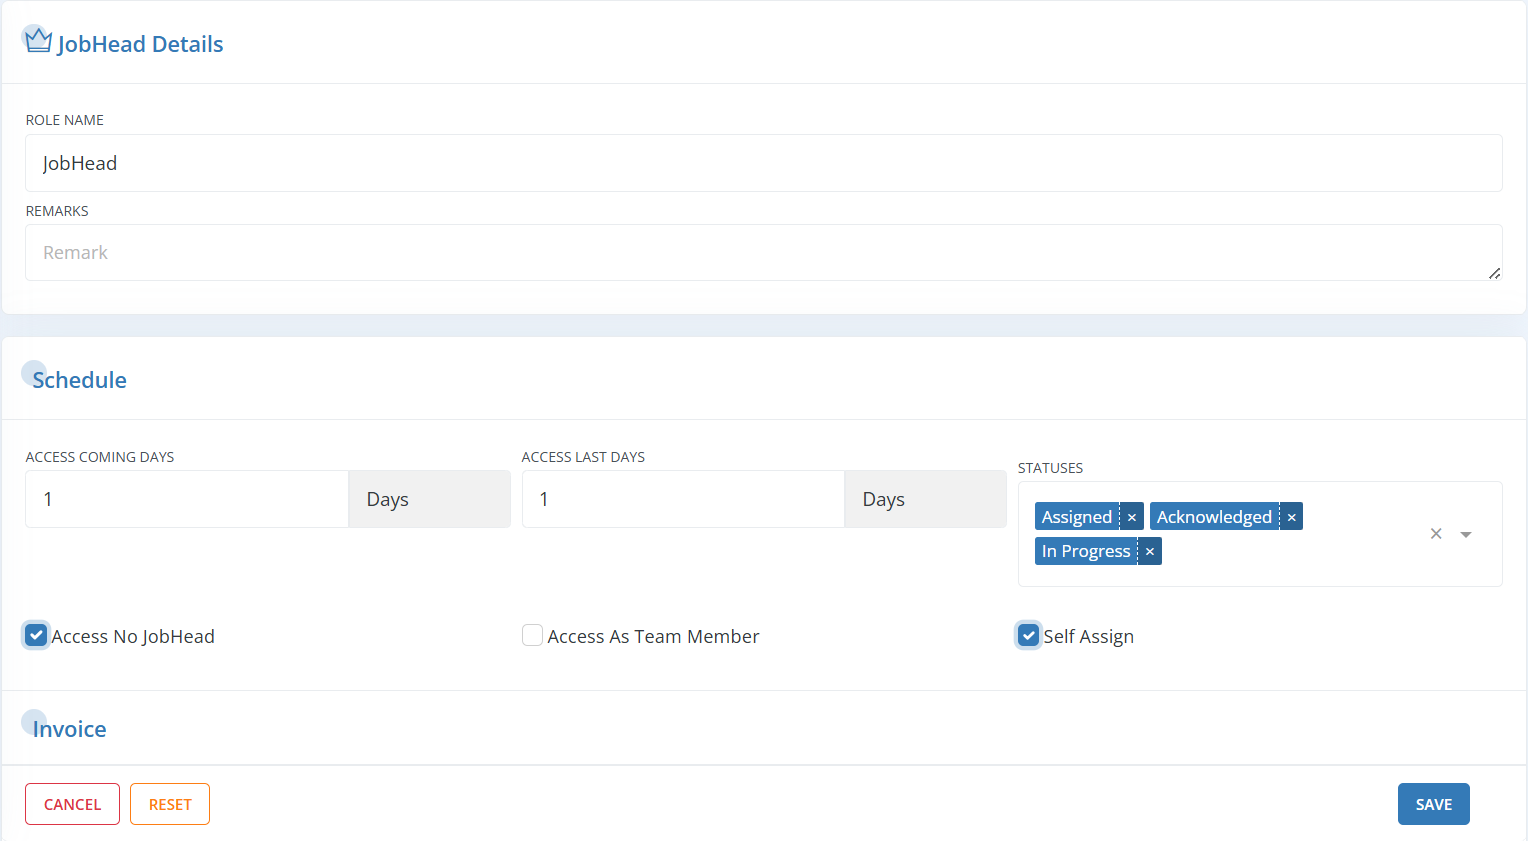
The Jobhead Role is a user role specifically designed for Jobheads who manage schedules and work sites. You can create multiple roles with unique names and assign them to individual Jobheads.
To set up Jobhead roles in Workstair:
- Navigate to Settings > Roles
- Select the Jobhead tab and click on +New

Fill in the following details:
- Role Name
- Remarks (optional)
| Access Coming Days: | Specify the number of future days’ Schedules the Jobhead can access. |
| Access Last Days: | Specify the number of previous days’ Schedules the Jobhead can access. |
| Statuses: | Define which job statuses will be visible to the Jobhead. |
| Access No Jobhead: | Allow the Jobhead to view all Schedules that have not been assigned to any Jobhead. |
| Access As Team Member: | Enable the Jobhead to access Schedules where they are a team member. |
| Self-Assign: | Allow the Jobhead to assign themselves to available Schedules. |
Jobhead Access Configuration
The Jobhead Access Configuration allows you to set permissions for what a Jobhead can access. You can create multiple configurations, each with a unique name, to customize access at the Job level.
There are two types of configurations:
- Common Configurations: Apply universally to all jobs.
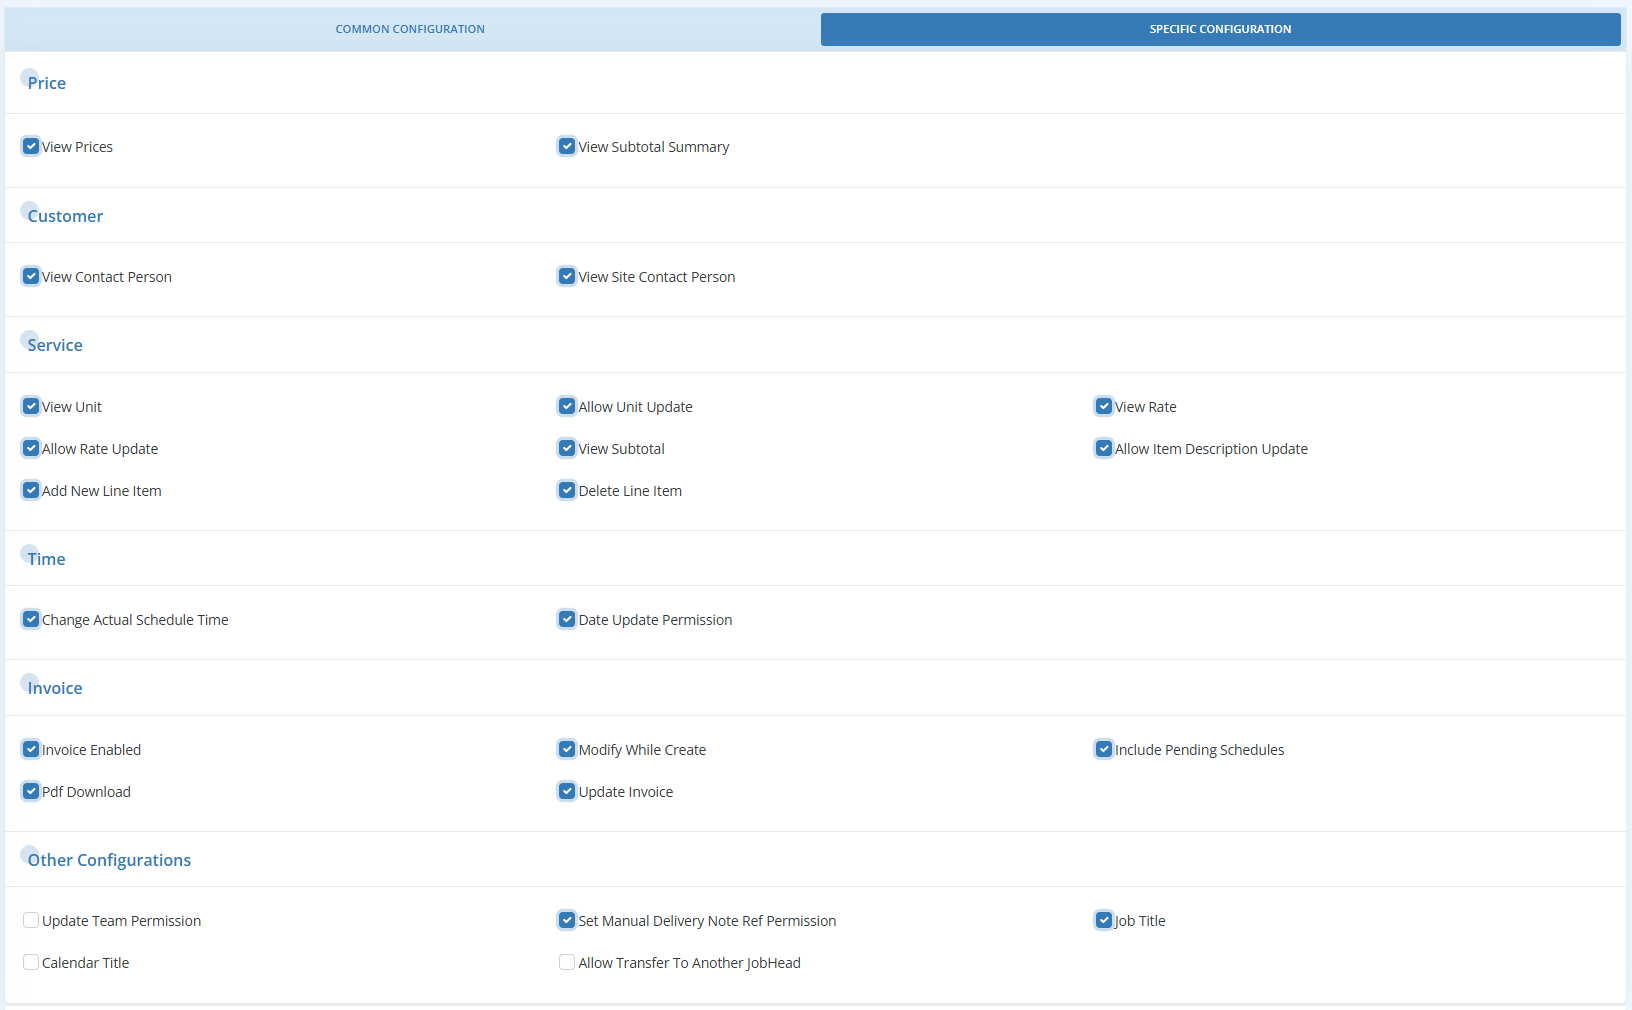
- Specific Configurations: Can be customized for individual jobs.
To create a Jobhead Access Configuration, navigate to the Settings section and select the Jobhead Access tab.
Common Configurations

| View Referred By Employee: | Allows you to see the employee who referred the customer for this job or service. |
| View Customer Address: | Displays the customer’s physical address for reference in scheduling or invoicing. |
| View Customer Phone: | Provides the customer’s landline phone number for contact purposes. |
| View Customer Mobile: | Shows the customer’s mobile number for more direct communication, including calls or texts. |
| View Customer Email: | Displays the customer’s email address, useful for sending digital invoices or communications. |
| View Customer Tax ID: | Shows the customer’s tax identification number, typically used for invoicing and tax-related purposes. |
Specific Configurations
Price
| View Prices: | Displays the price of each service or product. |
| View Subtotal Summary: | Shows a summary of the subtotal. |
Customer
| View Contact Person: | Displays the information of contact person for the customer-side. |
| View Site Contact Person: | Shows the information of customer’s on-site contact person. |
Service
| View Unit: | Displays the unit of measurement for services or products (e.g., square meter, cm). |
| Allow Unit Update: | Grants permission to modify the unit of measurement if needed. |
| View Rate: | Shows the rate or cost per unit for the service. |
| Allow Rate Update: | Enables the user to update the service rate. |
| View Subtotal: | Displays the subtotal for the service before taxes. |
| Allow Item Description Update: | Allows updating the description of the line item. |
| Add New Line Item: | Permits the addition of new services or products to the Schedule. |
| Delete Line Item: | Allows removal of existing services or products from the Schedule. |
Time
| Change Actual Schedule Time: | Provides permission to update the actual start or end time of a scheduled job. |
| Date Update Permission: | Grants permission to modify the job’s scheduled date. |
Invoice
| Invoice Enabled: | Toggles whether invoicing is available for the Jobhead. |
| Modify While Create: | Allows the details to be edited during the Invoice creation. |
| Include Pending Schedules: | Option to include incomplete or pending Schedules in the Invoice. |
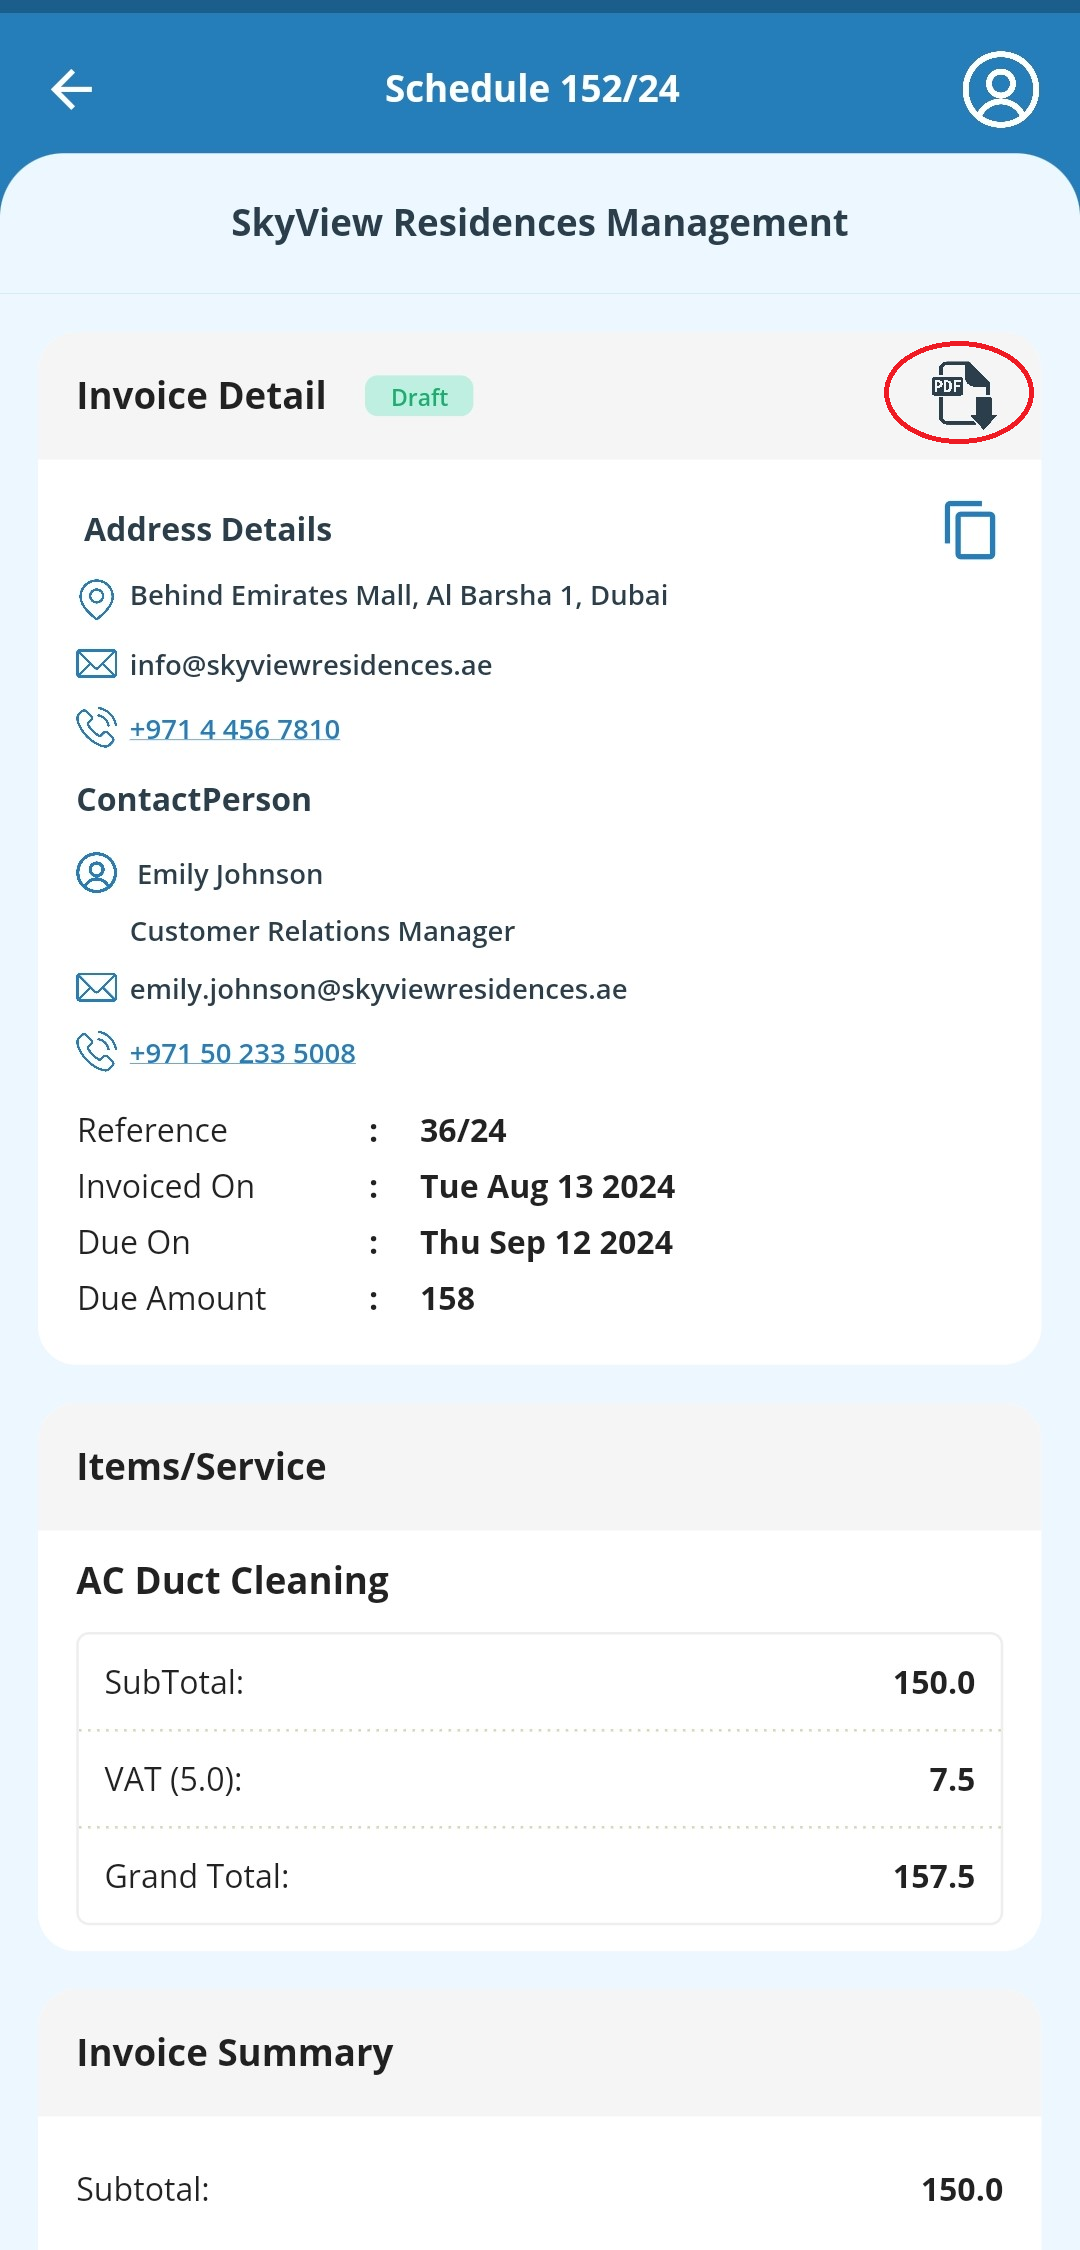
| PDF Download: | Provides the ability to download the Invoice as a PDF file. |
| Edit Invoice: | Grants permission to edit the saved Invoice. |
Other Configurations
| Update Team Permission: | Allows permission to update the team members involved in the Job. |
| Set Manual Delivery Note Permission: | Enables the creation of manual delivery notes to the Schedule. |
| Show Job Title: | Displays the title or name of the Job in relevant sections. |
| Calendar Title: | The title of the Job or Schedule as it appears on the calendar. |
| Allow Transfer to Another Jobhead: | Grants permission to transfer the Job or Schedule to a different Jobhead for reassignment or handling. |
Invoicing
Easily create Invoices directly from any Schedule within the Jobhead App. You can enable or disable Invoicing at the Schedule level as needed.
To activate Invoicing for a specific Schedule,
- Go to the Jobhead Configuration section within that Schedule
- Adjust the invoice-related settings
- Each setting is detailed in the Jobhead Access Configuration section
Invoicing from the App
Once invoicing is enabled:
- Go to the Schedule Details page and tap the Invoice icon.
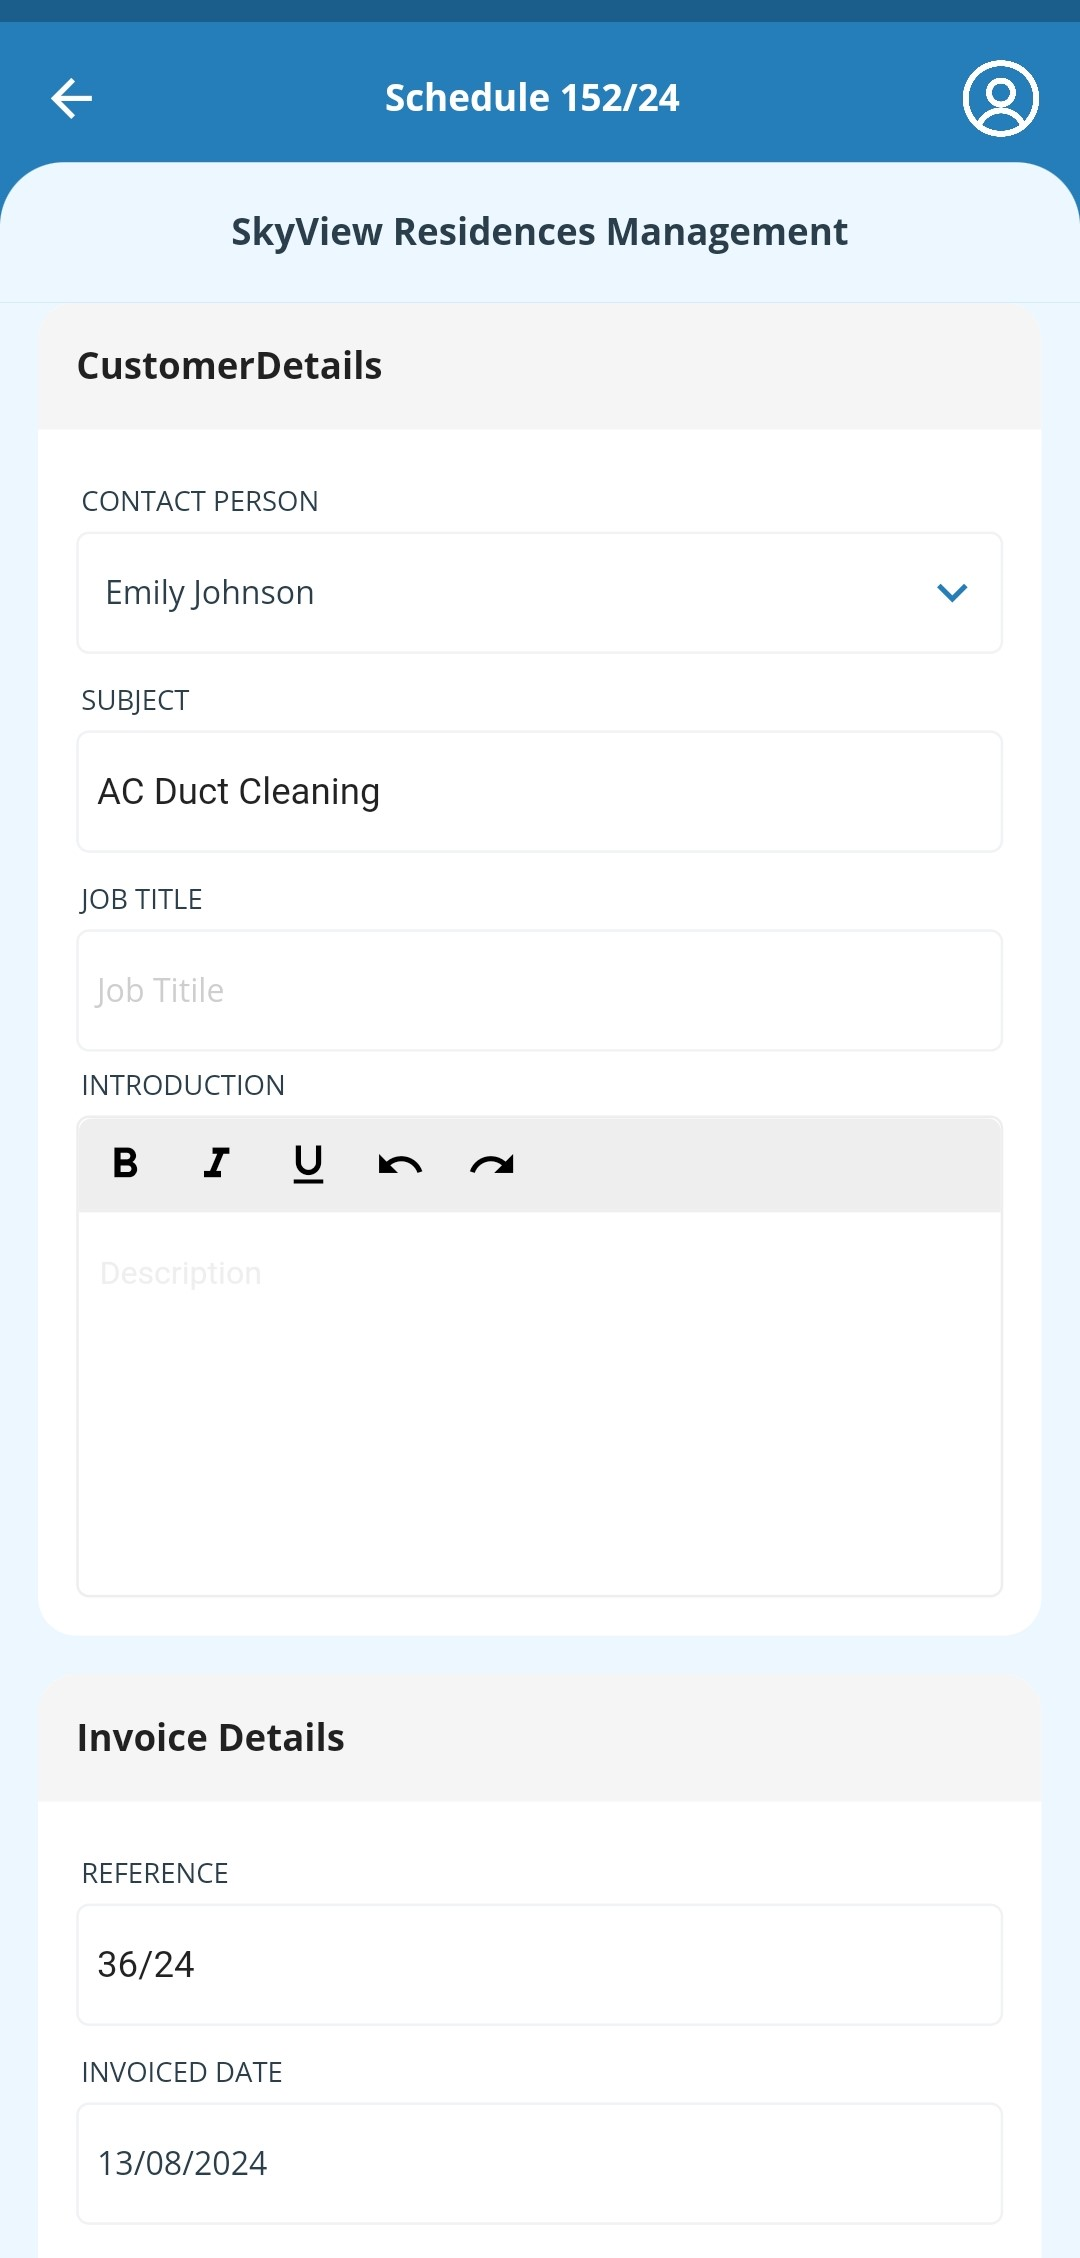
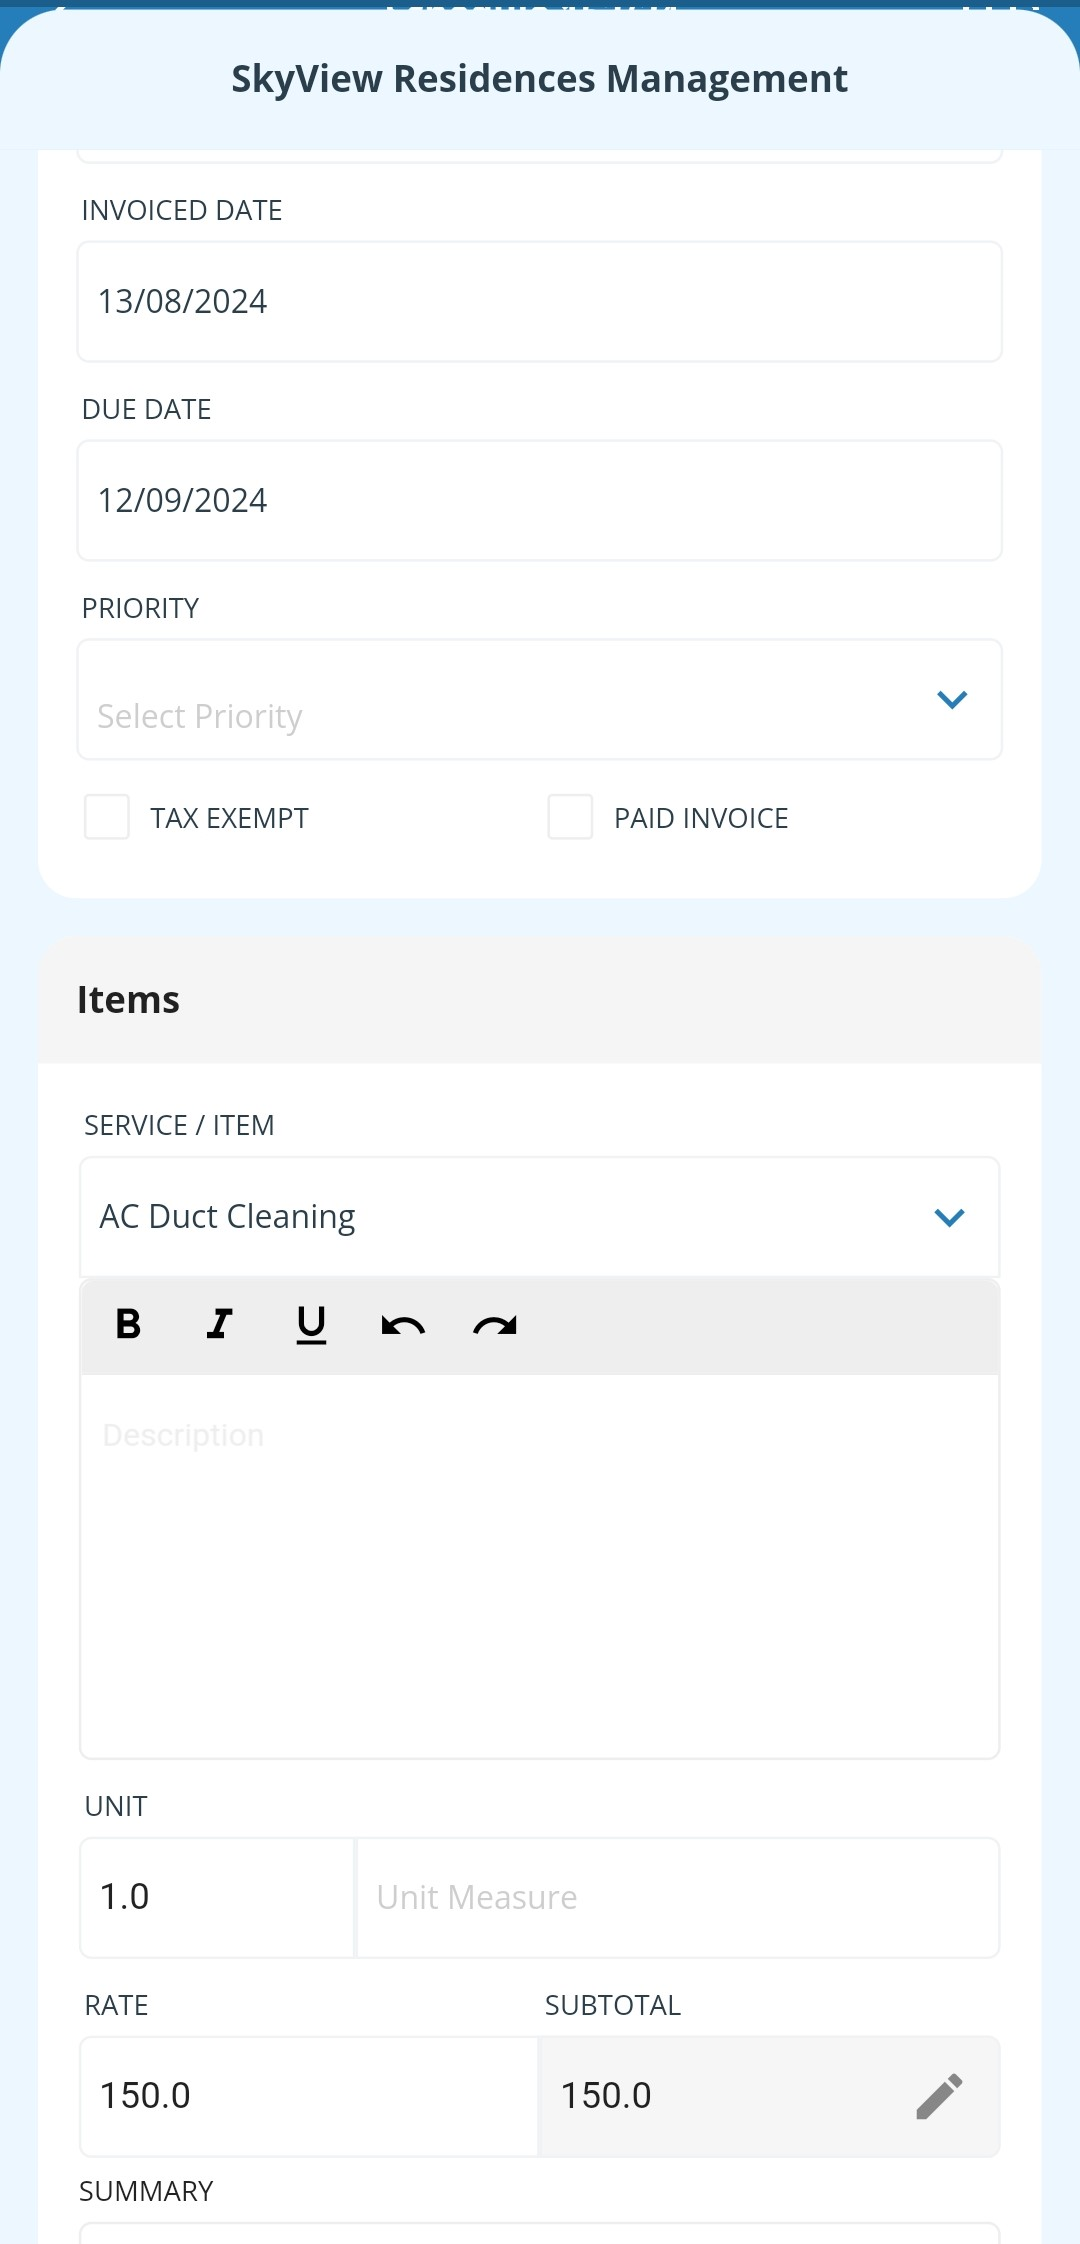
- On the Invoice Editing page, review and update customer and service details.
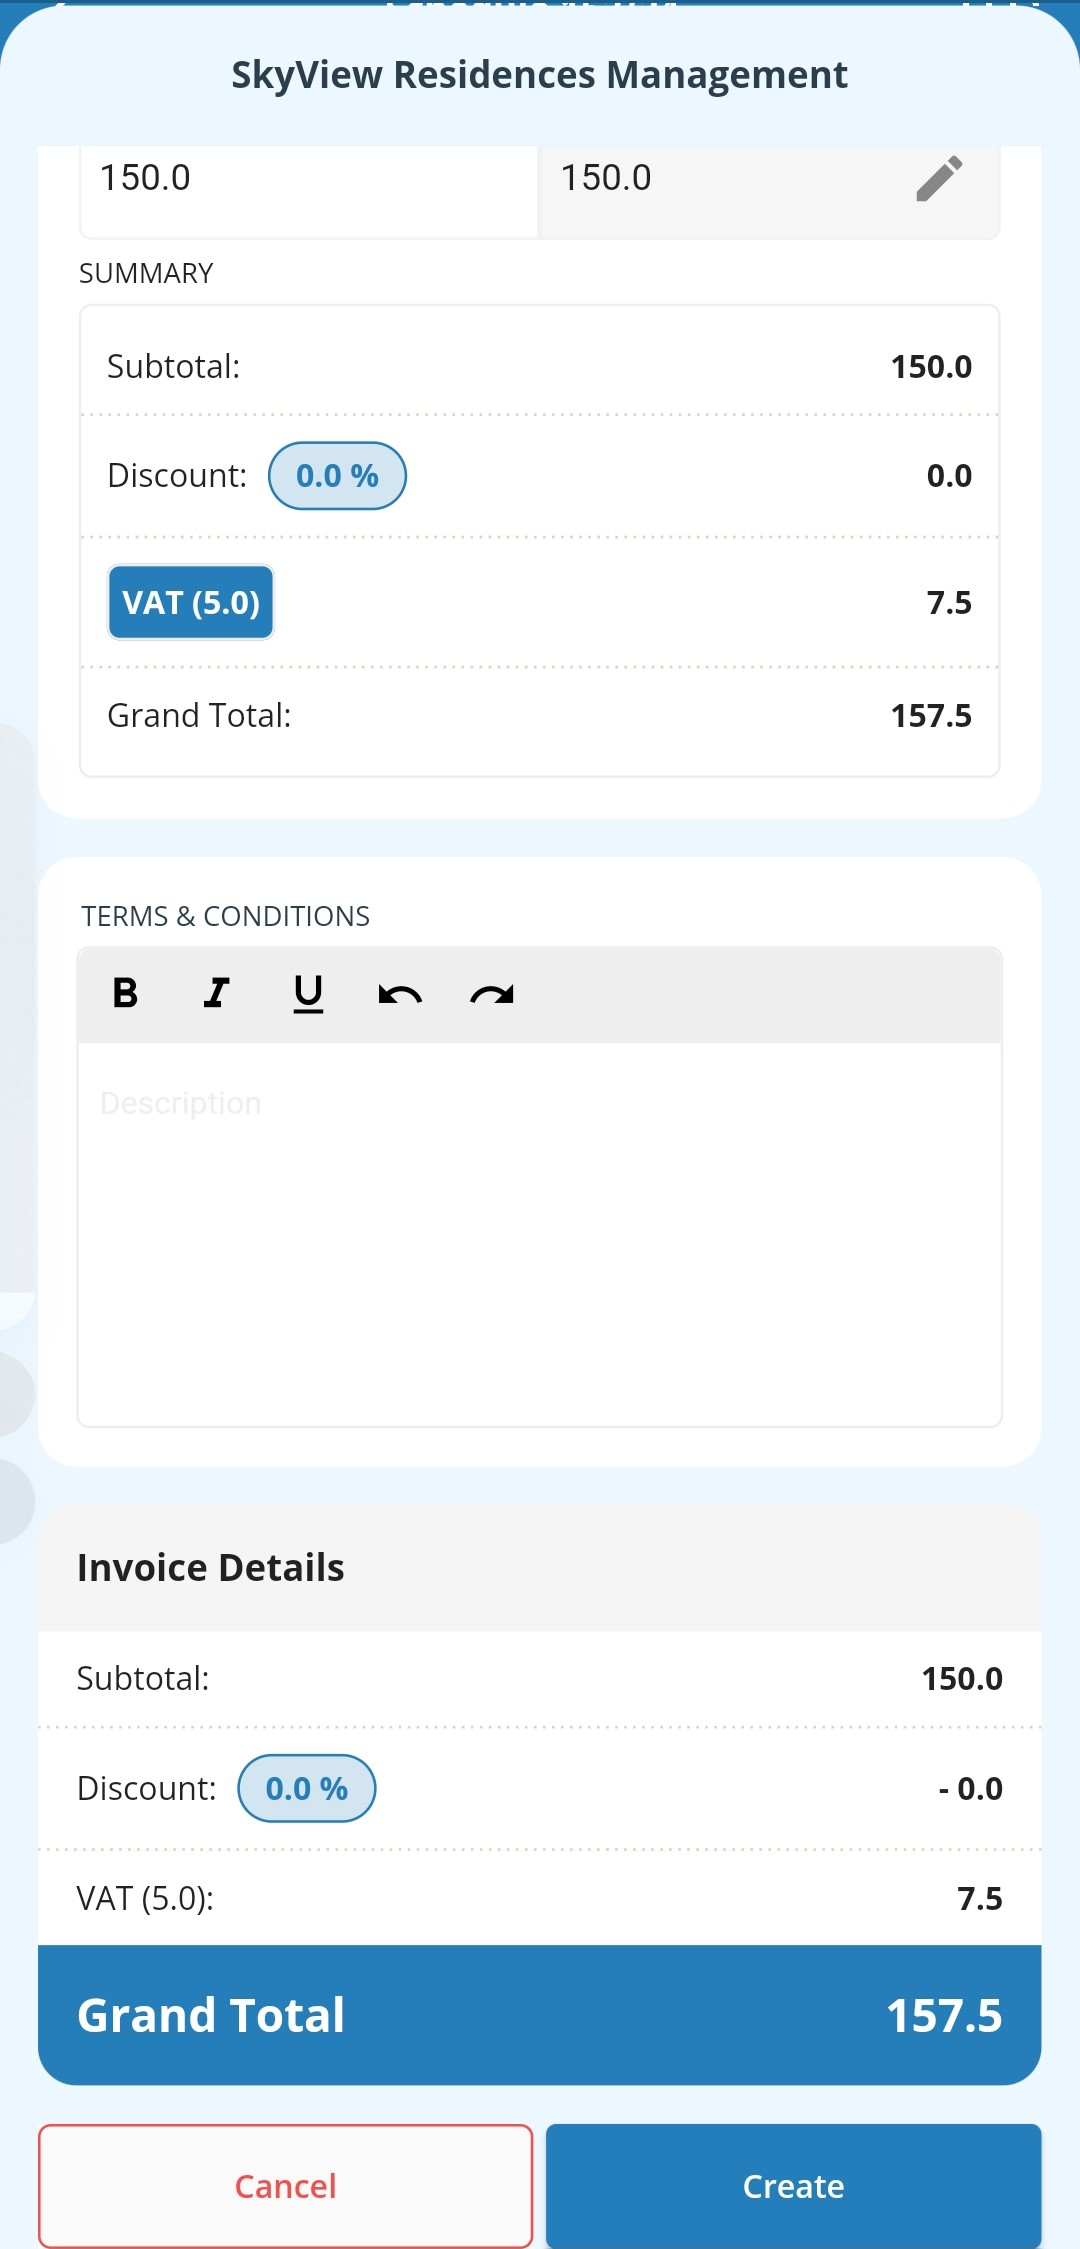
- Tap Create to generate the invoice.
- Share the invoice using the PDF Share button.
